
Excavating Companies Near Me: Top 5 Best Picks 2024
Excavating companies near me are essential for various construction projects, from laying the foundation for a new home to installing utilities. Whether you need to dig an in-ground pool or prepare land for a driveway, finding the right contractor can make or break your project.
Here’s a quick overview of top-rated excavating services near Middlesex County, MA:
- Marchi Paving Inc.: Full-service, focuses on customer service and job quality.
- Service B: Highly-rated, featuring experienced local pros.
- Service C: Licensed, insured, uses advanced heavy machinery.
- Service D: Experts in land grading and yard leveling, handle permits.
- Service E: Offers manual excavation and heavy equipment services, focuses on reducing labor costs.
Excavation is more than just digging; it involves site preparation, trenching, and leveling, often requiring heavy machinery like backhoes and excavators. These processes are crucial for creating a stable base for any construction project.
First steps:
- Call 311 to check for utility lines.
- Consult with your local building department for permits.
For detailed reviews, pricing, and service guarantees, keep reading to learn more about the top excavating services near you.

Excavating companies near me terms explained:
Top 5 Excavating Companies Near Me
At Marchi Paving Inc., we pride ourselves on being a leading provider of excavation services in Middlesex County, MA. Here’s why you should consider us for your next project:
Marchi Paving Inc.
Marchi Paving Inc. is known for being a full-service company that excels in customer service and job quality. We are always available to answer questions and address concerns, ensuring that each project meets customer expectations. AJ and Janelle have built a strong team over the years, creating a work family they are proud of.
We specialize in a variety of excavation services, including land grading, yard leveling, and both manual and heavy equipment excavation. Our team is equipped with advanced machinery and has extensive experience in handling both small-scale and large-scale projects efficiently.
Our commitment to reducing labor costs while maintaining high standards of quality makes us an affordable option for your excavation needs. We handle all necessary permits and ensure that every project complies with local regulations and safety standards.

By choosing Marchi Paving Inc., you’re not just hiring a contractor; you’re partnering with a team dedicated to delivering outstanding results.
Understanding Excavation Services
Excavation is a crucial part of any construction project, involving earthmoving, trenching, and tunneling to prepare a site for building. Let’s break down the different types of excavation and their common applications, along with the associated costs.
Types of Excavation
- Topsoil Excavation
- Topsoil excavation involves removing the uppermost layer of soil, which is rich in organic material and unsuitable for foundations. This is essential for projects requiring a stable base, such as driveways or patios.
- Earth Excavation
- Earth excavation digs deeper into the ground, removing soil to make way for foundations, basements, or other structures. This type often includes the removal of both topsoil and subsoil.
- Rock Excavation
- Rock excavation is the most challenging and requires specialized equipment like jackhammers or even explosives. It’s needed for sites with rocky terrain or large boulders that interfere with construction.
Common Excavation Projects
Excavation is used in a variety of projects, each with its specific requirements and challenges:
- Swimming Pools
- Digging an in-ground swimming pool costs between $1,000 to $5,000 depending on the size and soil conditions. This involves precise digging to create the pool shape and depth.
- Driveways
- Excavating for a driveway or patio typically ranges from $1,000 to $2,500. This includes clearing the area, leveling the ground, and preparing a stable base.
- Basements
- For new construction, digging a basement can cost between $1,500 to $10,000. This involves extensive earth removal and careful planning to avoid undermining existing structures.
- Foundation Pads
- Creating a foundation pad for a new home site also costs $1,500 to $10,000. This ensures a level and stable base for the new building, crucial for structural integrity.
Excavation Costs
Understanding the costs involved in excavation can help you budget more effectively:
- Cost Per Cubic Yard
- Excavation costs range from $2.50 to $15.00 per cubic yard. The price varies based on the project type, site accessibility, and soil type.
- Hourly Rates
- For hiring a trained operator with their own equipment, expect to pay $100 to $300 per hour. If you rent a mini excavator separately, the operator’s rate drops to $50 to $150 per hour.
- Project Size
- Larger projects naturally incur higher costs due to the amount of material to be moved and the time required. Sites with rocky soil or other obstacles may also see increased expenses.

By understanding these different aspects of excavation, you can better plan your project and choose the right excavating companies near me to ensure quality and affordability.
Next, we’ll dive into how to choose the best excavation company for your needs, including key questions to ask and tips for hiring.
How to Choose the Best Excavation Company
Choosing the right excavation company is crucial for the success of your project. Here are some practical tips and key questions to help you make an informed decision.
Questions to Ask Excavation Companies
Before hiring, ask these questions to ensure you select the best company for your needs:
- How long have you been in business?
- Experience matters. Companies with a long track record are often more reliable.
- Are you licensed, bonded, and insured?
- Verify that the company complies with local regulations and has insurance to cover any potential damages.
- Do you own or rent your excavation equipment?
- Companies that own their equipment may offer better reliability and faster project completion.
- What is your erosion control plan for my project?
- Erosion and Sediment Control certification is a good sign. Ensure the company has a solid plan to manage erosion on your site.
- Will you flag any buried pipes and utility lines before work begins?
- Safety first. Confirm that they will locate and mark any underground utilities.
- Does the estimate include leveling and/or grading the land?
- Make sure all necessary tasks are included in the estimate to avoid surprises later.
- Does the estimate include fill dirt, topsoil, and dirt delivery fees?
- Clarify what materials are included to understand the full cost.
- Does the estimate include site cleanup and debris removal?
- Ensure post-project cleanup is covered to avoid additional expenses.
- What other costs might come up during the project?
- Ask about potential additional costs to better budget for the project.
- Will this project require permits, and will you obtain them?
- Determine if permits are needed and if the company will handle the paperwork.
- How long will the project take?
- Get a clear timeline to plan around the excavation work.
Tips for Hiring
Follow these tips to hire the best excavation company:
- Get Multiple Quotes
- Obtain at least three quotes to compare prices and services. An on-site visit is often necessary for an accurate estimate.
- Check Certifications
- Look for certifications like Erosion and Sediment Control to ensure the company follows best practices.
- Read Reviews
- Check reviews on HomeGuide and Google to see what past clients say about the company’s work quality and reliability.
- Verify Licensing and Insurance
- Ensure the company is licensed and insured to protect yourself from liabilities.
- Ask for a Detailed Estimate
- Get a written estimate that includes all costs, from equipment fees to site cleanup.
- Check Their Experience
- Companies with experience in similar projects are more likely to deliver quality results.
- Follow a Payment Plan
- Never pay in full upfront. Agree on a payment plan that aligns with project milestones.
By asking the right questions and following these hiring tips, you can find the best excavating companies near me to ensure your project is completed on time, within budget, and to your satisfaction.
Frequently Asked Questions about Excavation
What is classed as a deep excavation?
A deep excavation is generally classified as any excavation deeper than 20 feet. These types of excavations often require special techniques and equipment to ensure safety and stability. For example, deep excavations might use shoring systems, trench boxes, or even steel sheet piling to prevent cave-ins and collapses.
Deep excavation is commonly needed for projects like basements, underground parking structures, and utility installations. The depth and complexity often mean additional safety measures and permits are required.
Can excavation be done in the winter?
Excavation can technically be done in the winter, but it’s generally not recommended in areas that experience heavy snow. Thawing snow can lead to shifting earth and drainage issues later on. The best time for excavation is in the spring, after the snow has melted and the ground has dried out.
In regions without snow, excavation can be done year-round. However, winter conditions can still pose challenges like frozen ground, which makes digging more difficult and time-consuming. Always consult with your excavation contractor to determine the best timing for your project.
Do I need a permit for excavation work?
Yes, most excavation projects require permits. Local regulations vary, so it’s essential to check with your city or county’s permitting office. Permits ensure that the work complies with safety guidelines and local building codes.
Your excavation contractor should handle the permit process, but it’s a good idea to verify this beforehand. Make sure to ask if the cost of obtaining permits is included in the project estimate. This will help you avoid unexpected expenses and legal issues down the line.
Conclusion
At Marchi Paving Inc., we understand that choosing the right excavation company can make a significant difference in the success of your project. Our commitment to quality and affordability sets us apart from other excavating companies near you.
Excavation Services
We offer a wide range of excavation services, from earthmoving and trenching to tunneling and land grading. Whether you need a foundation pad for a new home, a driveway, or a swimming pool, our experienced team has the skills and equipment to get the job done right.
Quality and Affordability
Marchi Paving Inc. prides itself on delivering high-quality workmanship at competitive prices. We use state-of-the-art equipment to ensure that your project is completed efficiently and to the highest standards. Our team is not only skilled but also dedicated to providing excellent customer service from start to finish.
Why Choose Us?
- Experienced Team: With over 20 years in the industry, our team has the expertise to handle any excavation project, big or small.
- Licensed and Insured: We are fully licensed, bonded, and insured, giving you peace of mind that your project is in capable hands.
- Customer Satisfaction: Our focus on customer service means we are always available to answer your questions and address your concerns.
Ready to start your excavation project? Contact us today to get a detailed quote and experience the Marchi Paving difference.
By choosing Marchi Paving Inc., you’re not just hiring a contractor; you’re partnering with a team dedicated to delivering outstanding results.
Retaining Wall Engineer Near Me: Top 3 Trusted Experts 2024
Why Hiring a Retaining Wall Engineer Near Me is Crucial
When searching for a retaining wall engineer near me, you’re likely focused on finding a professional who can ensure your project is both structurally sound and visually appealing. Retaining walls are not just about holding back soil—they play a key role in managing land slopes, preventing erosion, and even enhancing the aesthetics of your landscape.
Key factors to consider when hiring a retaining wall engineer near me:
– Expertise in structural integrity
– Experience with different wall types
– Knowledge of local building codes and regulations
– Ability to provide accurate cost estimates
Retaining walls are vital for maintaining the stability of your property. From supporting landscapes to preventing erosion, a well-designed retaining wall requires expertise in soil mechanics, drainage solutions, and material selection. This is why hiring a qualified retaining wall engineer is essential. Their expertise ensures that the wall withstands lateral earth pressures and environmental challenges, safeguarding both property and occupants.
Whether you need a concrete retaining wall for a heavy-duty application or a segmented block wall for an neat finish, a skilled engineer will provide the right design custom to your needs.

Easy retaining wall engineer near me word list:
– retaining wall builders near me
– retaining wall repair near me
– what type of contractor builds retaining walls
What is a Retaining Wall?
A retaining wall is a structure built to hold back soil or rock from a building, structure, or area. It prevents soil erosion and manages sloped landscapes, making land more usable and aesthetically pleasing.
Purpose of Retaining Walls
Retaining walls serve several critical functions:
– Soil Retention: They hold back soil in areas with steep slopes.
– Erosion Control: They prevent soil erosion by stabilizing the ground.
– Water Management: They help manage water runoff and prevent flooding.
– Aesthetic Improvement: They add visual appeal to landscapes and can create usable outdoor spaces.
Types of Retaining Walls
There are various types of retaining walls, each suited for different applications and conditions:
- Concrete Retaining Walls:
- Cantilevered Walls: Supported by a footing below, these walls resist sliding and overturning by leveraging their weight and the weight of the soil above the footing.
- Gravity Walls: These rely on their mass to hold back the soil.
- Modular Block Walls:
- Also known as segmented block walls, these are made of interlocking concrete blocks that provide flexibility and ease of installation.
- Mechanical Stabilized Earth (MSE) Walls:
- These walls use layers of soil and reinforcement materials like geogrids to increase stability.
- Gabion Walls:
- Made of wire baskets filled with rocks, these walls are often used in areas prone to erosion.
- Timber Walls:
- Constructed from treated wood, these are cost-effective but have a shorter lifespan compared to other types.
Soil Retention and Lateral Earth Pressure
The effectiveness of a retaining wall largely depends on its ability to manage lateral earth pressure—the force exerted by the retained soil against the wall. Several factors influence this pressure, including:
- Soil Type: Different soils exert different pressures. For example, clay retains water and exerts more pressure than gravel.
- Slope of the Soil: Steeper slopes increase the pressure against the wall.
- Water Accumulation: Water adds weight to the soil, increasing the pressure. Proper drainage solutions like weep holes or pipe drains are essential to manage this.

Key Considerations
When designing a retaining wall, engineers must consider:
– Soil Stability: Conducting a soil slope stability analysis to ensure the wall can withstand the forces acting upon it.
– Drainage Solutions: Implementing effective drainage to reduce hydrostatic pressure.
– Material Selection: Choosing the right materials based on the wall’s purpose and environmental conditions.
Retaining walls are crucial for both functional and aesthetic reasons. They manage land slopes, prevent erosion, and improve landscapes. Proper design and construction are essential to ensure they perform these functions effectively.
Next, we’ll explore the different types of engineers you might need for your retaining wall project.
Types of Retaining Walls
When considering a retaining wall for your project, understand the different types available. Each type has its own set of advantages, suitable applications, and cost implications.
Concrete Retaining Walls
Concrete retaining walls are a popular choice due to their durability and strength. There are two main types:
- Cantilevered Walls: These walls are supported by a footing below. They resist sliding and overturning by leveraging their weight and the weight of the soil above the footing. Cantilevered walls are ideal for taller structures and can handle significant lateral earth pressure.
- Gravity Walls: These rely purely on their mass to hold back the soil. They are thicker and use concrete’s weight to provide stability. Gravity walls are simpler to construct but require more material compared to cantilevered walls.
Modular Block Walls
Also known as segmented block walls, modular block walls are made of interlocking concrete blocks. They offer several benefits:
- Flexibility: The interlocking nature allows for some movement, making them suitable for areas with slight soil shifts.
- Ease of Installation: They are relatively easy to install, even for DIY enthusiasts, and don’t always require mortar.
- Aesthetic Options: Available in various colors, sizes, and textures, modular block walls can improve the visual appeal of landscapes.
Mechanical Stabilized Earth (MSE) Walls
MSE walls are built using layers of soil and reinforcement materials like geogrids. These walls are known for their high stability and strength. Key features include:
- Reinforcement: The use of geogrids or other reinforcement materials increases the wall’s stability.
- Versatility: Suitable for various heights and applications, including highway embankments and large commercial projects.
- Cost-effective: Often more economical for large-scale projects compared to traditional concrete walls.
Gabion Walls
Gabion walls are constructed using wire baskets filled with rocks or other materials. These walls are particularly effective in areas prone to erosion. Benefits include:
- Permeability: The gaps between the rocks allow water to pass through, reducing hydrostatic pressure.
- Erosion Control: Ideal for riverbanks and areas with significant water flow.
- Natural Appearance: The use of natural stones can blend seamlessly with the surrounding environment.
Timber Walls
Timber retaining walls are made from treated wood and are a cost-effective solution for smaller projects. However, they have a shorter lifespan compared to other materials. Key points include:
- Cost-effective: Generally cheaper to build than concrete or stone walls.
- Aesthetic Appeal: Provides a natural look that can complement certain landscapes.
- Maintenance: Requires regular maintenance and treatment to prevent rot and insect damage.
Each type of retaining wall has its own set of advantages and is suited for different applications and conditions. When choosing the right type for your project, consider factors like soil type, slope, water drainage, and aesthetic preferences.
Next, we’ll explore when you might need a retaining wall engineer and how to choose the right one for your project.
When Do You Need a Retaining Wall Engineer?
Retaining walls are more than just barriers; they are critical structures that require precise engineering to ensure safety and compliance. Here’s when you should consider hiring a retaining wall engineer:
Height Regulations
Height is a key factor in determining the need for professional engineering. In many regions, walls over 4 feet tall require a structural engineer’s expertise. This is because taller walls face greater lateral earth pressure and need to be designed to withstand these forces safely.
Structural Engineer
A structural engineer is essential for designing concrete and block retaining walls. They ensure that the wall can handle the lateral forces exerted by the soil. For example, cantilevered concrete walls need to be heavy enough to resist sliding and wide enough to prevent overturning. A structural engineer will also consider factors like:
- Footing design: To ensure the base is strong enough to support the wall.
- Reinforcement: Using steel bars or other materials to add strength.
- Drainage solutions: To prevent water buildup behind the wall.
Civil Engineer
Civil engineers play a crucial role in planning and constructing retaining walls as part of larger landscape or infrastructure projects. They are experts in integrating retaining walls into the overall site design, ensuring that the wall complements the surrounding environment. Civil engineers can help with:
- Site planning: Ensuring the wall fits well within the landscape.
- Permits and regulations: Navigating local building codes and obtaining necessary permits.
- Coordination with other structures: Making sure the retaining wall works in harmony with other site features like parking lots or buildings.
Geotechnical Engineer
A geotechnical engineer focuses on the soil and ground conditions that affect the retaining wall. They perform soil slope stability analysis to determine the best type of wall and its design specifications. Key responsibilities include:
- Soil analysis: Identifying the type of soil and its properties.
- Stability calculations: Ensuring the soil can support the wall without shifting or collapsing.
- Drainage solutions: Designing systems to manage water and prevent hydrostatic pressure buildup.
Safety
Safety is paramount when building retaining walls. Poorly designed walls can fail, leading to soil erosion, property damage, or even injury. Hiring a qualified engineer ensures that the wall is built to withstand all relevant forces and conditions. They will consider:
- Load factors: Including the weight of soil, water, and any nearby structures.
- Material strength: Ensuring that the chosen materials can handle the expected loads.
- Construction methods: Using proven techniques to build a stable and durable wall.
Compliance
Compliance with local regulations is crucial. Many areas have strict codes governing the construction of retaining walls, especially those over a certain height. Engineers ensure that your project meets all legal requirements, including:
- Building permits: Obtaining necessary approvals from local authorities.
- Zoning laws: Ensuring the wall complies with local zoning regulations.
- Environmental regulations: Considering the impact on the surrounding environment and adhering to any relevant environmental laws.
By understanding when to hire a retaining wall engineer, you can ensure your project is safe, compliant, and built to last. Whether you need a structural, civil, or geotechnical engineer, their expertise will be invaluable in creating a stable and effective retaining wall.
Next, we’ll guide you on how to choose the right retaining wall engineer near you for your project.
How to Choose the Right Retaining Wall Engineer Near Me
Selecting the right retaining wall engineer is crucial for the success of your project. Here are the key factors to consider:
Experience
Experience matters. Look for engineers who have a proven track record with retaining wall projects similar to yours. For instance, a retaining wall supporting a parking lot requires different expertise than a small garden wall. Experienced engineers will understand the specific challenges and solutions needed for your project.
Example: A structural engineer with experience in designing cantilevered concrete walls will know how to handle lateral earth pressures effectively.
Qualifications
Check qualifications. Ensure the engineer is licensed and certified. They should have a degree in civil, structural, or geotechnical engineering and be registered with relevant professional bodies.
Important: In regions like North Texas, retaining walls over 4 feet typically require a structural engineer’s certification due to the increased lateral forces.
Local Regulations
Understand local regulations. Different areas have different building codes and zoning laws. Your engineer should be familiar with these regulations to ensure compliance. They can help you steer permit requirements and avoid legal issues.
Fact: In many regions, retaining walls over 4 feet require a permit. Engineers can help you obtain this, ensuring your project meets all legal standards.
Project Scope
Define the project scope. Clearly outline your project needs, including the wall’s height, length, and purpose. This helps in selecting an engineer with the right expertise. For example, a geotechnical engineer is essential for soil analysis and slope stability, while a structural engineer is vital for designing the wall itself.
Tip: For complex projects, consider hiring a team that includes structural, civil, and geotechnical engineers to cover all aspects of the design and construction.
Cost Estimates
Get cost estimates. Request detailed quotes from multiple engineers. This should include hourly rates, project costs, and any additional fees. Compare these to find a balance between cost and quality.
Statistic: Waterproofing a retaining wall can cost between $2 and $10 per square foot but is essential for longevity.
Additional Considerations
- References: Ask for references and check reviews from previous clients.
- Communication: Ensure the engineer communicates clearly and promptly.
- Timeline: Confirm their availability matches your project timeline.
By considering these factors, you can find a retaining wall engineer near you who is qualified, experienced, and capable of delivering a safe and compliant project.
Next, we’ll explore the top-rated retaining wall engineers in your area.
Top-Rated Retaining Wall Engineers Near Me
Structural Engineers
Structural engineers play a crucial role in designing retaining walls, especially for more complex projects like supporting parking lots or tall walls. They specialize in understanding and counteracting the lateral earth pressures that can cause walls to slide or topple.
Concrete retaining walls are a common project for structural engineers. These walls, often cantilevered, rely on their weight and the design of their footing to resist forces. The engineer ensures that the wall is heavy enough and the footing is wide enough to prevent sliding and overturning.
Example: In North Texas, structural engineers are typically required for walls over 4 feet tall due to the significant lateral forces involved.
 ning wall engineer near me infographic 4_facts_emoji_grey
Civil Engineers
Civil engineers are often involved in the landscape design and planning stages of retaining wall projects. They focus on integrating the wall into the overall landscape, ensuring it complements the surrounding environment and meets aesthetic goals.
Civil engineers can also oversee the construction process, ensuring that the wall is built according to design specifications and local regulations. They work closely with other professionals to ensure the wall’s stability and functionality.
Case Study: A civil engineer in Houston designed a stunning natural stone retaining wall for a homeowner in The Woodlands, TX. The wall not only solved an erosion problem but also added a beautiful feature to the backyard.
Geotechnical Engineers
Geotechnical engineers are experts in soil analysis and slope stability. Their role is crucial for understanding the soil conditions behind and beneath the retaining wall. They provide the necessary data to ensure the wall is designed to handle the specific soil characteristics of the site.
These engineers also develop drainage solutions to prevent water from accumulating behind the wall, which can add significant weight and pressure. Proper drainage is essential for the longevity and safety of retaining walls.
Fact: Geotechnical engineers often perform slope stability analysis to determine if a retaining wall is necessary or if other solutions can be implemented. For example, in some cases, soil slopes can be stabilized without a wall for heights up to 4 feet.
By combining the expertise of structural, civil, and geotechnical engineers, you can ensure your retaining wall project is both safe and aesthetically pleasing.
Next, we’ll discuss the cost of hiring a retaining wall engineer and what you can expect in terms of fees and expenses.
Cost of Hiring a Retaining Wall Engineer
When planning a retaining wall project, understand the costs involved. Here’s a breakdown of what you can expect when hiring a retaining wall engineer near me:
Hourly Rates
Engineers typically charge by the hour for their services. The rates can vary based on their experience and the complexity of the project.
- Structural Engineers: $100–$200 per hour
- Civil Engineers: $80–$150 per hour
- Geotechnical Engineers: $90–$180 per hour
Fact: In areas with higher living costs, such as San Francisco, rates can be on the higher end of the spectrum.
Project Costs
The total cost for a retaining wall project includes several components:
- Design Fees: The cost for designing the wall, which can range from $1,000 to $5,000 depending on the wall’s complexity.
- Engineering Reports: Geotechnical analysis and soil reports can add $500 to $2,500.
- Construction Oversight: Engineers may charge for site visits and construction oversight, usually billed hourly.
Example: A typical retaining wall project in Texas might cost around $3,000 to $7,000 for engineering services alone, including design, reports, and oversight.
Consultation Fees
Initial consultations are often necessary to assess the site and discuss project requirements. Some engineers offer free consultations, while others may charge a fee ranging from $100 to $300.
Material Costs
Material costs can vary significantly based on the type of retaining wall. Here’s a quick comparison:
- Concrete Walls: $20–$50 per square foot
- Modular Block Walls: $15–$40 per square foot
- Natural Stone Walls: $40–$110 per square foot
Statistic: In San Antonio, Texas, the cost for concrete retaining walls is approximately $50 per square foot of face, including labor and materials.
Labor Costs
Labor is a significant part of the overall cost. Skilled labor for masonry and concrete work can be expensive but ensures quality and durability.
- Concrete Work: $30–$50 per hour
- Masonry Work: $25–$45 per hour
Fact: Labor costs can make up 50% or more of the total project cost, depending on the complexity and location of the project.
Additional Considerations
- Permits: Required for walls over 3 or 4 feet tall, costing $50 to $450.
- Waterproofing: Essential for longevity, costing $2 to $10 per square foot.
- Geographical Location: Costs vary based on local labor rates and material availability.
By understanding these cost factors, you can better plan your retaining wall project and ensure you get the best value for your investment.
Next, we’ll address some frequently asked questions about retaining wall engineers to help you make informed decisions.
Frequently Asked Questions about Retaining Wall Engineers
Do I need a structural engineer for a retaining wall?
Yes, you often need a structural engineer for a retaining wall, especially if it’s over 4 feet tall. Local regulations typically require a structural engineer’s input to ensure safety and compliance. Structural engineers are experts in designing walls that can withstand lateral earth pressure and other forces.
Fact: In North Texas and New York, any retaining wall over 4 feet needs a structural engineer’s approval.
What is the thumb rule for retaining wall design?
The thumb rule for retaining wall design involves several key dimensions:
- Base Width: Should be about half the height of the wall.
- Base Thickness: Typically, 1/8th of the wall’s height.
- Stem Thickness: Varies but usually around 1/12th of the wall’s height.
These dimensions help ensure the wall’s stability and prevent sliding or overturning.
Example: For a 12-foot high wall, the base width should be around 6 feet, the base thickness 1.5 feet, and the stem thickness 1 foot.
Can civil engineers design retaining walls?
Yes, civil engineers can design retaining walls. They often handle the landscape design, planning, and construction aspects. However, for taller or more complex walls, they usually collaborate with structural and geotechnical engineers to ensure the wall’s stability and safety.
Story: A civil engineer in Houston designed a stunning natural stone retaining wall for a home in The Woodlands, TX, solving an erosion problem and adding aesthetic value.
How does planning affect retaining wall construction?
Proper planning is crucial for retaining wall construction. It involves:
- Site Assessment: Understanding the landscape and soil type.
- Design: Creating detailed plans that incorporate safety and compliance with local regulations.
- Permits: Ensuring all necessary permits are obtained.
Statistic: Proper planning can reduce project delays and cost overruns by up to 30%.
What safety considerations should you keep in mind?
Safety is paramount when designing and building retaining walls. Key considerations include:
- Drainage: Preventing hydrostatic pressure build-up.
- Soil Stability: Ensuring the soil can support the wall.
- Load Factors: Considering additional loads like nearby buildings or vehicles.
Fact: Improper drainage is a leading cause of retaining wall failure.
By addressing these FAQs, you can better understand the importance of hiring the right professionals and the key factors involved in retaining wall design and construction.
Conclusion
Retaining walls are more than just functional structures; they are essential for maintaining the integrity and usability of your property. Whether it’s preventing soil erosion, creating usable space, or adding a stylish touch to your landscape, retaining walls play a crucial role.
Importance of Hiring Professionals
Hiring the right professionals is vital for the success of your retaining wall project. Structural, civil, and geotechnical engineers each bring unique expertise to the table. Their combined knowledge ensures that your wall is not only aesthetically pleasing but also safe and compliant with local regulations.
Example: In North Texas, any retaining wall over 4 feet requires a structural engineer’s approval to ensure it can withstand lateral earth pressure and other forces.
Proper planning and expert execution can save you from costly repairs and potential safety hazards. For instance, improper drainage is a leading cause of retaining wall failure. Professionals know how to design and build walls that account for drainage, soil stability, and load factors.
Choose One of the Best Retaining Wall Contractors Near Me
At Marchi Paving Inc., we pride ourselves on delivering high-quality retaining wall solutions. With over 20 years of experience, we have the expertise to handle every aspect of your project, from design to installation. Our team is committed to ensuring your retaining wall is both functional and visually appealing.
Customer Review: “The whole company started upon our job with great enthusiasm, kept in constant touch, and made us feel valued,” said one satisfied client.
Ready to start your retaining wall project? Contact us today to get a detailed quote and experience the Marchi Paving difference.
By choosing Marchi Paving Inc., you’re not just hiring a contractor; you’re partnering with a team dedicated to delivering outstanding results.
Landscape Professionals Near Me: Top 5 Experts in 2024
Finding the Best Residential Landscape Companies Near You
When looking for landscape professionals near me, you want reliable, high-quality service that meets your needs. Here’s a quick guide:
- Initial meeting to discuss project goals, budget, and desired features
- Design concept presentation with opportunity for edits
- Detailed planting plan creation and plant selection
- Implementation of the landscaping project
Professional landscapers provide a range of services to transform your outdoor space. From creating visually appealing gardens to functional outdoor living areas, they bring expertise and creativity to each project.

Landscape professionals near me terms you need:
What is Landscaping?
Landscaping is the art and science of modifying outdoor spaces to improve their visual appeal and functionality. It involves a mix of gardening, design, and construction to create beautiful and practical environments.
Definition
At its core, landscaping is about planning and arranging elements in outdoor areas. This includes the selection and placement of plants, as well as the incorporation of hardscaping elements like pathways, patios, and retaining walls. The goal is to create a harmonious and aesthetically pleasing space.
Visual Appeal
Visual appeal is a major focus in landscaping. A well-designed landscape can transform a bland yard into a stunning outdoor oasis. Elements like color, texture, and form are carefully chosen to create a balanced and inviting look.
- Color: Use a mix of flowering plants and foliage to add vibrant hues.
- Texture: Combine different plant types and hardscaping materials to add depth.
- Form: Pay attention to the shapes of plants and structures to create visual interest.

Gardening
Gardening is a key component of landscaping. It involves the cultivation of plants to improve the beauty and function of outdoor spaces. This can range from simple lawn maintenance to creating elaborate flower beds and vegetable gardens.
- Plant Selection: Choose plants that thrive in your local climate and soil conditions.
- Maintenance: Regular tasks like watering, pruning, and weeding keep the garden healthy and attractive.
- Seasonal Changes: Select plants that offer year-round interest, with different blooms and foliage colors in each season.
Outdoor Spaces
Creating functional outdoor spaces is another important aspect of landscaping. These areas can serve various purposes, from relaxation to entertainment.
- Patios and Decks: Provide a space for outdoor dining and gatherings.
- Paths and Walkways: Connect different areas of the yard and guide visitors through the landscape.
- Water Features: Add a soothing element with ponds, fountains, or streams.
- Lighting: Extend the usability of outdoor spaces into the evening with well-placed lighting.

Landscaping is not just about planting flowers. It’s about creating a cohesive and functional outdoor environment that improves your home’s beauty and usability. Whether you’re looking to add a simple garden bed or completely transform your yard, professional landscapers can help bring your vision to life.
Types of Landscape Professionals
When it comes to landscaping, there are several types of landscape professionals you might consider hiring. Each one has a unique role in creating and maintaining beautiful outdoor spaces. Here’s a breakdown of the main types:
Landscape Architects
Landscape architects are the big-picture thinkers in landscaping. They are licensed by the state and have degrees in landscape architecture. Their primary job is to create detailed construction plans for large projects like parks, commercial properties, and extensive residential landscapes.
- Education: Bachelor’s or master’s degree in landscape architecture.
- Skills: Design, planning, and knowledge of local regulations.
- Projects: Large-scale developments, public spaces, and complex residential projects.
Garden Designers
Garden designers focus more on the aesthetic and horticultural aspects of landscaping. They usually work on smaller, residential projects and specialize in “softscape” elements like plants and flowers.
- Education: Often have a background in horticulture or design.
- Skills: Plant selection, garden layout, and seasonal planning.
- Projects: Home gardens, flower beds, and small-scale landscaping.
Landscape Contractors
Landscape contractors are the hands-on professionals who bring the designs to life. They handle the physical labor, including planting, building patios, and installing irrigation systems.
- Education: Training in landscaping techniques and equipment operation.
- Skills: Construction, planting, and hardscaping.
- Projects: Implementing designs by landscape architects and garden designers.
Landscape Gardeners
Landscape gardeners maintain the beauty and health of your outdoor spaces after they’ve been designed and implemented. They perform regular upkeep tasks like mowing, weeding, and pruning.
- Education: Often have experience or training in horticulture.
- Skills: Plant care, lawn maintenance, and pest control.
- Projects: Ongoing maintenance of residential and commercial landscapes.
Understanding the roles of these landscape professionals can help you choose the right expert for your project. Whether you need a comprehensive design plan or regular garden maintenance, there’s a professional suited for your needs.
How to Choose the Right Landscape Professional Near You
Selecting the right landscape professionals near me can make a huge difference in the success of your outdoor project. Here are key factors to consider:
Licensed, Bonded, and Insured
Licensing is crucial. A licensed landscape professional has met state requirements and is qualified to perform the work. Always ask for their license number and verify it online.
Bonding protects you if the contractor fails to meet their obligations. It ensures that the job will be completed, even if the contractor defaults.
Insurance is a must. It covers any accidents or damages that occur during the project. Request proof of both general liability and workers’ compensation insurance.
Customer Referrals and Reviews
Referrals from previous clients can give you insights into the contractor’s reliability and quality of work. Don’t hesitate to ask for a list of past clients you can contact.
Reviews on platforms like Google Reviews and the Better Business Bureau (BBB) can also be very telling. Look for patterns in the feedback. Consistent praise or complaints can help you gauge what to expect.
Guarantees
A solid guarantee backs up the work performed. Ask if the landscape professional offers any warranties on their services. This can include guarantees on plants, hardscaping, and overall workmanship. A contractor who stands by their work is likely to deliver better results.
Questions to Ask
Here are some questions to ask before making your decision:
- Are you licensed, bonded, and insured?
- Can you provide customer referrals or reviews?
- Do you offer guarantees or warranties?
- What is the estimated time frame for completing the work?
- Will you stay to complete the job if challenges delay completion?
Choosing the right landscape professional involves careful consideration of these factors. By doing your homework, you can ensure that your landscaping project is in capable hands.
Services Offered by Landscape Professionals Near Me
When you’re looking for landscape professionals near me, it’s important to understand the wide range of services they offer. Here are some key services you can expect:
General Maintenance
General maintenance is the backbone of any landscaping service. This includes:
- Trimming the grass
- Weeding flowerbeds
- Adding fertilizer to the soil
- Pruning trees
- Mulching
These tasks keep your outdoor space looking neat and healthy. Many companies offer regular maintenance plans to ensure your yard stays in top shape all year round.
Irrigation
Proper watering is essential for a thriving landscape. Professional landscapers can:
- Install and manage irrigation systems
- Ensure grass and plants get the right amount of water
From simple sprinkler systems to more complex drip irrigation, these solutions help maintain your garden efficiently.
Drainage Control
Drainage issues can wreak havoc on your landscape. To prevent problems like soil erosion and waterlogging, landscapers can:
- Install turf and hardscaping
- Design effective drainage systems
This is especially crucial in flood-prone areas. Proper drainage ensures that water flows away from your home and garden, protecting your investment.
Hardscaping
Hardscaping involves adding non-plant elements to your landscape, such as:
- Paver installation for driveways, walkways, and patios
- Retaining walls to prevent soil erosion
- Outdoor fireplaces and fire pits for cozy gathering spots
- Steps and stairs to steer elevation changes
These features add both functionality and aesthetic appeal to your outdoor space. For example, a well-constructed patio can become an extension of your living area, perfect for relaxation and entertainment.
Outdoor Lighting
Outdoor lighting improves the beauty and safety of your landscape. Services include:
- Installing lights to highlight landscape features
- Improving nighttime visibility
Proper lighting can transform your garden into a magical space after dark and provide added security.
Pest Management
Pests can quickly turn a beautiful garden into a nightmare. Landscape professionals offer:
- Chemical and organic pest control solutions
- Regular monitoring and treatment plans
Effective pest management ensures that your plants stay healthy and your outdoor space remains enjoyable.
By understanding these services, you can better plan your landscaping project and ensure you choose the right landscape professionals near me to bring your vision to life.
Next, we’ll dive into the average costs of landscaping services to help you budget your project effectively.
Average Costs of Landscaping Services
When planning your landscaping project, understanding the costs involved is crucial. Here’s a breakdown of typical expenses to help you budget effectively.
Hourly Rates
The cost of hiring landscape professionals can vary widely based on the provider and the service required. For general maintenance, individual pros usually charge between $15 to $30 per hour. If you opt for a larger landscaping company, expect to pay $40 to $80 per hour.
Project Costs
Project-based pricing can also vary significantly:
- General Maintenance: The average cost for a residential landscaping job is around $140.
- Irrigation Services: Installing a sprinkler system costs between $2,500 to $3,500 for a quarter acre.
- Hardscaping: Building a patio or pathway ranges from $1,700 to $4,700. More complex projects, like constructing a deck, can cost between $2,000 and $7,500.
Geographic Location
Location plays a big role in pricing. For instance, New York has some of the highest landscaping costs in the U.S. due to higher living expenses and demand. Always consider local market rates when budgeting.
Yard Size
The size of your yard directly impacts the cost. Larger yards require more materials and labor, driving up expenses. For instance, lawn aeration for a small yard might cost around $100, but this can increase for larger properties.
Materials
The type and quality of materials used can significantly affect costs:
- Mulch: Prices vary depending on the type, with bulk options like organic hardwood or dyed mulches available.
- Topsoil: Custom soil mixes designed to optimize plant health can be more expensive but are often worth the investment.
- Plants and Trees: The selection of plants, shrubs, and trees will also influence your budget.
Labor Costs
Labor is a significant part of landscaping expenses. Skilled landscapers spend years perfecting their craft, and their expertise is essential for quality work. Labor costs can make up a large portion of the total project cost, especially for complex tasks like hardscaping or drainage control.
Understanding these cost factors will help you budget effectively and make informed decisions for your landscaping project. Next, we’ll introduce you to the top 5 residential landscape companies near you to consider for your next project.
Top Residential Landscape Companies Near You
When it comes to changing your outdoor space, finding the right landscape professionals near me is key. Here are five top-rated residential landscape companies in your area that can help bring your vision to life.
Marchi Paving Inc.
Marchi Paving Inc. is known for their comprehensive landscaping and paving solutions. They specialize in everything from basic lawn maintenance to intricate landscape designs. Whether you need a new patio or a complete yard makeover, their skilled team can handle it all.
Services Offered:
- Landscape design and installation
- Lawn maintenance
- Hardscaping
- Paving services
Tips for Making Your Landscaping Look Professional
Creating a professional-looking landscape can make your home stand out. Here are some simple, effective tips to lift your outdoor space.
Layering for Height
Layering plants of different heights adds depth and interest. Start with taller plants or trees at the back, then medium-sized shrubs, and finally, shorter flowers or ground covers in the front. This technique creates a natural flow and makes each plant visible.
Contrast
Use contrasting colors and textures to make your garden pop. Dark green foliage next to bright flowers, or smooth leaves beside spiky ones, can create visual interest. Consider pairing purple flowers with yellow ones, or soft grasses with rough bark.
Backdrop Evergreens
Evergreens provide a year-round backdrop that keeps your garden looking lush, even in winter. Plant them along fences or at the back of flower beds to create a green canvas for seasonal plants. This adds structure and consistency to your landscape.
Flowering Shrubs
Flowering shrubs are a great way to add color and fragrance. They are low-maintenance and can bloom for months. Options like azaleas, hydrangeas, and roses can create focal points in your garden. Place them near entryways or along pathways for maximum impact.
By following these tips, you can achieve a polished, professional look in your landscape. Next, we’ll answer some frequently asked questions about landscape professionals near you.
Frequently Asked Questions about Landscape Professionals Near Me
What do most landscapers charge per hour?
The cost of hiring a landscaper can vary depending on several factors. Individual professionals typically charge between $15 to $30 per hour. For larger landscaping companies, the rate is usually higher, ranging from $40 to $80 per hour.
General maintenance tasks such as mowing the lawn or weeding are often on the lower end of the scale. More specialized services, like hardscaping or irrigation installation, can be more expensive.
For a full day of work, hiring a landscaping team can cost around $2,300, which usually includes a team of five people. Always ask for an estimate before starting any project to avoid surprises.
How can I make my landscaping look professional?
Achieving a professional-looking landscape doesn’t have to be complicated. Here are some tips to get you started:
Layering for Height: Arrange plants of different heights to add depth. Place taller plants or trees at the back, medium-sized shrubs in the middle, and shorter flowers or ground covers in the front.
Contrast: Use contrasting colors and textures. Pair dark green foliage with bright flowers or smooth leaves with spiky ones to create visual interest.
Backdrop Evergreens: Plant evergreens along fences or at the back of flower beds. They provide a year-round backdrop that keeps your garden looking lush even in winter.
Flowering Shrubs: Add color and fragrance with low-maintenance flowering shrubs like azaleas, hydrangeas, and roses. Place them near entryways or along pathways for maximum impact.
By following these simple steps, you can create a landscape that looks like it was designed by a professional.
What should I expect during the landscape process?
When hiring a landscape professional, understanding their process can help set expectations. Here’s a typical workflow:
Initial Meeting: The landscaper will meet with you to discuss your goals, budget, and desired features. Be prepared to talk about what you want and any specific plants or styles you prefer.
Design Concept: After the initial meeting, the landscaper will present a design concept. This is your opportunity to provide feedback and make any necessary changes.
Detailed Plan: Once the design is finalized, the landscaper will create a detailed plan, including the types of plants to be used and their placement.
Plant Selection: You may visit a local nursery with the landscaper to pick out plants. This ensures you get exactly what you want.
Implementation: The landscaper will then implement the plan, which may include tasks like planting, installing irrigation systems, and adding hardscaping elements.
Completion and Review: After the project is completed, there will be a final review to ensure everything meets your expectations.
Understanding these steps can help you feel more confident and informed throughout the landscaping process.
Next, we’ll dive into the conclusion and explain why Marchi Paving Inc. is the best choice for your landscaping needs.
Conclusion
Choosing the right landscaping company is crucial for achieving your dream outdoor space. At Marchi Paving Inc., we pride ourselves on delivering top-notch landscaping services that transform your yard into a beautiful, functional area.
High-Quality Work
We focus on using only the best materials for every project. From premium-grade plants to durable hardscaping elements, our commitment to quality ensures your landscape stands the test of time. Our attention to detail and dedication to excellence make us the go-to choice for all your landscaping needs.
In-House Project Execution
Our team of highly skilled professionals handles every aspect of the project in-house. This approach allows us to maintain strict quality control and ensure that every detail meets our high standards. With over 20 years of experience, we have the expertise to tackle any landscaping project, big or small.
Advanced Equipment
We invest in state-of-the-art equipment to improve the efficiency and precision of our work. Our advanced machinery allows us to complete projects on schedule and within budget, without compromising on quality. This means you get a stunning, durable landscape that looks great and performs well.
Local Expertise
As a local business, we understand the specific needs and challenges of our community. Our customer-centric approach involves transparent communication, detailed project planning, and personalized solutions custom to meet your specific needs.
When you choose Marchi Paving Inc., you’re not just getting a contractor; you’re partnering with a team dedicated to delivering outstanding results.
Ready to start your project? Contact us today to get a detailed quote and experience the Marchi Paving difference.
Repair Sewer Line: The Ultimate 2024 How-To Guide
Understanding Your Sewer Line: Why Repairs Are Crucial
Repair sewer line issues are more than just an inconvenience; they can pose significant health risks and financial burdens if not addressed promptly. In this guide, we’ll walk you through the importance of timely repair, common causes of damage, and how to identify when a repair is needed.
Quick Takeaways:
– Health Risks: Untreated sewer line issues can lead to harmful bacteria entering your home, causing illness.
– Costly Repairs: Delaying sewer line repairs can escalate problems, resulting in more expensive solutions.
– Environmental Impact: Leaking sewage can contaminate local water sources and harm the environment.
Sewer lines play a vital role in maintaining the hygiene and functionality of your home or business. When these lines crack or break, they can release untreated sewage into your property, leading to severe health risks. Bacteria, parasites, and toxic gases can all emerge from a faulty sewer line, putting everyone in your household or business at risk.
Ignoring sewer line damage also tends to lead to higher costs down the road. Simple repairs can turn into complete replacements if not handled promptly, burdening you with significant financial stress. Additionally, untreated leaks can pollute local water bodies, impacting not just your property but your entire community.
At a glance:

By understanding the importance of sewer line repair, you can take proactive steps to maintain a safe and healthy environment for everyone. Keep reading to learn about the causes of sewer line damage and how to identify when it’s time for a repair.
Simple repair sewer line glossary:
– cost to replace 50 feet of sewer line
– sewage line
– trenchless sewer line replacement
Common Causes of Sewer Line Damage
Sewer lines are integral to your home’s plumbing system, but they are vulnerable to various types of damage. Understanding these causes can help you take preventive measures and identify issues early. Here are the most common reasons for sewer line damage:
Poor Maintenance
Neglecting regular maintenance can lead to significant sewer line problems. Over time, debris, grease, hair, and other materials can build up, causing blockages and increasing pressure inside the pipes. Regular inspections and cleanings can prevent these issues.
Tree Roots
Tree roots are a frequent culprit of sewer line damage. They naturally seek out water sources, and your sewer line can be an attractive target. Roots can infiltrate small cracks or joints in the pipes, causing significant blockages and even breaking the pipes over time.
Ground Movement
Ground movement, including regular freezes and thaws or more severe events like earthquakes, can shift the soil around your sewer lines. This movement can cause the pipes to crack or become misaligned, leading to leaks and blockages.
Aging Pipes
All pipes have a lifespan, and as they age, they become more susceptible to wear and tear. Older pipes, particularly those made from outdated materials like clay or cast iron, are more prone to cracking, corrosion, and other forms of degradation.
Debris Buildup
A buildup of debris such as grease, oil, sludge, and even toilet paper can lead to clogs and increased pressure inside the sewer line. This pressure can cause the pipes to crack or burst, leading to leaks and other severe issues.
Poor Installation
Improper sewer pipe layout, design, or installation can lead to a host of problems down the line. Poorly installed pipes may not have the correct slope for drainage, leading to back-pitched pipes and problematic clogs.

Quick Facts:
– Tree Roots: Can infiltrate and break pipes.
– Ground Movement: Shifts can cause cracks and misalignment.
– Aging Pipes: More prone to wear and tear.
By understanding these common causes of sewer line damage, you can take proactive steps to maintain your system and avoid costly repairs. Up next, we’ll explore the signs that indicate you need to repair your sewer line.
Signs You Need to Repair Your Sewer Line
Knowing the signs of a failing sewer line can save you from a messy and costly disaster. Here are the key indicators that you need to repair your sewer line:
Gurgling Sounds
If you hear gurgling noises coming from your toilet, it’s a red flag. These sounds often indicate trapped air in the sewer pipes, which can be caused by blockages or cracks.
Sewage Backup
One of the most alarming signs is sewage backing up into your toilet or tub. This is not just an inconvenience but a serious health hazard. It usually means there’s a significant blockage or break in the sewer line.
Slow Draining
A bathtub that drains slowly or fails to drain at all is another common sign of sewer line problems. This can be due to debris buildup, roots infiltrating the pipe, or other obstructions.
Greener Grass
Noticeably greener grass near your sewer line could be a sign of a leak. The leaking sewage acts as a fertilizer, making the grass in that area grow faster and look healthier than the rest of your lawn.
Sewer Odor
A persistent sewer odor around your property is a strong indicator of a cracked or broken sewer pipe. Sewage gases escaping through these cracks can create an unpleasant smell that’s hard to ignore.

By keeping an eye out for these signs, you can catch sewer line issues early and avoid more extensive damage. Up next, we’ll guide you through the steps to repair your sewer line, whether you’re tackling it yourself or calling in the pros.
How to Repair Sewer Line: Step-by-Step Guide
DIY Sewer Line Repair
Repairing a sewer line yourself can be daunting but is achievable for minor issues. Here’s how to get started:
Identify the Problem
First, pinpoint the issue. Look for gurgling sounds, slow drains, or unusual green patches in your yard. These signs suggest a blockage or crack.
Locate the Damage
Use a sewer camera to inspect the pipe. This will help you see exactly where the damage is. You can rent these cameras from hardware stores.
Tools Needed
- Sewer camera
- Shovel
- Pipe cutting tools
- Rubber couplings
- PVC or cast-iron pipe (matching your existing pipe)
- Safety gear (gloves, goggles, mask)
Safety Precautions
Always wear safety gear. Sewer lines can be hazardous due to bacteria and gases. Ensure the area is well-ventilated.
Step-by-Step Process
- Turn Off Water Supply: Shut off the main water valve to prevent water from flowing into the damaged sewer line.
- Excavate the Area: Dig carefully around the damaged pipe section. Make sure to expose enough of the pipe for easy access.
- Cut the Damaged Pipe: Use pipe cutting tools to remove the damaged section. Be precise to ensure a clean cut.
- Install Rubber Couplings: Fit rubber couplings on both ends of the existing pipe. These will connect the new pipe section securely.
- Insert New Pipe: Measure and cut a new pipe section to fit the gap. Place it between the couplings and tighten the clamps.
- Test the Repair: Turn the water back on and check for leaks. If everything is secure, fill the excavation and restore the area.
Professional Sewer Line Repair
Sometimes, the damage is too extensive for a DIY fix. Here’s when to call in the pros:
Licensed Contractors
Hiring a licensed contractor ensures the job is done correctly and safely. Look for someone with an NYC Master Plumbers license and sufficient insurance coverage.
Advanced Equipment
Professionals use advanced equipment like backhoes, jackhammers, and sewer cameras for precise and efficient repairs.
NYC Master Plumbers License
In NYC, only contractors with an NYC Master Plumbers license can obtain the necessary permits for subsurface sewer repairs. This license guarantees they have the required skills and knowledge.
Steps Professionals Follow
- Assessment: The contractor will first assess the issue using advanced diagnostic tools.
- Permits: They will obtain any necessary permits, especially if the repair involves digging up a public road.
- Excavation: Using heavy machinery, they will excavate the area around the damaged pipe.
- Repair or Replace: Depending on the damage, they will either repair the pipe using methods like pipe relining or replace it entirely.
- Testing: After the repair, they will test the system to ensure everything is working correctly.
- Restoration: Finally, they will restore the excavation site, including repaving roads or sidewalks if needed.
Choosing between DIY and professional repair depends on the damage’s extent and your comfort level with handling sewer repairs. Up next, we’ll help you decide whether to repair or replace your sewer line by comparing costs and benefits.
Repair vs. Replacement: Making the Right Choice
When faced with a broken sewer line, it’s crucial to decide whether to repair or replace the pipe. Your choice impacts not only the immediate cost but also long-term benefits and potential future issues.
When to Opt for Repair
Minor Damage
If the damage is minor, such as small cracks or isolated blockages, repairing the sewer line can be a cost-effective solution.
Cast Iron Pipes
Cast iron pipes are highly durable and can last over 50 years if properly maintained. If your property has cast iron pipes, a repair is often the best choice. Repairing cast iron pipes can extend their lifespan significantly without the need for a full replacement.
Cost-Effective
Repairing a sewer line is generally less expensive than replacing it. For minor issues, a repair can usually be done quickly and at a lower cost. This can save you money and minimize disruption to your property.
When to Opt for Replacement
Extensive Damage
If the sewer line has extensive damage, such as multiple cracks, severe blockages, or is completely collapsed, replacement is often the best option. Trying to repair severely damaged pipes can be a temporary fix that leads to more problems later.
Clay pipes, commonly used in older homes, are more prone to damage and deterioration. They are susceptible to root infiltration and can easily crack. If your property has clay pipes, replacing them with more durable materials like cast iron or PVC can prevent future issues.
Long-Term Solution
While replacement is more costly upfront, it provides a long-term solution. A new sewer line can last over 50 years and often comes with a guarantee, giving you peace of mind. This is especially beneficial if you’re planning to stay in your home for many years.
Cost Comparison
Repair Costs
Repairing a sewer line can cost between $4,500 and $9,500. The cost depends on the extent of the damage and the materials used. Repairs are generally quicker and less invasive, making them a more affordable option for minor issues.
Replacement Costs
Replacing a sewer line is more expensive, ranging from $10,000 to $15,000. The cost includes material, labor, permits, and restoration of the excavation site. However, a complete replacement eliminates the need for future repairs and provides a long-term solution.
Long-Term Benefits
Durability
Replacing your sewer line with durable materials like cast iron or PVC can prevent future issues. These materials are less prone to cracking and root infiltration, ensuring a long-lasting solution.
Peace of Mind
Knowing that your sewer line is new and guaranteed can provide peace of mind. You won’t have to worry about sudden failures or costly repairs in the near future.
Making the right choice between repair and replacement involves assessing the extent of the damage, the type of pipes in your home, and your long-term plans. Up next, we’ll explore the different methods available for repairing sewer lines and how to choose the best one for your needs.
Types of Sewer Line Repair Methods
When it comes to fixing your sewer line, several methods can be used depending on the severity and type of damage. Here, we’ll explore three common techniques: Pipe Relining, Burst Pipe Hydraulic Replacement, and Trenchless Sewer Line Repair.
Pipe Relining
Pipe relining is a modern method that involves creating a new pipe inside the existing damaged one. This process is less invasive and can be completed relatively quickly.
- Cleaning: First, the damaged pipe is thoroughly cleaned to remove debris, grease, and other obstructions. This ensures the new lining adheres properly.
- New Lining: A flexible tube coated with epoxy is inserted into the cleaned pipe. The tube is inflated, pressing the epoxy against the inner walls of the existing pipe.
- Hardening Process: The epoxy is allowed to harden, forming a new, durable pipe within the old one. This new lining acts as a protective sleeve, preventing future cracks and leaks.
Pipe relining is ideal for minor to moderate damage and can extend the life of your sewer line by decades.
Burst Pipe Hydraulic Replacement
Burst pipe hydraulic replacement is used for more severe damage, where relining is not an option. This method involves replacing the old pipe by breaking it apart and simultaneously pulling a new one into place.
- Hydraulics: A hydraulic machine is used to pull a bursting head through the old pipe. The bursting head breaks the old pipe apart from the inside.
- Seamless Replacement: As the old pipe is broken, a new high-density polyethylene (HDPE) pipe is pulled into place behind the bursting head. This new pipe is seamless and highly durable.
- Minimal Excavation: Only two small access points are needed at either end of the pipe, minimizing the disruption to your property.
This method is effective for replacing heavily damaged pipes and can even increase the pipe’s diameter, improving flow capacity.
Trenchless Sewer Line Repair
Trenchless sewer line repair is a technique that avoids the need for extensive digging. This method is both time-efficient and cost-effective, making it a popular choice for homeowners.
- No Digging: Unlike traditional methods that require large trenches, trenchless repair involves minimal excavation, preserving your landscaping and reducing overall costs.
- Advanced Techniques: Techniques like pipe relining and burst pipe hydraulic replacement fall under trenchless repair. Both methods use advanced equipment to repair or replace the sewer line without significant disruption.
- Cost-Effective: While trenchless methods can be slightly more expensive upfront, they save money in the long run by reducing labor and restoration costs. They also offer a quicker turnaround time, often completing the job in just a day or two.
Trenchless sewer line repair is ideal for properties with extensive landscaping or where traditional excavation would be too disruptive.
Each of these methods has its own set of advantages and is suitable for different types of damage. Up next, we’ll dive into the cost of sewer line repair and replacement to help you budget for your project.
Cost of Sewer Line Repair and Replacement
Cost Breakdown
Understanding the costs involved in sewer line repair or replacement is crucial for budgeting and planning. Here’s a detailed breakdown of the average costs and factors that can influence the total expenditure:
- Average Costs:
- Minor Repairs: Typically range from $300 to $1,100.
- Moderate Repairs: Can cost between $1,100 and $4,000.
- Full Replacement: Generally falls between $10,000 and $15,000, but can go up to $20,000 for extensive projects.
- Factors Affecting Cost:
- Material Costs:
- ABS Plastic: $140 to $260 per 50 linear feet.
- PVC Plastic: $80 to $400 per 50 linear feet.
- Cast Iron: $1,200 to $3,700 per 50 linear feet.
- Labor Costs: Labor is the most significant factor, often accounting for over 50% of the total cost. Expect to pay for skilled mechanics and specialized equipment like backhoes and dump trucks.
- Distance to City Sewer: Longer distances mean more materials and labor, increasing costs. For instance, a 30-foot run can cost up to $10,000.
- Depth of Sewer Line: Deeper lines are harder to access and repair, leading to higher costs.
- Restoration Costs: Restoring the roadway and concrete can add $700 to $1,500 to the project, especially if the area is a protected roadway requiring additional permits and tests.
Cost-Saving Tips
- Preventive Maintenance:
- Regular inspections and drain cleanings can prevent major issues. This proactive approach can save you thousands by catching problems early.
- Example: Regularly clearing tree roots from your sewer line can prevent costly repairs ranging from $300 to $1,100.
- Regular Inspections:
- Schedule annual inspections to identify potential issues before they become severe. Using camera inspections can pinpoint problems like cracks or blockages early on.
- Fact: Spotting a minor crack early can save you from a full replacement that costs $10,000 to $15,000.
- Choosing the Right Contractor:
- Always get multiple estimates to compare prices and services. Look for licensed and experienced contractors who offer warranties on their work.
- Case Study: A homeowner saved over $2,000 by choosing a contractor who used trenchless repair methods, reducing labor and restoration costs.
By understanding these cost factors and implementing preventive measures, you can manage your sewer line repair expenses more effectively. Up next, we’ll answer some frequently asked questions about sewer line repair to further guide you through the process.
Frequently Asked Questions about Sewer Line Repair
How much does it cost to replace a sewer line in NYC?
Replacing a sewer line in NYC can be quite costly, but it’s important to understand the factors that influence the total price. On average, a full sewer line replacement ranges from $10,000 to $15,000, but it can go as high as $20,000 for more extensive projects. The cost is influenced by several factors:
- Material Costs: For example, cast iron pipes can cost between $1,200 and $3,700 per 50 linear feet.
- Labor Costs: Labor is the largest expense, often making up over 50% of the total cost.
- Permits and Restoration: Permits can range from $250 to $450. Restoring the roadway and concrete can add another $700 to $1,500.
Pro Tip: Always get multiple estimates to compare prices and services. This helps ensure you get the best value for your money.
What happens if your sewer line breaks?
A broken sewer line can cause significant disruptions and pose serious health risks. Here’s what typically happens:
- Initial Signs: You might notice gurgling sounds from your toilet, slow drainage, or sewage backup. There could also be a foul odor around your property.
- Health Risks: A broken sewer line can lead to the spread of harmful bacteria and pathogens, posing health risks to you and your family.
- Property Damage: Standing water and sewage can damage your lawn, foundation, and even the interior of your home.
- Emergency Repairs: It’s crucial to address the issue immediately. Professional plumbers will assess the damage, locate the break, and recommend either a repair or a replacement.
Quote: “When a sewer line fails, repair is the first line of defense. When repair is not a viable option, we turn to sewer line replacement.” – Marchi Paving Inc.
Who is responsible for a sewer line in NYC?
In NYC, the responsibility for maintaining and repairing the sewer line falls on the property owner. This includes the section of the sewer line that runs from your house to the city sewer main, which is usually located under the street.
- Property Owner’s Responsibility: You are responsible for any repairs or replacements needed for the sewer line within your property boundaries and up to the connection with the city sewer main.
- City’s Responsibility: The city is responsible for the maintenance and repair of the main sewer lines that run under public streets.
Fact: If you receive a 3-Day Notice from the NYC DEP indicating your main water line is leaking, you must fix it within three days to avoid fines and potential water shutoff.
By understanding these key points, you can better steer the complexities of sewer line repair and ensure timely and effective solutions for any issues that arise.
Conclusion
Repairing a sewer line can be a complex and costly task, but it’s essential for maintaining the health and safety of your property. From identifying the problem to choosing between repair and replacement, knowing what to expect can make the process smoother and less stressful.
Key Takeaways
- Identify Early Signs: Look out for gurgling sounds, slow drainage, and unusual odors around your property. Early detection can save you time and money.
- Understand Repair Methods: Different issues require different solutions. Familiarize yourself with methods like pipe relining, burst pipe hydraulic replacement, and trenchless repair.
- Cost Factors: Be aware of the various factors that influence the cost, including material, labor, and permit fees. Always get multiple estimates to ensure you’re getting the best value.
- Professional Help: While some minor repairs can be DIY, it’s generally advisable to consult professionals, especially for complex issues. Licensed contractors have the expertise and equipment to get the job done right.
Final Tips
- Preventive Maintenance: Regular inspections and cleanings can help prevent major issues down the line. This small investment can save you from costly repairs in the future.
- Choose the Right Contractor: Look for licensed and experienced professionals. Check reviews and ask for recommendations to find a reliable service provider.
- Understand Your Responsibilities: In NYC, property owners are responsible for the sewer line up to the city sewer main. Make sure you know your obligations to avoid fines and additional costs.
At Marchi Paving Inc., we are committed to providing top-notch sewer line repair and replacement services. Our team of experts uses advanced equipment and techniques to ensure your sewer system is in optimal condition. Don’t wait for a small problem to turn into a big one—contact us today for a consultation and experience the Marchi Paving difference.
By staying informed and proactive, you can effectively manage your sewer line issues and keep your property safe and functional. Thank you for trusting Marchi Paving Inc. with your sewer line repair needs.
Commercial Roof Snow Removal: Top Methods for 2024 Safety
Why Commercial Roof Snow Removal Matters
Commercial roof snow removal is essential for maintaining the safety and integrity of your building during winter. For a quick answer: It’s vital because accumulated snow can be extremely heavy, leading to structural damage, leaks, and even roof collapses if not properly managed.
Key Points:
- Maximum Load Limits: Every roof has a maximum weight it can safely support.
- Snow Weight: Dry snow can weigh around 7 lbs per cubic foot; wet snow can range from 12 to 18 lbs per cubic foot.
- Safety Hazards: Accumulated snow can lead to avalanches, leaks, and collapses that endanger your employees and customers.
Snow accumulation on a flat roof can be more problematic due to the sheer volume that can build up, leading to thousands of pounds of stress. Ignoring this issue can result in major building damage and severe safety hazards. Even a few inches of snow can exceed the load limit of most commercial roofs, making timely snow removal crucial.
Problems Caused by Snow Accumulation:
- Structural Damage
- Roof Leaks
- Safety Risks
- Loss of Productivity
During winter, a flat roof can collect several feet of snow, adding immense pressure on the structure. Without removing this snow, you’re putting your building at risk of significant damage, which can be costly to repair. Using professional services ensures the job is done safely and correctly, preventing damage to your roof and keeping your property accessible and safe.

By staying prepared and taking action early, you can protect your commercial property from the severe effects of snow accumulation. Read on to learn more about the importance of snow removal, effective methods, and how to keep your roof safe during the winter months.
Learn more about commercial roof snow removal:
– commercial snow removal contract
– commercial snow removal near me
– snow removal service
Why is Commercial Roof Snow Removal Important?
Commercial roof snow removal is not just a winter chore; it’s a critical task to ensure the safety and longevity of your building. Let’s break down why this is so important.
Weight Limits and Roof Collapse
Every roof has a maximum load limit, which is the total weight it can safely support. Exceeding this limit can lead to catastrophic consequences. For instance:
- Dry snow weighs about 7 lbs per cubic foot.
- Wet snow can weigh between 12 to 18 lbs per cubic foot.
Even a moderate snowfall can quickly add up to thousands of pounds on your roof. If your roof’s load limit is exceeded, it can lead to a roof collapse, causing extensive damage and posing serious risks to anyone inside the building.

Building Damage
Snow accumulation can cause several types of damage to your building, including:
- Structural Damage: The weight of the snow can weaken the roof’s structure, leading to cracks and eventual collapse.
- Roof Leaks: Melting snow can seep into cracks and cause leaks, damaging the interior of your building.
- Blocked Drains and Gutters: Snow and ice can clog drainage systems, leading to water buildup and potential flooding.
Safety Hazards
Accumulated snow on your roof can create dangerous conditions:
- Roof Avalanches: Large amounts of snow can suddenly slide off the roof, endangering anyone below.
- Falls and Injuries: If employees attempt to remove snow themselves, they risk falling or getting injured.
- Electrical Hazards: Snow removal can lead to accidental contact with power lines, posing electrocution risks.
Productivity Loss
A damaged or unsafe building can severely impact your business operations:
- Emergency Repairs: Unexpected roof repairs can be costly and time-consuming.
- Business Disruption: Safety hazards may force you to close your building temporarily, leading to loss of productivity and revenue.
- Employee Safety: Ensuring a safe working environment is crucial for maintaining employee morale and efficiency.
By understanding the importance of commercial roof snow removal, you can take proactive steps to protect your property and ensure the safety of everyone inside.
Next, we’ll explore the different methods for removing snow from commercial roofs, including the tools and services that can help you get the job done safely and effectively.
Methods for Removing Snow from Commercial Roofs
Using a Roof Rake
A roof rake is one of the simplest tools for commercial roof snow removal. It consists of a long telescoping handle with a blade at the end, often made from a rubber squeegee to prevent damage to the roof surface.
Steps to Use a Roof Rake:
1. Assemble the Roof Rake: Attach the blade to the telescoping handle.
2. Position the Rake: Stand safely on the ground and extend the rake to the edge of the roof.
3. Pull Snow Down: Gently pull the rake towards you to remove the snow. Leave about an inch of snow to avoid scraping the roof surface.
Benefits:
– Safety: You can remove snow without getting on the roof.
– Cost-Effective: Roof rakes are relatively inexpensive.
– Minimal Damage: The rubber squeegee blade reduces the risk of damaging the roof.
Professional Snow Removal Services
Hiring licensed professionals for snow removal ensures the job is done safely and efficiently. Companies like Marchi Paving Inc. offer comprehensive services that include snow and ice removal, ensuring your roof remains in optimal condition throughout winter.
What Professionals Offer:
– Safety Measures: Professionals use safety equipment like harnesses and fall protection to prevent accidents.
– Specialized Equipment: They employ tools such as steamers and eco-friendly ice melters to remove snow and ice without damaging the roof.
– Expertise: Licensed professionals follow safety regulations and have the experience to spot potential issues.
Case Study:
One of our clients faced severe snow accumulation on their flat roof, risking a collapse. Our team quickly intervened, using steamers to melt the snow and clear the drainage systems. The process was completed without any damage to the roof, saving the client from costly repairs.
Manual Snow Shoveling
Manual shoveling is another method, but it requires caution to avoid damaging the roof or causing injuries.
Steps for Safe Shoveling:
1. Use Plastic-Bladed Shovels: Metal blades can damage the roof surface. Plastic blades are safer.
2. Clear in Sections: Remove snow in small sections to avoid overloading any part of the roof.
3. Work in Pairs: One person can shovel while the other ensures safety and assists if needed.
Safety Precautions:
– Avoid Heavy Loads: Shoveling heavy, wet snow can weaken roof supports.
– Watch Your Step: Be mindful of skylights, vents, and other rooftop features.
– Dress Warmly: Wear layers to prevent hypothermia.
Quote:
commercial roof snow removal infographic simple-quote-colorful
By understanding and utilizing these methods, you can effectively manage snow removal on your commercial roof and maintain the safety and integrity of your building.
Next, we’ll discuss when snow should be removed from a commercial roof to prevent damage and ensure safety.
When Should Snow Be Removed from a Commercial Roof?
Knowing when to remove snow from a commercial roof is crucial to prevent damage and ensure safety. Here are some key points to consider:
Snow Load Limits
Every roof has a maximum load limit, which is the amount of weight it can safely support. This limit can be exceeded with as little as 6 inches of wet snow. Wet snow can weigh between 12 to 18 lbs. per cubic foot, while dry snow weighs around 7 lbs. per cubic foot. It’s essential to monitor snow accumulation and its weight to avoid overloading the roof.
Weight of Snow
Understanding the weight of snow is important. A cubic foot of dry snow weighs about 7 lbs., but wet snow can be much heavier. For instance, 12 inches of wet snow can add thousands of pounds of stress to your roof. Always consider the type of snow when assessing the need for removal.
FEMA Guidelines
FEMA suggests looking for certain signs to determine if the weight of snow is too much for your roof:
- Sagging ceiling tiles or boards
- Popping, cracking, and creaking noises
- Sagging roof members, including metal decking or plywood sheathing
- Bowing truss bottom chords or web members
- Doors and windows that can no longer be opened or closed
- Cracks in walls or masonry
- Severe roof leaks
If you notice any of these signs, it’s time to remove the snow immediately.
Warning Signs of Stress
Be vigilant for signs that your roof is under stress from snow accumulation. These can include:
- Visible sagging: Check for sagging in the roof structure or ceiling.
- Unusual sounds: Listen for creaking, cracking, or popping noises.
- Water leaks: Look for new leaks or water stains on the ceilings and walls.
- Structural changes: Notice if doors or windows become difficult to open or close.
Timely Snow Removal
Typically, you should start removing snow when it reaches 50% of your roof’s load capacity. For many roofs, this could mean removing snow when it’s just 6 inches deep, especially if it’s wet snow. Don’t wait for signs of imminent collapse; proactive removal is key.
By keeping these guidelines in mind, you can ensure that snow is removed from your commercial roof at the right time, preventing damage and maintaining safety.
Next, we’ll explore how to prepare for snowy weather to avoid potential roofing disasters.
Preparing for Snowy Weather
When it comes to commercial roof snow removal, preparation is key. By taking proactive steps before the snow arrives, you can prevent damage and ensure the safety of your building. Here are some essential preparation tips:
Preventive Maintenance
Start with preventive maintenance. This means inspecting your roof for any signs of damage, clogged gutters, or debris. A well-maintained roof is less likely to suffer from snow-related issues. Address any repairs needed before the snow season begins.
Roof Inspection
Conduct a thorough roof inspection. Check for weak spots, leaks, or structural damage. Focus on areas around HVAC units, skylights, and other roof penetrations. Identifying and fixing these problems early can save you from bigger headaches later.
Wind Baffles
Consider installing wind baffles. These devices help to reduce wind pressure on your roof, preventing snow from accumulating in drifts. Wind baffles can be particularly useful in areas with high winds and heavy snowfall.
Snow Guards
Snow guards are another effective tool. They hold the snow in place, preventing it from sliding off in large chunks. This not only protects your roof but also ensures the safety of people and property below.
Roof Map
Create a detailed roof map. This map should identify all roof features, such as drains, gutters, HVAC units, and skylights. A roof map helps in planning snow removal and ensures that no critical areas are missed during the process.
By following these preparation tips, you can minimize the risks associated with snow accumulation on your commercial roof. Proper preparation not only protects your building but also ensures the safety of everyone inside.
Next, we’ll discuss the safety measures during snow removal to keep your team and property safe during the process.
Safety Measures During Snow Removal
Safety is paramount when it comes to commercial roof snow removal. The risks involved can lead to severe injury or even death if not properly managed. Here are essential safety measures to ensure a safe snow removal process:
Fall Protection
Falls are one of the most significant hazards during snow removal. To prevent falls:
- Use Harnesses and Guardrails: Ensure all workers are equipped with safety harnesses and secure guardrails around the work area.
- Install Warning Lines: These lines help to demarcate safe zones and keep workers away from roof edges.
- Training: Workers should be trained in the proper use of fall protection equipment.
OSHA Regulations
Compliance with OSHA regulations is not just about avoiding fines; it’s about keeping your team safe. OSHA mandates:
- Proper Fall Protection: Any worker on a roof must have appropriate fall protection in place.
- Equipment Maintenance: Regularly inspect and maintain all safety equipment to ensure it’s in good working order.
- Documentation: Keep records of all safety training and equipment inspections.
Hypothermia Prevention
Working in cold conditions poses the risk of hypothermia. To prevent this:
- Wear Appropriate Clothing: Dress in layers, including thermal undergarments, waterproof outer layers, and insulated gloves and boots.
- Take Breaks: Schedule regular breaks in a warm area to prevent prolonged exposure to cold.
- Stay Hydrated: Drinking warm, non-caffeinated beverages can help maintain body temperature.
Safe Snow Storage
Properly managing where the snow goes after removal is crucial:
- Designate Dump Zones: Identify safe areas away from buildings, walkways, and essential infrastructure to dump the snow.
- Avoid Blocking Exits: Ensure that snow piles do not block emergency exits or pathways.
- Monitor Snow Piles: Keep an eye on snow piles for potential refreezing and ice formation, which can create hazards later.
By adhering to these safety measures, you can significantly reduce the risks associated with commercial roof snow removal. Prioritizing safety not only protects your team but also ensures the integrity of your roof and building.
Next, we’ll address some frequently asked questions about commercial roof snow removal to clarify common concerns and provide further guidance.
Frequently Asked Questions about Commercial Roof Snow Removal
How do professionals remove snow from roofs?
Professionals use a variety of methods to safely and effectively remove snow from commercial roofs.
Roof Rake: This tool features a telescoping handle and a rubber squeegee blade, allowing workers to pull snow off the roof without stepping on it. This minimizes the risk of roof damage and personal injury.
Professional Services: Hiring licensed professionals ensures the job is done safely and efficiently. They come equipped with specialized tools and safety gear, such as fall protection harnesses and guardrails, to handle the task without endangering themselves or damaging your roof.
Safety Equipment: Professionals use safety equipment like harnesses, guardrails, and warning lines to prevent falls. They also follow OSHA regulations to ensure a safe working environment.
Should snow on a roof be removed?
Yes, snow should be removed from commercial roofs to prevent several hazards:
Weight Limits: Every roof has a maximum load limit. Exceeding this limit can lead to a roof collapse. Wet snow can be particularly heavy, weighing up to 18 lbs. per cubic foot.
Water Damage: Accumulated snow can melt and refreeze, creating ice dams. These dams block drainage, leading to water leaks and potential damage to the building’s interior.
Roof Collapse: Ignoring snow buildup can result in severe structural damage or even a complete roof collapse, endangering employees and inventory.
How do you remove snow from a high roof?
Removing snow from a high commercial roof requires specialized tools and precautions:
Roof Rake: A roof rake with a telescoping handle can be used to reach higher areas from the ground or a safe platform. This method minimizes the need for workers to climb onto the roof.
Professional Services: For high roofs, it’s best to hire professionals. They have the necessary equipment, such as aerial lifts and safety harnesses, to safely access and clear snow from liftd areas.
Safety Equipment: Ensuring the use of proper safety gear, like harnesses and guardrails, is crucial. Professionals are trained to use this equipment effectively to avoid falls and injuries.
By understanding these methods and precautions, you can ensure that commercial roof snow removal is handled safely and efficiently, protecting your building and its occupants.
Conclusion
At Marchi Paving Inc., we understand the critical importance of professional snow removal for commercial roofs. Our expert team is dedicated to ensuring the safety and efficiency of your snow removal needs.
Why Choose Professional Snow Removal?
- Safety First: Removing snow from a commercial roof is not just about clearing the snow. It’s about doing it safely. Professional services ensure that all safety measures are in place, from using the right equipment to following OSHA regulations. This minimizes the risk of accidents and injuries.
- Prevent Damage: Using the wrong tools or methods can damage your roof. Our team uses plastic-bladed shovels and other specialized equipment to avoid any harm to your roof’s surface and critical components like gas lines and skylights.
- Efficiency: Time is money. Professional snow removal services are quick and efficient, reducing downtime and ensuring your business operations are not disrupted. We monitor weather conditions and snow accumulation to act promptly and effectively.
- Comprehensive Care: Our services go beyond just snow removal. We offer a multi-season strategy that includes preseason inspections, seasonal monitoring, drainage clearing, and more. This comprehensive approach ensures your roof remains in top condition throughout the winter.
Protect Your Investment
Ignoring snow buildup can lead to severe consequences, including roof collapse, water damage, and safety hazards. By choosing Marchi Paving Inc. for your commercial roof snow removal, you are protecting your investment, ensuring the safety of your employees, and maintaining the integrity of your building.
Contact Us Today
Don’t wait until it’s too late. Prepare for the winter season with our professional snow removal services. Visit our commercial snow removal page to learn more and get in touch with our team.
Stay safe, stay efficient, and let us handle the snow.
How to Build Retaining Walls: Top Tips in 2024
How to build retaining walls is a frequently asked question, and for good reason. Retaining walls not only hold back soil to prevent erosion but also add visual interest to landscapes.
Quick Steps:
- Plan: Choose the location and design.
- Dig: Create a trench for the foundation.
- Base: Add gravel for stability.
- Build: Lay concrete blocks and add backfill.
- Finish: Pour concrete and cure properly.
Retaining walls come with numerous benefits. They help manage water flow, prevent landslides, and create usable space on hilly terrain. These walls can transform a sloped yard into a beautiful, functional area for gardens or patios.
When constructed properly, retaining walls not only improve the aesthetics of your property but also provide essential erosion control. They keep your landscape intact, even during heavy rains, making them a valuable investment for any homeowner.

How to build retaining walls terminology:
– how to build a retaining wall with blocks
– retaining wall ideas
Planning Your Retaining Wall
Before diving into how to build retaining walls, it’s crucial to plan effectively. Proper planning ensures your wall is both functional and durable.
Choosing the Right Location
First, identify the best location for your retaining wall. Consider the slope and drainage. A well-placed wall can prevent soil erosion and manage water flow.
- Slope: The ideal slope for a retaining wall is less than 35 degrees. Steeper slopes may require additional engineering.
- Drainage: Ensure the wall will direct water away from your home and other structures. Poor drainage can compromise the wall’s stability.
- Underground Utilities: Always call 811 before you dig. This service will mark any underground utilities to avoid accidents.
Obtaining Necessary Permits
Next, check local building codes and HOA restrictions. Some areas require permits for walls over a certain height, typically 3 or 4 feet.
- Local Building Codes: These codes ensure your wall is safe and compliant with local regulations. Ignoring them can result in fines or having to dismantle your wall.
- HOA Restrictions: Homeowners associations may have additional rules regarding the appearance and height of retaining walls.
Gathering Materials and Tools
Having the right materials and tools is vital for a successful project. Here’s what you’ll need:
Materials:
– Concrete Blocks: Choose blocks designed for retaining walls. Interlocking blocks are ideal for DIY projects.
– Gravel: Used for the base and backfill, gravel ensures stability and proper drainage.
– Paver Base: A layer of paver base will help keep your wall level.
– Landscape Fabric: This prevents soil from mixing with the gravel, maintaining drainage.
– Drainage Pipe: A perforated pipe helps manage water behind the wall.
Tools:
– Level: Ensures each row of blocks is even.
– Shovel: For digging the trench and moving materials.
– Tamper: Compacts the gravel base.
– Rubber Mallet: Helps position blocks without damaging them.
– Masonry Chisel: For cutting blocks to size.
– Circular Saw: Equipped with a diamond blade for precise cuts.
– Angle Grinder: Useful for smoothing edges.
– Construction Adhesive: Secures the top layer of blocks and capstones.
Safety Gear:
– Safety Glasses: Protect your eyes from debris.
– Safety Gloves: Prevent cuts and abrasions.
– Back Brace: Helps avoid injury when lifting heavy blocks.
By carefully planning your retaining wall project, you ensure a smoother building process and a more durable final product. Next, we’ll dive into preparing the ground to set a strong foundation for your wall.
Preparing the Ground
Before you lay the first block, you need a solid foundation. This involves excavation, digging a trench, leveling, and compacting the base. Let’s break it down.
Digging the Trench
Start by marking the wall’s dimensions with stakes and string. The trench should be deep enough to bury at least half the height of your first course of blocks plus 3 inches of paver base. Depending on your block size, this is typically 4 to 8 inches deep.
Width: The trench should be twice as wide as a single block. This extra width provides stability and room for adjustments.
Slope: If your wall will be on a slope, you may need to create steps in the trench to keep the top of the wall level. The wall should never run parallel to a slope as this can compromise stability.
Tools: Use a trenching shovel to dig. For larger projects, consider renting a skid steer to speed up the process.
Once dug, compact the trench with a hand tamper or a vibrating plate compactor. Compacting ensures a stable base, preventing future settling.
Laying the Base
The base is crucial for the wall’s stability. Follow these steps to lay a solid base:
- Gravel Layer: Pour a 2- to 3-inch layer of gravel into the trench. Choose gravel with stones sized between 1/2-inch and 3/4-inch for the best results.
- Distribution: Use a rake to spread the gravel evenly across the trench.
- Compaction: Tamp the gravel down with a hand tamper or a vibrating plate compactor. This step is vital to ensure the gravel is firmly packed.

- Leveling: Use a 4- or 6-foot level to check that the base is level lengthwise. For front-to-back leveling, use a torpedo level. Adjust as needed by adding or removing gravel.
Tip: If your trench is on a slope, make sure the base accounts for this by creating steps as necessary. This ensures the top of your wall will be level.
With the trench dug and the base laid, you’re ready to start building your retaining wall. A well-prepared ground sets the stage for a durable and stable structure. Next, we’ll move on to laying the first course of blocks.
Building the Retaining Wall
Laying the First Course of Blocks
The first course of blocks is the foundation of your retaining wall. Proper leveling and positioning are crucial for stability and longevity.
- Positioning: Start by placing the first block at one end of the trench. Use a rubber mallet to tap it into place.
- Leveling: Check both the front-to-back and side-to-side levels using a torpedo level. Adjust as needed by adding or removing gravel beneath the block.
- Gravel Fill: Once the first block is level, fill the hollow cores with gravel. This adds weight and stability.
- Tamping: Use a hand tamper to compact the gravel around the block.
Repeat this process for each block in the first course. Ensure each block is level with its neighbor to maintain a straight and stable base.
Adding Additional Courses
After laying the first course, you can start adding additional courses. Here’s how to do it:
- Staggering Blocks: For each new course, start with a half block to stagger the joints. This improves the wall’s strength and stability.
- Cutting End Blocks: Use a masonry chisel or circular saw to cut the end block in half. This will be your starting block for even-numbered courses.
- Interlocking: Place the blocks so they interlock with the course below. This provides additional security and helps the wall withstand pressure.
- Landscape Adhesive: Apply landscape adhesive between each course to bond the blocks together.
- Check for Level: As you add each course, use your level to ensure the wall remains straight and even.
Brush off any debris from the blocks before starting the next course to ensure a good adhesive bond.
Installing Drainage
Proper drainage is essential to prevent water pressure from building up behind the wall. Follow these steps:
- Drain Pipe: Lay a perforated drain pipe behind the first or second course of blocks. The pipe should extend the entire length of the wall.
- Drain Sleeve: Cover the pipe with a drain sleeve to prevent sediment from clogging it.
- Gravel Backfill: Pour gravel over the pipe to completely cover it. This helps water flow into the pipe and away from the wall.
If you live in an area with heavy rainfall, installing a drainage pipe is highly recommended.
Backfilling the Wall
Backfilling provides support to the wall and helps with drainage. Here’s how to do it:
- Gravel: After each course, backfill with gravel up to the height of the wall. This allows the gravel to settle naturally.
- Sand: If you prefer to use sand, cover the backside of the wall with landscape fabric first. This prevents the sand from seeping between the blocks.
- Tamping: Shovel in small portions of backfill material and tamp it down to eliminate hollow areas.
- Topsoil: Backfill up to slightly below the height of the wall, then fill the remaining space with topsoil or sod for planting.
Tip: Use well-draining soil mix to ensure excess water doesn’t accumulate behind the wall.
By following these steps, you’ll ensure your retaining wall is stable, well-drained, and ready to withstand the elements. Now, let’s move on to pouring the concrete.

Pouring the Concrete
Mixing the Concrete
To get a strong and durable retaining wall, you need to mix your concrete properly.
- Proportions: Use a mix of 1 part cement, 2 parts sand, and 3 parts gravel. Add water until the mixture reaches a thick, workable consistency.
- Consistency: The concrete should be like thick oatmeal. It should hold its shape but still be easy to pour.
- Tools: Use a wheelbarrow and a shovel for small batches. For larger projects, consider renting a concrete mixer.
Tip: Always wear protective gear like gloves, goggles, and a dust mask when mixing concrete.
Pouring the Concrete
Pouring concrete requires careful planning and execution.
- Formwork: Set up wooden forms to shape the wall. Make sure they are level and secure. Use stakes to hold the forms in place.
- Pouring: Start pouring the concrete into the forms, filling them about halfway. Use a shovel or hoe to spread it evenly.
- Leveling: Once the forms are half full, use a trowel to level the surface. This helps eliminate air pockets.
- Smoothing: After filling the forms completely, use a trowel to smooth the top. This will give your wall a neat finish.
Tip: Tap the sides of the forms with a hammer to help settle the concrete and remove air bubbles.
Curing the Concrete
Proper curing is crucial for the strength and durability of your wall.
- Time: Concrete needs to cure for at least 7 days. During this time, it will harden and gain strength.
- Moisture Control: Keep the concrete moist by spraying it with water daily. This prevents it from drying out too quickly and cracking.
- Protection: Cover the concrete with plastic sheeting to protect it from rain and extreme temperatures.
Tip: Avoid walking or placing heavy objects on the wall during the curing process.
By following these steps, you’ll ensure your concrete retaining wall is strong and long-lasting. Now, let’s move on to adding the finishing touches.
Finishing Touches
Adding Capstones
Capstones are the final touch to your retaining wall, giving it a polished look and extra stability.
- Brush Off Debris: Before applying capstones, clean the top layer of your wall to remove any dirt or debris.
- Apply Construction Adhesive: Use a strong construction adhesive to secure the capstones. Make sure the blocks are dry; otherwise, the adhesive won’t hold properly.
- Align and Overhang: Place each capstone carefully, ensuring they overhang the retaining blocks by about 1 to 1 1/2 inches. This gives a clean finish and helps shed water away from the wall.
- Check Alignment: Use a level to make sure the capstones are even. Adjust as needed to maintain a straight line.
Tip: Work in small sections to ensure the adhesive doesn’t dry before you place the capstones.
Landscaping Around the Wall
Improve the look of your retaining wall by adding some landscaping elements.
- Plants: Choose plants that thrive in your climate. Consider using a mix of ornamental grasses, shrubs, and flowering plants to add color and texture.
- Mulch: Spread mulch around the plants to help retain moisture and reduce weeds. Mulch also gives a neat, finished look to the garden.
- Decorative Stones: Use decorative stones or gravel to cover the ground around the wall. This not only looks good but also helps with drainage.
- Sod or Topsoil: If you have a lawn, replace the topsoil and sod in front of the wall. Ensure the soil is well-draining to prevent water buildup.
Tip: Consider adding climbing plants or succulents to make the wall look like a natural extension of your garden.
Maintenance Tips
Proper maintenance ensures your retaining wall remains sturdy and attractive for years.
- Regular Inspection: Check your wall periodically for any signs of wear or damage, such as cracks or shifting blocks.
- Repairs: Address any issues immediately. Small cracks can often be filled with mortar, while larger problems may require professional help.
- Drainage Upkeep: Ensure the drainage system remains unclogged. Check the perforated drain pipe and remove any debris that might block water flow.
- Tamping and Refill: If you notice settling or hollow areas behind the wall, add more backfill material and tamp it down to maintain stability.
Tip: Keep an eye on the landscaping around the wall. Overgrown roots can push against the wall and cause damage.
By following these finishing touches and maintenance tips, your retaining wall will not only look great but also stand the test of time. Up next, we’ll address some frequently asked questions about building retaining walls.
Frequently Asked Questions about How to Build Retaining Walls
Can I build a retaining wall myself?
Yes, you can build a retaining wall yourself, especially if it’s under 3 feet tall. For walls higher than this, it’s often best to hire professionals. Taller walls need specific engineering to handle the pressure from the soil behind them. Plus, local building codes may require permits and inspections for higher walls.
Tip: Always check with your local building department before starting your project to ensure you’re following regulations.
What is the easiest retaining wall to build?
The easiest type of retaining wall to build is one made from interlocking concrete blocks. These blocks are designed to fit together without the need for mortar, making them straightforward to assemble.
Here are some options:
- Concrete Blocks: These are sturdy and durable. They come in various shapes and sizes, making them versatile for different designs.
- Interlocking Blocks: These have a lip or groove that helps them lock together, providing extra stability.
- Large Pavers: These are another good option, though they may require more effort to move due to their size.
Tip: Choose blocks that are designed for DIY projects to make the process smoother.
Does a 3-foot retaining wall need drainage?
Generally, a 3-foot retaining wall does not require a drainage system, but this depends on the soil type and water sources around your wall. Proper drainage is crucial to prevent water pressure from building up behind the wall, which can cause it to fail over time.
Consider these factors:
- Soil Type: Clay soil retains water and can increase pressure on the wall, so drainage may be necessary. Sandy soil drains too quickly and may not provide enough support.
- Water Sources: If your wall is near a downspout or an area prone to heavy rain, adding a drainage pipe is a good idea.
Tip: Even if drainage isn’t required, adding gravel behind the wall can help water move away from the structure, increasing its lifespan.
By understanding these key points, you can confidently approach your retaining wall project and ensure it stands the test of time.
Conclusion
Building a retaining wall can be a rewarding DIY project, especially if you follow our step-by-step guide. However, for more complex projects or walls taller than 3 feet, hiring professionals ensures safety and longevity.
At Marchi Paving Inc., we specialize in high-quality retaining wall construction that stands the test of time. Our team has over 30 years of experience, ensuring each project is executed with precision and care.
Benefits of Choosing Marchi Paving Inc.
Expertise and Quality: Our skilled professionals handle every aspect of the project, from planning to execution. We use premium materials and advanced equipment to deliver durable and aesthetically pleasing results.
Local Knowledge: Being a local business in Chelmsford, MA, we understand the specific needs and challenges of our community. Our custom solutions ensure that your retaining wall not only looks great but also performs well under local conditions.
Comprehensive Services: We offer a range of hardscaping services, including retaining wall construction, patios, and walkways. Whether you need a small garden wall or a large structural retaining wall, we have the expertise to get it done.
Contact Information
Ready to start your retaining wall project? Contact us today for a detailed quote and experience the Marchi Paving difference.
- Website: Marchi Paving Inc.
- Address: Chelmsford, MA
We look forward to helping you bring your vision to life with our expert masonry services. For more tips and guides on how to build retaining walls, visit our website and explore our resources.
Let us make your outdoor space both beautiful and functional!
Drainage and Excavation Services Near Me: Top 5 Picks 2024
Understanding Drainage and Excavation Services Near Me
If you’re looking for drainage and excavation services near me, you’ve come to the right place. Finding reliable and expert contractors to handle everything from water line repairs to site grading can be a game changer for your project.
Quick Picks for Drainage and Excavation Services:
1. Marchi Paving Inc.: Expert in sewer line replacement and water line repairs in Chelmsford, MA.
2. Expert Excavation Services: Offers diagnostic, customized repair, and execution services.
3. Reliable Drainage Solutions: Specializes in pipe replacement and septic tank services.
4. Quality Concrete Works: Known for clean jobs like fence repair and porch replacement.
5. Lawn & Landscape Care: Provides quick service and reasonable pricing for lawn care.
Drainage and excavation are critical for maintaining a property’s foundation and ensuring proper water management. Whether you’re planning a new construction, renovating an existing structure, or addressing a flooding issue, these services are essential.
Why These Services Matter:
– Prevent Water Damage: Proper drainage prevents water from seeping into foundations and causing damage.
– Improve Property Value: Efficient excavation lays the groundwork for safe, durable construction projects.
– Ensure Safety: Proper site preparation and water management systems reduce the risk of accidents and structural failures.
Key Services Available:
– Sewer and Water Line Repairs
– Site Grading and Leveling
– Foundation Excavation
– Septic Tank Installation and Repair
– Custom Drainage Solutions

Handy drainage and excavation services near me terms:
– best excavation services near me
– excavator repair service near me
– mini excavator service near me
Top Drainage and Excavation Services Near Me
Marchi Paving Inc. is known for its top-notch sewer line replacement and water line repairs. Located in Chelmsford, MA, this company has built a strong reputation over the last 20 years for delivering high-quality services. They handle a wide range of projects, from road paving to utility installations.

Reliable Drainage Solutions specializes in pipe replacement and septic tank services. They focus on providing effective drainage solutions that prevent water damage and ensure the longevity of your property.
Quality Concrete Works is renowned for their clean jobs on projects like fence repair and porch replacement. They take pride in their meticulous work and attention to detail, ensuring every project is completed to the highest standard.
For those seeking quick and reasonably priced services, Lawn & Landscape Care is a top pick. They offer a range of services including lawn care, ensuring your landscape looks its best.

Finding the right drainage and excavation services near me can make all the difference in your project’s success. Whether you need sewer line repairs, custom drainage solutions, or quick lawn care, these top picks have you covered.
Average Costs of Drainage and Excavation Services
Understanding the costs associated with drainage and excavation services can help you budget effectively and avoid surprises. Here’s a breakdown of what you can expect:
Drainage System Costs
Installing a drainage system can vary widely in cost based on the type and complexity of the project.
- Landscaping Drainage: Basic landscaping drainage solutions, like simple yard drains, typically cost between $1,600 and $13,000. Factors such as soil type and trench length can impact the final price.
- French Drains: French drains are a popular choice for homeowners dealing with water issues. Exterior French drains cost $10 to $50 per linear foot, while interior systems are more expensive, ranging from $40 to $100 per linear foot. The total cost usually falls around $6,200 on average.
- Sewer Line Repair: Repairing or replacing a sewer line is another common drainage project. Costs for this can range from $1,500 to $4,000, depending on the extent of the damage and the length of the pipe.

Excavation Costs
Excavation costs can also vary based on several factors, including the project size, soil type, and equipment used.
- Per Cubic Yard: On average, excavation costs range from $2.50 to $15.00 per cubic yard.
- Per Hour: Hiring a trained operator with their own equipment typically costs $100 to $300 per hour. If you rent a mini excavator separately, expect to pay $50 to $150 per hour for the operator.
Common excavation projects include:
- In-Ground Swimming Pools: Digging an in-ground pool costs between $1,000 and $5,000.
- Driveways or Patios: Excavating for a driveway or patio ranges from $1,000 to $2,500.
- Basements for New Construction: Costs for digging a basement can be as high as $10,000.
- Foundation Pads for New Homes: Similar to basements, foundation pads also range from $1,500 to $10,000.
Additional Costs
Several additional costs can arise during drainage and excavation projects:
- Permits: Depending on your location, permits can cost between $100 and $750. Always check local regulations to ensure compliance.
- Equipment Fees: Renting specialized equipment like backhoes can add significantly to your budget. For instance, renting a backhoe can cost $200 to $400 per day.
- Site Cleanup: After the excavation or drainage work is complete, site cleanup and debris removal can add to the costs. These services can range from $100 to $300.
- Fill Dirt and Topsoil: If your project requires additional fill dirt or topsoil, expect to pay $12 to $30 per cubic yard.

Understanding these cost factors can help you plan and budget effectively for your drainage and excavation needs. Next, let’s explore how to choose the best drainage and excavation services near me to ensure your project is in good hands.
How to Choose the Best Drainage and Excavation Services Near Me
When searching for the best drainage and excavation services near me, it’s crucial to do your homework. Here are some key steps to guide you:
Get Multiple Quotes
Compare estimates from different service providers. This will give you a sense of the market rate and help you avoid overpaying. Make sure the quotes are detailed, covering all aspects of the job, from labor to materials.
- On-Site Visits: Request on-site visits for accurate quotes. This allows contractors to assess the project scope and provide a more precise estimate.
- Detailed Contracts: Ensure that the contract is detailed and includes timelines, costs, and specific services. This will protect you from unexpected expenses and delays.
Check Certifications and Insurance
Hiring a certified and insured contractor is non-negotiable. It ensures that the work will be done to industry standards and protects you from liability in case of accidents.
- Erosion Control: Verify that the contractor is knowledgeable about erosion control measures to prevent soil erosion during and after the project.
- Licensed and Bonded: Make sure the contractor is licensed and bonded. This adds an extra layer of security, ensuring that the company is legitimate and financially stable.
Read Reviews and Testimonials
Online reviews and testimonials can provide valuable insights into a contractor’s reliability and quality of work.
- HomeGuide and Google: Check platforms like HomeGuide and Google for reviews. Look for consistent high ratings and read both positive and negative feedback to get a balanced view.
- Customer Feedback: Pay attention to customer feedback regarding communication, punctuality, and problem-solving skills. Reliable contractors should have a track record of satisfied customers.
By following these steps, you can find a trustworthy contractor to handle your drainage and excavation needs. Next, let’s answer some frequently asked questions to help you make an informed decision.
Frequently Asked Questions about Drainage and Excavation Services
How Deep Should Excavation Be for Drainage?
The depth of excavation for drainage depends on the type of system you need. For general yard drainage, the trench should be at least 18 inches deep. This depth is enough to manage surface water and prevent pooling.
- Soil Wetness: If the soil is particularly wet, you might need a deeper trench to ensure proper drainage.
- Trench Depth: For foundation drains or retaining walls, the trench should reach the footing level of the foundation, which can be several feet deep.
Proper depth is crucial for effective drainage. An incorrectly sized trench can lead to poor water flow and potential flooding issues.
What is the Reason for Excavation?
Excavation is essential for various construction and landscaping projects. Here are the main reasons:
- Site Preparation: Before building, the land must be cleared and leveled. This ensures a stable foundation.
- Foundation Stability: Excavation helps create a solid base for structures, preventing future settling or shifting.
- Construction Process: Whether it’s for a new home, a driveway, or an inground pool, excavation is the first step in the construction process.
Without proper excavation, your project can face structural issues down the line.
Can Excavation Be Done in the Winter?
Excavation can be done in the winter, but it’s generally not recommended in snowy areas. Here are some considerations:
- Snow Impact: Thawing snow can cause shifting earth or drainage issues later on. This makes it risky to excavate during snowy months.
- Best Time: The best time for excavation is in the spring after the snow has thawed and the water has drained or evaporated.
- Regional Considerations: In areas without snow, excavation can be done year-round. However, always consider local weather conditions and soil types.
Choosing the right time for excavation can save you from potential complications and additional costs.
By understanding these common questions, you’ll be better prepared to tackle your drainage and excavation projects. For expert assistance, always consult with professionals who can provide custom solutions based on your specific needs.
Conclusion
When it comes to drainage and excavation services near me, Marchi Paving Inc. stands out as a top choice in Chelmsford, MA and beyond. With over two decades of experience, we pride ourselves on delivering high-quality execution for every project we undertake.
High-Quality Execution
At Marchi Paving Inc., our commitment to excellence is evident in every job we do. Whether it’s sewer line replacement or water line repairs, we approach each project with meticulous attention to detail. Our team of seasoned professionals ensures that every task is completed to the highest standards, guaranteeing customer satisfaction.
Advanced Equipment
We understand that having the right tools is crucial for efficient and effective work. That’s why we maintain a robust fleet of over 20 pieces of advanced equipment. This enables us to handle projects of various sizes, from small residential jobs to large commercial undertakings. By keeping all work in-house, we maintain strict control over the quality and timeline of each project.
For more information about our services, visit our excavation services page. We are here to meet all your construction needs with professionalism and expertise.
Choosing Marchi Paving Inc. means choosing reliability, quality, and a partner dedicated to exceeding your expectations. Whether you’re dealing with drainage issues or need extensive excavation work, we’re here to help. Contact us today to discuss your project and find why we’re the preferred choice for so many in Chelmsford, MA.
Excavator Service Near Me: Top 3 Trusted Providers 2024
Finding Quality Excavator Services Near You
Looking for excavator service near me? You’ve come to the right place! Whether you’re managing a property in Middlesex County, MA, or a homeowner in need of reliable excavation services, finding a dependable provider can be challenging. But don’t worry—we’ve got you covered.
Here’s a quick snapshot of top excavation service providers near you:
- Marchi Paving Inc.
Excavation is essential for a variety of projects, from building foundations to landscaping. Efficient and precise excavation services not only save time but also ensure safety and stability.
In this guide, we’ll dig into the types of excavation services available, introduce you to the top local provider, and explain what to consider when selecting a service. Let’s get started!

Terms related to excavator service near me:
– dirt work near me
– dozer work near me
– excavator companies near me
Types of Excavation Services
When it comes to excavation, knowing the different types of services available can help you choose the right one for your project. Here are some common types of excavation services you might need:
Topsoil Excavation
Topsoil excavation involves removing the uppermost layer of soil, which is rich in organic material. This type of excavation is often used for landscaping, gardening, and preparing sites for construction.
Example: Imagine you’re planning to build a new garden. The first step is to remove the top layer of soil to get rid of any debris and prepare the land for planting.
Earth Excavation
Earth excavation goes deeper than topsoil excavation. It involves removing the soil beneath the top layer, which is necessary for creating foundations, basements, and other structures.
Example: For building a house, earth excavation is crucial to create a stable foundation. This process ensures that the structure will be safe and secure.
Rock Excavation
Rock excavation is one of the most challenging types of excavation. It involves breaking and removing large rocks and boulders from a site. This type of excavation is often required in areas with rocky terrain.
Example: If you’re constructing a building on rocky ground, rock excavation will be necessary to clear the site and make it suitable for construction.
Mechanical Excavation
Mechanical excavation uses heavy machinery like backhoes, bulldozers, and excavators to remove large amounts of soil and rock quickly. This method is efficient and often used for large-scale projects.
Example: For a commercial construction project, mechanical excavation can speed up the process and handle large volumes of earth and rock efficiently.
Vacuum Excavation
Vacuum excavation is a non-destructive method that uses high-powered suction to remove soil and debris. This technique is ideal for working around underground utilities without causing damage.
Example: When installing new utility lines, vacuum excavation can safely expose existing pipes and cables without risking damage to them.
Understanding these types of excavation services can help you make informed decisions for your project. Whether you need to prepare a site for construction, create a garden, or install utilities, choosing the right type of excavation is crucial.

Next, let’s explore the top providers of excavator services near you and what sets them apart.

Top Providers of Excavator Services Near Me
When searching for excavator service near me, choose a provider known for reliability, expertise, and quality service. Here are some top providers in the Chicago area:
Marchi Paving Inc.
Marchi Paving Inc. is a trusted provider of excavation services, known for their commitment to excellence. Their expertise extends across various excavation types, ensuring your project is in capable hands.
Key Highlights:
– Comprehensive Services: From topsoil excavation to deep excavation, Marchi Paving covers all your needs with specialized techniques and equipment.
– Modern Equipment: They use the latest technology to deliver precise and efficient excavation services.
– Customer Focus: Marchi Paving is dedicated to ensuring customer satisfaction, providing personalized solutions for each project.

Next, let’s explore the factors that influence the duration and cost of excavation projects.
Factors Influencing Excavation Duration and Cost
When planning an excavation project, several factors can significantly influence both the time required and the overall cost. Understanding these elements can help you better prepare and budget for your project.
Project Size
The size of the project is a primary factor affecting both duration and cost. Larger projects naturally require more time and resources. For example, grading a five-acre site for a new parking lot will take considerably longer and cost more than digging a small basement.
Soil Quality
Soil composition and stability also play crucial roles. Dense or rocky soils may require specialized heavy equipment and additional labor, increasing both time and costs. Conversely, loose or sandy soils may be easier and quicker to excavate.
Manual vs. Heavy Machinery
The choice between manual labor and heavy machinery can significantly impact the project timeline. While manual excavation may be more cost-effective for small projects, it is time-consuming. On the other hand, heavy machinery can expedite the process but comes at a higher cost.
Landscaping Features
Existing landscaping features, such as trees, boulders, or underground utilities, can complicate excavation. Removing these obstacles requires additional time and specialized equipment, increasing costs.
Permits
Obtaining the necessary permits is a critical step that can affect both the duration and cost of your project. In Chicago, for instance, you may need multiple permits depending on the scope of the excavation. Delays in permit approval can postpone the start of your project, adding to the timeline and potentially increasing costs.
Additional Costs
- Site Preparation and Cleanup: Clearing vegetation and removing debris add to the overall cost.
- Environmental Considerations: Special measures to protect the environment can also increase expenses.
Understanding these factors will help you get a more accurate estimate and timeline for your excavation project.
Next, let’s dig into what you need to know about deep excavation.
Deep Excavation: What You Need to Know
Deep excavation is a specialized process involving digging to significant depths, often for foundations, basements, or underground parking structures. It requires careful planning, advanced techniques, and stringent safety measures to ensure the stability and safety of the site.
Definition
Deep excavation generally refers to any excavation deeper than 6 feet. This type of excavation is common in urban areas like Chicago, where space constraints necessitate building downwards rather than outwards.
Techniques
Several techniques are used in deep excavation:
- Sheet Piling: Steel sheets are driven into the ground to support the excavation walls and prevent soil collapse.
- Diaphragm Walls: Concrete walls constructed in sections around the excavation site to provide structural support.
- Secant Pile Walls: Overlapping concrete piles drilled to form a continuous wall.
- Bracing and Anchoring: Internal supports like struts or tiebacks to stabilize the excavation.
Safety Measures
Safety is paramount in deep excavation. Here are key safety measures:
- Shoring and Bracing: Properly designed shoring systems prevent cave-ins and protect workers.
- Monitoring Systems: Instruments to monitor ground movement and ensure the stability of adjacent structures.
- Protective Gear: Workers must wear helmets, gloves, and other protective equipment.
- Regular Inspections: Frequent site inspections to identify and mitigate potential hazards.
Equipment
Deep excavation requires specialized equipment, including:
- Excavators with Long Reach Arms: These machines can dig deeper and are ideal for confined spaces.
- Hydraulic Trenchers: Effective for creating narrow, deep trenches.
- Cranes: Essential for lifting heavy materials and equipment.
- Concrete Pumps: Used for constructing diaphragm walls and other concrete structures.
Understanding these elements of deep excavation helps ensure your project is completed safely and efficiently. Proper planning, using the right techniques, and adhering to safety protocols are crucial for success.
Next, we’ll discuss how to prepare your site for excavation.
Preparing Your Site for Excavation
Proper site preparation is crucial for a smooth excavation process. Here are the essential steps you need to take:
Site Preparation
Clear the Area: Remove any objects that aren’t fixed to the ground. This includes walkways, decks, and patios. Clearing the area can save time and reduce labor costs.
Access for Machinery: Ensure the site is accessible for heavy machinery like excavators and bulldozers. This means removing any obstacles that could hinder equipment movement.
Safety First: Make sure the site is safe for workers and machinery. This includes removing any hazardous materials and ensuring the ground is stable.
Utility Line Checks
Call 311: Before starting any excavation, check for underground utility lines. Dial 311 to get information on the location of water, gas, and electrical lines. This prevents accidental damage and ensures safety.
Mark the Lines: Once you have the information, mark the utility lines clearly on the site. This helps the excavation team avoid these areas.
Permits
Check with Local Building Department: Different areas have different regulations. Confirm if you need permits for your specific project. Not having the necessary permits can result in fines or delays.
Submit Applications Early: Permits can take time to process. Submit your applications well in advance to avoid any hold-ups in your project timeline.
Hardscaping Removal
Move Hardscaping Elements: Remove any hardscaping elements like stone pathways, retaining walls, or garden features. This makes the excavation process easier and faster.
Dispose of Waste Properly: Make sure to dispose of any debris or waste materials in accordance with local regulations. This keeps the site clean and safe for the excavation team.
By focusing on these factors—site preparation, utility line checks, permits, and hardscaping removal—you can ensure your project runs smoothly and safely. Proper preparation saves time, money, and stress, making the excavation process more efficient.
Next, we’ll address some frequently asked questions about excavator services near me.
Frequently Asked Questions about Excavator Services Near Me
What are the three types of excavation?
Topsoil Excavation: This is the removal of the uppermost layer of soil, usually rich in organic matter. It’s often done to prepare land for construction or landscaping. Removing topsoil helps create a stable base for foundations or other structures.
Earth Excavation: This involves digging deeper than the topsoil to remove earth layers. It’s commonly used for creating foundations, basements, and other underground structures. Earth excavation is essential for projects that require significant soil removal.
Rock Excavation: This type involves breaking and removing rocky layers using heavy machinery or explosives. It’s typically needed for construction projects in areas with hard rock formations. Rock excavation is more challenging and costly due to the need for specialized equipment and techniques.
How long does excavation take?
Project Size: The duration of an excavation project largely depends on its size. Larger projects, like commercial buildings, will naturally take more time than smaller residential projects.
Soil Quality: The type of soil also affects the excavation time. Soft, sandy soils are easier and quicker to excavate compared to hard, clayey, or rocky soils. Soil with a lot of roots or debris can also slow down the process.
Manual vs. Heavy Machinery: Using heavy machinery like excavators and bulldozers significantly speeds up the excavation process compared to manual digging. However, in tight spaces or delicate areas, manual labor might be necessary, which takes more time.
What is classed as a deep excavation?
Definition: Deep excavation refers to any excavation deeper than 4.5 meters (approximately 15 feet). These projects require careful planning and specialized techniques to ensure safety and stability.
Depth Criteria: The depth of excavation can vary depending on the project. For example, constructing a multi-story building or installing large underground utilities often requires deep excavation.
Deep excavations involve more complex safety measures and equipment. Shoring systems, trench boxes, and other support structures are often used to prevent collapses and ensure worker safety.
Conclusion
At Marchi Paving Inc., we pride ourselves on delivering top-notch excavation services custom to meet your specific needs. Our extensive experience and commitment to excellence ensure that every project, big or small, is handled with utmost professionalism and efficiency.
Why Choose Marchi Paving Inc.?
Customer Satisfaction: Our primary goal is to exceed your expectations. We have built a stellar reputation based on the superb quality of our work, honesty, and superior service. Whether you’re a retailer, property manager, or homeowner association, we treat every client with the same level of dedication and respect.
Advanced Equipment: We use state-of-the-art equipment to ensure precision and efficiency in all our excavation projects. From scrapers and bulldozers to front-end loaders and dump trucks, our fleet is equipped to handle any challenge, whether it’s a simple topsoil excavation or a complex deep excavation.
Comprehensive Services: Our range of services goes beyond excavation. We offer grading, asphalt paving, sewer repairs, and much more. This means you can rely on us for all your construction and paving needs, making the process smoother and more cohesive.
Proven Expertise: With over 46 years in the business, we have the knowledge and experience to tackle any project. Our team is skilled in various excavation techniques and safety measures, ensuring that your project is completed on time and within budget.
Ready to start your next excavation project? Contact us today for a free quote and let Marchi Paving Inc. be your trusted partner in delivering high-quality excavation services.
What Type of Contractor Builds Retaining Walls: Top 5 Expert Tips
Why Choosing the Right Retaining Wall Contractor is Important
Selecting the right contractor is the first and most crucial step in building a retaining wall. What type of contractor builds retaining walls? Typically, retaining walls are built by:
- Landscape contractors
- Landscape architects
- Civil engineers
- Structural engineers
Retaining walls do more than just hold back soil; they add both aesthetic appeal and structural integrity to your property. A well-constructed retaining wall can transform your landscape, manage erosion, and increase property value. However, getting the right contractor is essential to ensure the job is done correctly and lasts for years to come.
Missteps in contractor selection can lead to poor-quality work, project delays, and costly repairs. In some cases, it can even result in safety issues. As a property manager or homeowner, your goal is to avoid these pitfalls by choosing a qualified and dependable contractor.
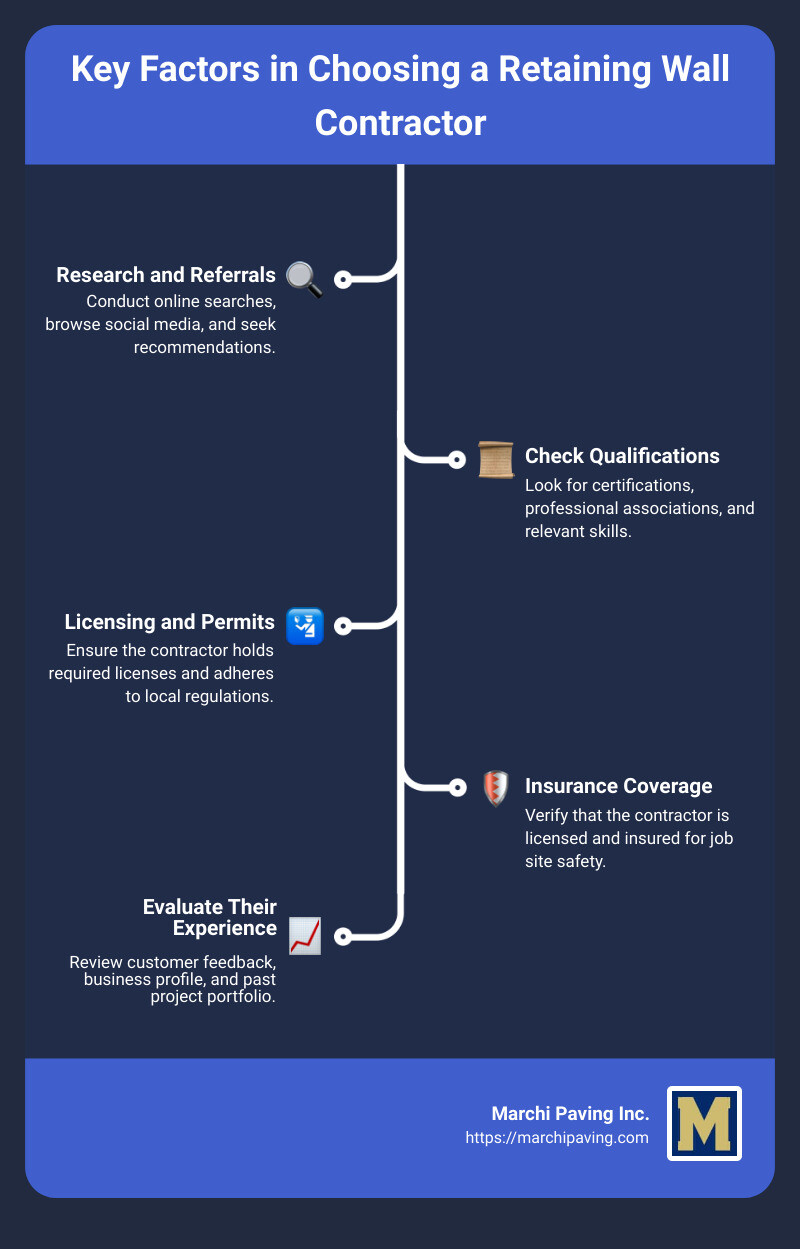
Simple what type of contractor builds retaining walls word guide:
– retaining wall builders near me
– retaining wall contractors near me
– retaining wall repair near me
What Type of Contractor Builds Retaining Walls?
When it comes to building retaining walls, several types of professionals can be involved. Each brings unique skills to the table, ensuring your project is both functional and visually appealing. Let’s break down the roles of landscape contractors, landscape architects, civil engineers, and structural engineers.
Landscape Contractors
Landscape contractors are often the go-to professionals for the construction and installation of retaining walls. They specialize in hardscape elements like patios, walkways, and, of course, retaining walls.
Key responsibilities:
– Construction and Installation: They handle the physical building of the wall, ensuring it is sturdy and well-constructed.
– Material Selection: They can source and recommend the best materials for your project, whether it’s stone, brick, or concrete blocks.
– Site Preparation: They prepare the site by clearing land, grading, and ensuring proper drainage.

Landscape Architects
Landscape architects focus more on the design and planning aspects of your retaining wall. They ensure that the wall not only serves its functional purpose but also blends seamlessly into the overall landscape design.
Key responsibilities:
– Comprehensive Landscape Design: They create a cohesive design plan that includes the retaining wall as part of the larger landscape.
– Planning and Management: They oversee the project from the initial design phase through to completion, coordinating with other professionals as needed.
– Aesthetics and Functionality: They ensure the wall is both beautiful and functional, considering factors like drainage and plant selection.
Civil and Structural Engineers
For larger or more complex projects, the expertise of civil engineers and structural engineers is invaluable. These professionals ensure that your retaining wall is structurally sound and built to last.
Key responsibilities:
– Structural Stability: They conduct engineering design and calculations to ensure the wall can withstand the pressures exerted by the soil and other forces.
– Geotechnical Evaluation: They assess the soil and site conditions to determine the best construction methods and materials.
– Compliance with Regulations: They ensure the project complies with local building codes and regulations, which is especially important for walls over 4 feet high.

In summary, what type of contractor builds retaining walls depends on the scope and complexity of your project. For straightforward projects, a landscape contractor may suffice. For more intricate designs or larger walls, you’ll likely need the expertise of landscape architects and engineers.
Next, let’s dive into the key factors to consider when choosing a retaining wall contractor.
Key Factors to Consider When Choosing a Retaining Wall Contractor
When selecting a retaining wall contractor, you want to ensure you’re partnering with someone who is knowledgeable, experienced, and reliable. Here are the key factors to consider:
Research and Referrals
Start by researching local retaining wall contractors online. Use search engines, social media, and online directories like the Chamber of Commerce.
Ask for recommendations from friends, family, neighbors, or colleagues who have had similar projects done. Word-of-mouth can be incredibly valuable. For instance, one homeowner noted, “Great communication, awesome work, and cleaning up at the end of every day” when praising a contractor. This kind of feedback is invaluable.
Check Qualifications
Verify that the contractor has relevant qualifications and certifications in construction, engineering, or landscaping. Look for memberships in professional associations related to retaining wall construction. These credentials indicate a commitment to industry standards and continuous learning.
Licensing and Permits
Ensure the contractor holds the required licenses to operate in your area. Retaining wall construction involves more than just stacking blocks; it requires careful estimation and engineering. Check local regulations and building codes to confirm that the contractor is compliant.
Insurance Coverage
Make sure the contractor is licensed and insured. This protects you from liabilities in case of accidents or damages during the project. Insurance coverage should include both liability insurance and workers’ compensation.
Fact: Most liability coverage does NOT include coverage for incorrect or bad work. Always verify the specifics of the contractor’s insurance.
Evaluate Their Experience
Look at the contractor’s business profile for customer reviews and ratings. A solid track record can give you confidence in their ability to deliver quality work. Check if they have a portfolio of past projects, including retaining walls similar to what you envision.
Invite potential contractors to visit your property and assess the project site. Discuss your project’s vision, how you hope to use the space, and identify any potential challenges. This site visit can help you gauge their expertise and suitability for your project.
Example: One client had a 1910s brick building that needed tuckpointing after a nearby demolition. The contractor’s quick and professional work left the client highly satisfied. This kind of experience is crucial when evaluating potential contractors.
In summary, thorough research and careful evaluation of qualifications, licenses, insurance, and experience are essential steps in choosing the right retaining wall contractor. Next, let’s explore the steps for selecting a retaining wall contractor.
Steps for Selecting a Retaining Wall Contractor
Site Visit and Assessment
Before you commit to a contractor, invite them for a site visit. This allows them to assess the project area and understand your vision. Discuss how you plan to use the space and any challenges that might arise, such as soil erosion or drainage issues.
Tip: During the site visit, ask the contractor questions about drainage, compaction, and gravel placement. These are critical for a stable and long-lasting retaining wall.
A thorough assessment ensures the contractor understands the scope and can provide accurate recommendations.
Detailed Estimates
After the site visit, obtain detailed estimates from multiple contractors. A good estimate should be clear and comprehensive, covering all aspects of the project. Be cautious of estimates that are vague or significantly lower than others. These might indicate the use of inferior materials or unreliable service.
Fact: According to Forbes, labor costs for building retaining walls can vary significantly. Ensure the estimate includes a breakdown of material and labor costs.
Compare the quotes carefully and ask for clarification on any unclear points. This will help you identify the most reliable contractor.
Contract and Warranty
Once you’ve selected a contractor, ensure all project details are outlined in a written contract. This should include:
- Project Scope: Detailed description of the work to be done.
- Timeline: Start and end dates for the project.
- Payment Terms: Clear terms regarding payment schedules and amounts.
- Warranty Coverage: Information on the warranty for both materials and workmanship.
Example: A homeowner in Raleigh, NC, was pleased with a contractor who provided a detailed contract and stuck to the timeline. The project was completed on time and within budget, thanks to clear communication and expectations set upfront.
Having a well-defined contract protects both you and the contractor and ensures the project proceeds smoothly.
In summary, the site visit and assessment, detailed estimates, and a clear contract with warranty coverage are crucial steps in selecting the right retaining wall contractor. These steps help ensure that your project is completed to your satisfaction and stands the test of time.
Benefits of Hiring a Qualified Retaining Wall Contractor
Network of Contacts
Hiring a qualified retaining wall contractor comes with the advantage of their extensive network of contacts. These professionals have spent years building relationships with wholesale material suppliers. This means they know where to find the best rock and other materials needed for your project.
Example: A contractor working on a project in The Woodlands, TX, was able to source high-quality natural stone at a fraction of the retail cost due to their long-standing relationship with a supplier. This not only saved the homeowner money but also ensured the wall’s durability and aesthetic appeal.
Training and Experience
Professional contractors bring a wealth of training and experience to the table. They have the skills necessary to ensure your retaining wall is built to last. This includes knowledge of proper drainage techniques, compaction, and material selection.
Fact: According to Forbes, poorly constructed retaining walls can fail, leading to costly repairs. Hiring a professional reduces this risk significantly.
With a qualified contractor, you can trust in the quality and durability of the construction. They are trained to handle various challenges that might arise, such as soil erosion or drainage issues, ensuring your wall remains stable for years.
Stress Relief
One of the most significant benefits of hiring a professional contractor is the stress relief it provides. Constructing a retaining wall is a complex and time-consuming task. Attempting to do it yourself can be overwhelming and lead to subpar results.
Quote: “Rather than going through the stress and time-consuming process of designing and building a retaining wall, contact a reputable contractor to handle the job for you,” suggests a professional from Sequoia Stonescapes.
By hiring a contractor, you avoid the hassle of sourcing materials, managing the construction, and ensuring compliance with local building codes. Professionals handle all these aspects, saving you time and effort.
Tip: Always ensure your contractor is licensed and insured to protect yourself from potential liabilities.
In summary, hiring a qualified retaining wall contractor provides access to a network of contacts, professional training and experience, and significant stress relief. This ensures your project is completed efficiently and to a high standard, allowing you to enjoy the benefits of a well-constructed retaining wall without the headaches of DIY construction.
Frequently Asked Questions about Retaining Wall Contractors
Do I Need a Structural Engineer to Design a Retaining Wall?
Yes, you might need a structural engineer, especially for taller walls. Building codes often require walls over a certain height (usually 4 feet) to be designed by a structural engineer. This ensures the wall can handle the soil pressure and any additional loads.
Fact: According to Forbes, retaining walls must rest on a stable footing, usually concrete, which should be twice as wide as the wall’s width for stability.
Engineered specs are crucial for structural support and safety. A structural engineer will assess the site conditions, soil type, and load requirements to design a safe and durable wall.
Who Should Design a Retaining Wall?
The design of a retaining wall can involve several professionals:
- Wall Design Engineer: Specializes in creating detailed plans and specifications for retaining walls.
- Site Civil Engineer: Focuses on the overall site design, including grading and drainage.
- Geotechnical Engineers: Evaluate soil conditions and ensure the foundation is appropriate for the wall.
Example: In Ontario, Canada, retaining walls often require comprehensive design to manage water flow and prevent soil erosion, as poorly designed walls can lead to significant water damage and mold issues.
What is the Most Cost-Effective Way to Build a Retaining Wall?
Cost-effectiveness depends on materials and methods:
- Poured Concrete: Durable and strong, but can be expensive due to labor and material costs.
- Pressure-Treated Pine: One of the cheapest options, but not as long-lasting as stone or concrete.
- Granite: Offers high durability and aesthetic appeal but comes at a higher cost.
Statistic: Retaining walls made of masonry materials can last from 50 to 100 years, while wood walls can last up to 40 years.
For DIY enthusiasts, small concrete blocks are the easiest to install and can be cost-effective for walls below 4 feet, avoiding the need for permits and inspections.
In the next section, we’ll guide you through the steps for selecting the right retaining wall contractor to ensure your project is a success.
Conclusion
Choosing the right contractor for your retaining wall is crucial for ensuring the longevity and safety of your project. Let’s recap the key points and emphasize why hiring a professional contractor is essential.
Summary
When it comes to what type of contractor builds retaining walls, several professionals can be involved. Landscape contractors handle the construction and installation, while landscape architects focus on design and planning. Civil and structural engineers ensure the structural stability and safety of the wall.
Importance of Professional Contractors
Hiring a professional contractor offers numerous benefits:
- Quality and Durability: Professional contractors have the training and experience to build retaining walls that last. According to Quora, well-constructed retaining walls outperform poorly constructed ones every time.
- Stress Relief: Building a retaining wall can be stressful and time-consuming for homeowners. A professional contractor takes on the responsibility, allowing you to avoid the hassle and focus on other things.
- Access to Materials: Contractors have established relationships with wholesale suppliers, which means they can get better deals on materials. This not only saves you money but also ensures the use of high-quality materials.
- Safety and Compliance: Professionals are familiar with local building codes and regulations. This ensures that your retaining wall is built safely and in compliance with all legal requirements.
Marchi Paving Inc.
At Marchi Paving Inc., we pride ourselves on delivering high-quality retaining wall construction services. With over 20 years of experience, our team of skilled professionals ensures that every project is completed to the highest standards.
Why Choose Marchi Paving Inc.?
- Expertise: Our team includes experienced landscape contractors, landscape architects, and engineers who work together to design and build the perfect retaining wall for your property.
- Customer Satisfaction: We have a long list of satisfied customers who can attest to the quality of our work. Check out our hardscaping services to see what we can do for you.
- Comprehensive Service: From the initial site visit and assessment to the final installation and inspection, we handle every aspect of the project. This ensures a seamless and stress-free experience for you.
- Warranty: We offer a 5-year warranty on our work, providing you with peace of mind and confidence in the durability of your retaining wall.
Ready to get started?
Visit our hardscaping services page to request an estimate. Let Marchi Paving Inc. transform your outdoor space with a beautiful, functional, and durable retaining wall.
Choosing the right contractor can transform your space and add significant value to your property. Trust Marchi Paving Inc. to bring your vision to life with expert craftsmanship and dedicated service.