
Commercial Retaining Wall Contractors: Top 5 Experts 2024
Commercial retaining wall contractors play a vital role in ensuring the stability and aesthetic appeal of commercial properties. These experts specialize in designing and constructing walls that not only prevent soil erosion and flooding but also improve the usability and beauty of the landscape.
When it comes to hiring commercial retaining wall contractors, consider these key points:
- Expertise in Engineering: Contractors work with structural engineers to ensure the wall can withstand pressure and avoid future issues.
- Material Knowledge: They select suitable materials like concrete, stone, or timber based on your property’s needs.
- Compliance with Regulations: Professionals know the local regulations and building codes, ensuring safe and lawful construction.
- Project Management: They coordinate the entire process smoothly, from design to construction.
A well-built retaining wall offers numerous benefits:
- Erosion Control: Protects your property from losing soil over time.
- Added Functionality: Creates additional space for parking, gardens, or recreational areas.
- Increased Property Value: Improves curb appeal and can attract potential tenants.
By understanding the value and benefits of retaining walls, you ensure a wise investment in your property’s future.

Quick commercial retaining wall contractors terms:
– retaining wall contractors
– retaining walls contractor
– retaining walls installers
Understanding Retaining Walls
Retaining walls are more than just barriers. They are essential structures that serve multiple purposes, especially in commercial settings.
Types of Retaining Walls
There are several types of retaining walls, each suited for different environments and needs:
- Gravity Walls: These rely on their weight to hold back soil. They are typically made of concrete or stone.
- Cantilevered Walls: Shaped like an “L,” these walls use less material and are often reinforced with steel.
- Sheet Piling Walls: Ideal for tight spaces, these are thin walls of steel, vinyl, or wood driven directly into the ground.
- Anchored Walls: Used when extra support is needed, these walls are anchored with cables or other stays.
Materials
Choosing the right material is crucial for durability and aesthetics:
- Concrete: Durable and versatile, often used for gravity and cantilevered walls.
- Natural Stone: Offers a classic look and blends well with landscapes.
- Timber: Provides a rustic appearance but may not be as long-lasting.
- Brick: Used for decorative purposes, though less common in commercial applications.
Functions
Retaining walls perform several key functions:
- Erosion Control: They prevent soil from washing away, especially on slopes.
- Ground Stabilization: Retaining walls hold back soil to prevent landslides.
- Space Utilization: They create usable spaces on uneven terrain, perfect for parking lots or terraces.
Erosion Control and Drainage
Erosion control is a primary reason for constructing retaining walls. Without them, properties can lose valuable soil, leading to instability. This is particularly important in areas with heavy rainfall.
Effective drainage is crucial for the longevity of a retaining wall. Without it, water can build up behind the wall, increasing pressure and potentially causing failure. A good drainage system includes:
- Gravel Backfill: Helps direct water away from the wall.
- Drainage Pipes: These pipes carry water away from the wall, preventing pressure buildup.
- Weep Holes: Small openings that allow water to escape.

By understanding these aspects of retaining walls, you can make informed decisions about design and materials, ensuring your commercial property remains stable and visually appealing.
Top 5 Commercial Retaining Wall Contractors
When it comes to commercial retaining wall contractors, choosing the right one is crucial for the success and safety of your project. Here are the top five factors to consider when selecting a contractor, along with insights into their reputation, experience, and services offered.
Selection Criteria
- Experience and Expertise: Look for contractors with a proven track record in commercial projects. They should have extensive experience with various types of retaining walls, such as gravity, cantilevered, and anchored walls. A contractor with years of experience is likely to understand the complexities involved in large-scale projects.
- Reputation: A contractor’s reputation can be gauged through client testimonials and industry recognition. Positive feedback from previous clients and endorsements from industry bodies are strong indicators of a contractor’s reliability and quality of work.
- Licensing and Certification: Ensure the contractor holds all necessary licenses and certifications. This guarantees they adhere to industry standards and regulations, which is crucial for compliance and safety.
- Comprehensive Services: Top contractors offer a range of services, from design and engineering to construction and maintenance. This full-service approach ensures consistency and quality throughout the project.
- Innovative Solutions: The best contractors stay updated with the latest technologies and materials. They should offer innovative solutions that improve the functionality and aesthetics of retaining walls while ensuring cost-effectiveness.
Reputation
A contractor’s reputation speaks volumes about their ability to deliver on promises. Look for companies with:
- Strong Client Relationships: Contractors who maintain open communication and deliver on time typically receive high praise from clients.
- Industry Awards and Recognition: Awards from reputable industry organizations can indicate a contractor’s commitment to excellence.
Experience
Experience is vital in handling the unique challenges of commercial retaining wall projects. Experienced contractors:
- Understand Local Regulations: They are familiar with local building codes and permit requirements, which helps avoid delays.
- Have a Portfolio of Successful Projects: A diverse portfolio demonstrates their ability to handle different project sizes and complexities.
Services Offered
Leading commercial retaining wall contractors provide a variety of services, including:
- Design and Engineering: Collaborating with design engineers and geotechnical experts to create effective and safe wall designs.
- Construction: Utilizing skilled labor and high-quality materials to build durable retaining walls.
- Maintenance and Repair: Offering ongoing maintenance to ensure the longevity of the retaining wall, as well as repair services if needed.
By focusing on these criteria, you can select a contractor who will deliver a high-quality retaining wall that meets your commercial needs.
How to Choose the Right Contractor
Choosing the right commercial retaining wall contractor is essential for a successful project. Here’s how to evaluate potential contractors effectively:
Evaluation
Start by assessing the contractor’s track record. Look for reviews and testimonials from previous clients. A contractor with a consistent history of satisfied customers is likely to deliver quality results.
Key Points to Evaluate:
- Experience: Check if they have handled projects similar to yours. Experience in commercial projects is crucial.
- Reputation: Look for positive feedback and industry recognition.
- Licensing: Ensure they have the necessary licenses and certifications.
Quotes
Obtaining detailed quotes from multiple contractors is vital. A comprehensive quote should outline all costs, including labor, materials, and any additional services.
Tips for Quotes:
- Compare Multiple Quotes: This helps you understand the market rate and avoid overpriced services.
- Ask for Detailed Breakdowns: Ensure the quote covers everything from materials to labor costs.
Permits and Engineering Plans
A reliable contractor will handle permits and develop engineering plans. This ensures compliance with local regulations and safety standards.
What to Check:
- Permit Management: Confirm that the contractor will manage all necessary permits.
- Engineering Plans: Ensure they provide detailed engineering plans approved by licensed engineers.
Site Inspections
Site inspections are crucial for assessing the project area and identifying potential challenges. A good contractor will conduct thorough site inspections before starting the project.
Inspection Checklist:
- Soil and Drainage Assessment: Evaluate soil stability and drainage needs.
- Safety Considerations: Identify any safety risks and plan mitigation strategies.
By following these steps, you can select a contractor who not only meets your project’s technical requirements but also ensures a smooth and compliant construction process. This will lead seamlessly into the next section, where we will explore the cost factors associated with retaining walls.
Cost Factors for Retaining Walls
When planning a retaining wall project, it’s crucial to understand the various cost factors involved. This will help you budget effectively and avoid unexpected expenses.
Labor Costs
Labor is a significant component of the overall cost. Skilled labor is essential for ensuring the wall’s structural integrity and longevity. The cost of labor can vary widely depending on the complexity of the project and the local market rates.
- Hourly Rates: Typically, labor costs can range from $50 to $100 per hour.
- Project Complexity: More complex projects, such as those requiring intricate designs or challenging site conditions, often incur higher labor costs.
Material Costs
The choice of materials greatly affects the total cost. Different materials come with their own price points and durability levels.
- Concrete Blocks: One of the most affordable and durable options.
- Natural Stone: Offers a premium look but at a higher price range.
- Timber: Generally cheaper but may require more maintenance over time.
The average cost of materials can range from $10 to $110 per square foot, depending on the type chosen.
Project Complexity
The complexity of your retaining wall project can significantly impact costs. Factors that increase complexity include:
- Height and Length: Taller and longer walls require more materials and labor.
- Site Conditions: Difficult terrain or poor soil conditions can increase the cost due to additional groundwork needed.
Average Costs
Understanding the average costs for retaining walls can help you plan your budget more effectively. Here’s a breakdown of typical costs:
- Basic Retaining Wall: Approximately $1,400 to $4,600 for a standard project.
- High-End Projects: Costs can soar to $10,000 or more, especially for large-scale commercial installations.

By considering these cost factors, you can better prepare for your retaining wall project and make informed decisions. This understanding will also help you communicate effectively with your contractor, ensuring a smooth and successful project execution. Next, we’ll dive into the benefits of hiring professional contractors for your retaining wall needs.
Benefits of Hiring Professional Contractors
When it comes to building retaining walls, hiring professional contractors offers several key benefits. Here’s why you should consider experts for your project:
Expertise
Professional contractors bring a wealth of knowledge and experience to the table. They understand the intricacies of retaining wall construction, from selecting the right materials to ensuring proper drainage. This expertise helps prevent common issues like soil erosion and wall failure. As highlighted in the research, a retaining wall contractor should be involved in projects where the wall supports other structures, like swimming pools, to ensure load-bearing capacities are met.
Quality Assurance
Hiring professionals ensures a high standard of workmanship. Contractors adhere to industry best practices and use high-quality materials, which contributes to the longevity and stability of the wall. Many reputable companies offer warranties on their labor, providing peace of mind that the work will stand the test of time.
Compliance
Navigating local regulations and obtaining the necessary permits can be daunting. Professional contractors are well-versed in these requirements and ensure your project complies with all relevant laws. This compliance is crucial, as retaining walls over four feet often need a structural engineering plan and city approval, as mentioned in the research.
Safety
Safety is paramount in any construction project. Professional contractors follow strict safety protocols to protect both workers and the public. They also have the necessary insurance, which safeguards you from potential liabilities. The research emphasizes the importance of having a licensed contractor manage site inspections and certify the wall, ensuring the structure is safe and sound.
By hiring a professional contractor, you not only benefit from their expertise and quality assurance but also ensure compliance and safety throughout your project. This approach saves you time and potential headaches, allowing you to focus on enjoying the new functional space your retaining wall creates.
Next, let’s address some frequently asked questions about commercial retaining wall contractors.
Frequently Asked Questions about Commercial Retaining Wall Contractors
How do you calculate labor cost for a retaining wall?
Calculating labor costs for a retaining wall involves a few key factors. Hourly rates for contractors can vary based on location, experience, and the complexity of the project. On average, labor costs may range from $14 to $46 per square foot.
The complexity of the project also plays a significant role. For example, a wall that requires intricate engineering or is built on a steep slope will generally incur higher labor costs due to the specialized skills and time required. To get a precise estimate, it’s best to gather quotes from at least three contractors and compare their pricing and services.
What is the most cost-effective retaining wall material?
When it comes to affordability and durability, concrete blocks often stand out as the most cost-effective material for retaining walls. They are not only economical but also durable, offering a long-lasting solution that can withstand harsh weather conditions.
Wood is another option that can be more affordable upfront. However, it may not be as durable as concrete and might require more maintenance over time. When choosing materials, consider both initial costs and long-term maintenance to determine the best option for your budget and project needs.
Who designs a retaining wall?
The design of a retaining wall is typically handled by a team of experts, including:
- Design Engineers: They create the initial plans and ensure the design meets all necessary specifications and standards.
- Geotechnical Engineers: These professionals assess the soil and environmental conditions to determine the best design approach. Their expertise is crucial in preventing issues like soil erosion.
- Site Civil Engineers: They oversee the implementation of the design, ensuring that all site-specific factors are considered and that the construction complies with local regulations.
These experts work together to ensure the retaining wall is both functional and safe. For walls over four feet, a structural engineering plan is often required, highlighting the importance of involving professionals in the design process.
By understanding these aspects, you can make informed decisions when hiring commercial retaining wall contractors. This ensures your project is completed efficiently and to a high standard.
Next, we’ll wrap up with some final thoughts and contact information for Marchi Paving Inc.
Conclusion
Choosing the right commercial retaining wall contractors is crucial for the success of your project. It ensures that your retaining wall is not only aesthetically pleasing but also structurally sound and compliant with local regulations. At Marchi Paving Inc., we pride ourselves on delivering high-quality solutions custom to meet your specific needs. Our experienced team, based in Chelmsford, MA, is ready to assist you with all aspects of retaining wall construction, from initial design to final execution.
With over 20 years of experience in the industry, we understand the importance of using the right materials and techniques to ensure longevity and performance. Our in-house project execution guarantees that every detail is handled with precision, leveraging advanced equipment to achieve the best results. Whether you’re looking to improve your commercial space or need assistance with erosion control, Marchi Paving Inc. is here to help.
If you’re ready to start your next project or need more information about our services, don’t hesitate to reach out. Visit our hardscaping services page for more details or contact us directly. We look forward to working with you to bring your vision to life.
Thank you for considering Marchi Paving Inc. as your trusted partner in retaining wall construction.
Basement Foundation Drain: Top 5 Essential Tips 2024
Why Basement Foundation Drains are Essential
A basement foundation drain is a critical component when it comes to safeguarding your home’s structural integrity. Its main role is to manage water appropriately, ensuring that moisture doesn’t seep into your foundation. Here’s a quick rundown for those wanting an immediate answer:
- Prevent Moisture Damage: Stops water from pooling around the base of your home, reducing the risk of moisture-related issues.
- Improve Structural Safety: Keeps the foundation dry and stable, minimizing the chances of structural damage over time.
- Mitigate Maintenance Costs: Helps avoid costly repairs by intercepting water before it reaches critical areas.
The presence of water can gradually erode a foundation’s strength. Over time, this leads to cracks, mold growth, and even potential structural failures. For property managers, homeowners, or commercial property owners in Middlesex County, MA, understanding this is the first step in ensuring their properties stay safe and accessible.

Basement foundation drain terms explained:
– foundation drainage solutions
– home drainage solutions
– residential drainage solutions
Types of Basement Foundation Drains
When it comes to keeping your basement dry, choosing the right basement foundation drain is crucial. Let’s explore the four main types: French drains, footing drainage, grading drainage, and sump pit and pumps.
French Drain
A French drain, also known as a weeping drain, is popular for its effectiveness and simplicity. It consists of a perforated pipe surrounded by gravel or rock that helps direct water away from your foundation. The gravel acts as a filter, allowing water to seep into the pipe while preventing debris from clogging it.
Pros:
– Prevents Flooding: Reduces the risk of water damage by channeling water away from your home.
– Durability: Can last 30 to 40 years when properly maintained.
– Cost-Effective: Offers a balance between affordability and functionality.
Cons:
– Installation Challenges: Requires removal of existing structures like decks or walkways.
– Not Suitable for All Locations: May not be ideal for homes near water sources or utility lines.

Footing Drainage
Footing drainage is similar to a French drain but is installed around the perimeter of your foundation walls at the footing level. It requires a slope to efficiently carry water away, usually to a sump pump or sewer.
Pros:
– Long-Lasting: With proper installation, it can last up to 50 years.
– Reduces Settlement Risks: Prevents water buildup around the foundation, reducing potential settlement issues.
Cons:
– Costly Installation: Often installed during the construction phase, making it a pricier option.
– Clogging Risks: Mud accumulation can clog the pipes, necessitating regular maintenance.
Grading Drainage
Grading drainage involves creating a slope around your home to direct water away naturally. It’s typically done during the construction of your home’s foundation.
Pros:
– Natural Water Flow: Redirects water to a stormwater drain or landscape without clogging.
– Increases Usable Space: Allows for more gardening or landscaping opportunities.
Cons:
– Potential for Over-Saturation: Improper installation can lead to water pooling and soil saturation.
– Mosquito Breeding Grounds: Ponding water can become a habitat for mosquitoes.
Sump Pit and Pumps
Sump pit and pumps are essential for areas with heavy rainfall or snowfall where other drainage methods might not suffice. The system collects water in a pit and pumps it away from your home.
Pros:
– Active Water Removal: Ensures water is pumped out even if the natural drainage is inadequate.
– Ideal for High Water Tables: Effective in areas prone to flooding or with high groundwater levels.
Cons:
– Power Dependency: Relies on electricity, which can be problematic during power outages.
– Installation Complexity: May require additional interior drainage systems for optimal performance.
Choosing the right basement foundation drain depends on several factors, including your home’s location, the type of soil, and your budget. Understanding these options helps in making an informed decision to protect your home from water damage.
Importance of Basement Foundation Drains
Keeping your basement dry is not just about comfort; it’s about protecting the very structure of your home. A well-installed basement foundation drain is crucial for several reasons.
Waterproofing
Basement foundation drains are key to effective waterproofing. They ensure that water doesn’t accumulate around your foundation, which can seep into your basement over time. This is especially important in areas with heavy rainfall or high water tables. By directing water away, these systems help maintain a dry and safe basement environment.
Moisture Prevention
Excess moisture is a silent enemy. It can lead to a host of problems, from structural damage to health issues. Foundation drains prevent moisture from penetrating your home’s foundation. This is critical because moisture can weaken concrete and other building materials, leading to cracks and other structural issues.
Structural Integrity
The integrity of your home depends heavily on a solid foundation. Water buildup around your foundation can cause soil erosion and lead to foundation settling or shifting. This can result in cracks in walls and floors, and in severe cases, can compromise the entire structure. A proper drainage system maintains the stability of your foundation by keeping water at bay.
Mold and Mildew Prevention
One of the most common consequences of poor drainage is mold and mildew growth. Mold thrives in damp environments and can pose serious health risks, including respiratory issues and allergies. By keeping your basement dry, foundation drains significantly reduce the risk of mold and mildew. This not only protects your home but also ensures a healthier living environment.
In summary, investing in a basement foundation drain is a proactive step in safeguarding your home. It protects against moisture, preserves structural integrity, and prevents mold, ensuring your basement remains a safe and usable space.
Next, we’ll explore the signs that might indicate problems with your foundation drainage system.
Signs of Foundation Drainage Problems
Even with a well-installed basement foundation drain, issues can arise over time. Recognizing these signs early can save you from costly repairs and maintain the structural integrity of your home.
Cracks on Walls
Cracks in your basement walls are one of the most visible signs of drainage problems. These can appear as small hairline fractures or larger, more concerning fissures. Water pressure builds up when drainage is inadequate, pushing against the walls and causing these cracks. If you notice new or expanding cracks, it’s time to investigate further.
Water Seepage
Water seepage is a clear indicator that your drainage system isn’t functioning properly. You might notice damp patches on the walls or floor, or even small puddles after a heavy rain. This seepage can weaken the foundation over time and lead to more severe structural problems.
Musty Odor
A musty smell in your basement is often a sign of hidden moisture. This odor is usually caused by mold or mildew, which thrive in damp environments. If you detect a persistent musty odor, it’s crucial to check your drainage system and address any moisture issues immediately.
Soil Washout
Soil washout around your home’s foundation can indicate drainage issues. When water is not properly diverted away, it can erode the soil, creating voids or uneven ground around your foundation. This can lead to settling or shifting of the foundation, resulting in structural problems.
If you notice any of these warning signs, it’s important to act quickly. Addressing drainage problems early can prevent more serious issues down the line. In the next section, we’ll cover how to maintain your basement foundation drain to ensure it continues to protect your home effectively.
How to Maintain Your Basement Foundation Drain
Proper maintenance of your basement foundation drain is crucial for preventing issues like clogs and water damage. Here’s how you can keep your system in top shape:
Clog Prevention
Clogs are a common problem that can severely impact the effectiveness of your drainage system. To prevent them:
- Install a Filter Fabric: Use a water-permeable filter fabric around your drain pipes to keep out soil and debris. This is especially important for systems like French drains, where soil can easily enter the pipe.
- Regular Cleanouts: Periodically flush the system with water to clear out any accumulated debris. This simple step can prevent minor blockages from becoming major issues.
- Gutter Maintenance: Ensure your gutters and downspouts are clean. Clogged gutters can overflow and lead to excess water around your foundation, which can overwhelm your drain system.
Periodic Inspections
Regular inspections can help you catch problems before they become serious. Here’s what to look for:
- Visible Damage: Check for cracks or breaks in the drain pipes. These can allow soil to enter and clog the system.
- Water Flow: Observe the water flow during heavy rain. If water isn’t draining properly, it might indicate a blockage or other issue.
- Sump Pump Functionality: If you have a sump pump, ensure it’s working correctly. Test it by pouring water into the sump pit and confirming it activates and pumps water out efficiently.
Maintenance Tips
Keeping your drainage system well-maintained isn’t difficult if you follow these tips:
- Seasonal Checks: Conduct a thorough inspection at least twice a year, ideally in spring and fall. These seasons often bring heavy rains, making them a good time to ensure your system is ready.
- Professional Help: Don’t hesitate to call in a professional if you notice persistent issues. They can provide a more thorough inspection and offer solutions that might not be obvious.
- Documentation: Keep records of any maintenance or repairs performed. This can be helpful for future troubleshooting or if you decide to sell your home.

By incorporating these maintenance practices, you can ensure your basement foundation drain remains effective and protects your home from water damage. Next, we’ll address some frequently asked questions about basement foundation drains to further clarify their importance and functionality.
Frequently Asked Questions about Basement Foundation Drains
How do I know if my foundation drain is clogged?
A clogged basement foundation drain can cause serious problems. Here are some signs to watch for:
- Water Seepage: If you notice water pooling around your basement walls or floor, your drain might be clogged.
- Musty Odor: A persistent musty smell can indicate trapped moisture due to poor drainage.
- Sump Pump Issues: If your sump pump is running constantly or not at all, it could be due to a blockage in the drain system.
Regular checks and maintenance can help prevent clogs. Keep an eye on water flow during heavy rains and ensure your sump pump is in good working order.
Is a foundation drain necessary?
Whether you need a foundation drain depends on several factors:
- Soil Type: Well-draining soils like sandy loam may not need extensive drainage systems. However, clay soils can retain water and may require a foundation drain.
- Installation Factors: If your home is in an area with high water tables or frequent heavy rains, a drain is crucial for preventing water damage.
- Building Codes: Some areas have specific requirements for drainage systems. Always check local codes before deciding.
A foundation drain is a smart investment for most homes. It protects against water damage and maintains your home’s structural integrity.
Where does the foundation drain water go?
The destination of water from your foundation drain depends on your drainage system setup:
- Sump Pump: Many systems use a sump pump to actively remove water from the basement. The pump directs water away from your home, often to a storm sewer or dry well.
- Storm Sewer: If connected to a storm sewer, the water is channeled into the municipal drainage system. However, storm sewers can sometimes be ineffective if not installed correctly.
- Surface Drainage: In some cases, water is directed to flow away from the house onto the surface. This requires careful grading to ensure water moves downhill and away from the foundation.
Choosing the right system depends on your specific needs and local conditions. A professional can help determine the best option for your home.
Conclusion
At Marchi Paving Inc., we understand the essential role that a well-designed basement foundation drain plays in safeguarding your home. Our commitment to providing top-tier drainage solutions ensures that your property remains dry and structurally sound.
Why Choose Us?
With over 20 years of experience, we specialize in delivering high-quality drainage solutions custom to your specific needs. Our team uses advanced equipment and in-house expertise to ensure every project is executed with precision and care.
Expert Installation
Our expert installation services are designed to prevent the common pitfalls of poor drainage systems. We focus on:
- Custom Solutions: Every home is unique, and so is our approach. We assess your property’s specific requirements to design a system that works best for you.
- Quality Materials: We use only the highest quality materials to ensure durability and long-lasting performance.
- Comprehensive Service: From initial consultation to final installation, we handle every step of the process to guarantee satisfaction.
Peace of Mind
Investing in a reliable basement foundation drain system not only protects your home but also adds value. With Marchi Paving Inc., you can rest easy knowing your home is in capable hands.
Ready to protect your home from water damage? Contact us today to learn more about our drainage solutions and experience the Marchi Paving difference.
Paving Driveway: Top 5 Ultimate Tips for 2024
Paving driveway is no small feat, especially when it comes to choosing the right material for your project. Whether you’re managing a commercial property or improving your home’s curb appeal, having a clear understanding of driveway materials and paving options is crucial. Here’s a quick overview of the essentials:
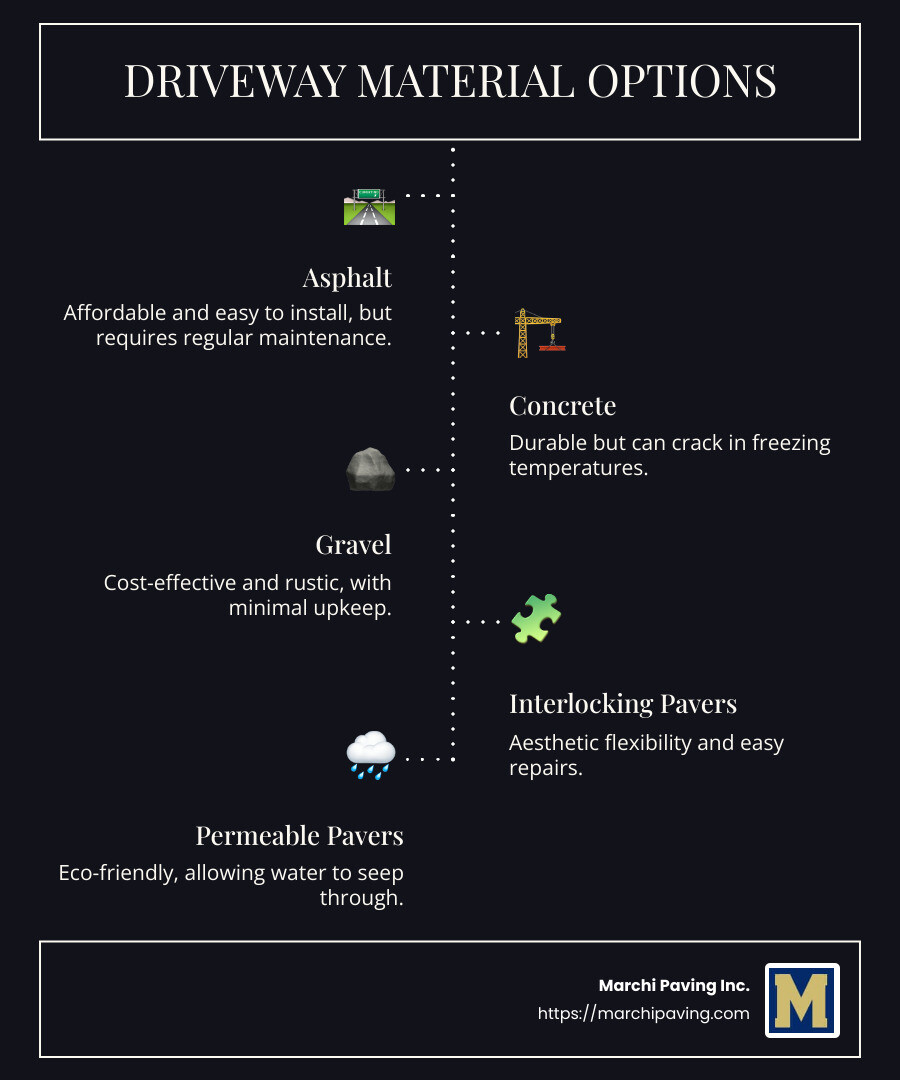
Driveway Materials:
- Asphalt: Affordable and easy to install, but requires regular maintenance.
- Concrete: Durable but can crack in freezing temperatures.
- Gravel: Cost-effective and rustic, with minimal upkeep.
- Interlocking Pavers: Aesthetic flexibility and easy repairs.
- Permeable Pavers: Eco-friendly, allowing water to seep through.
Paving Options:
- Traditional Paving: Durable surfaces like asphalt and concrete.
- Permeable Paving: Reduces environmental impact, ideal for managing stormwater runoff.
- Customized Designs: Use of borders, banding, and different textures for a unique look.
The materials and method you choose not only affect the aesthetics and functionality of your space but also determine long-term costs and maintenance efforts required. Understanding these can help you make informed decisions, ensuring lasting satisfaction and value.
Simple guide to paving driveway terms:
– asphalt driveway paving companies
– cost of driveway paving
– paving contractors
Choosing the Right Driveway Material
When it comes to paving your driveway, selecting the right material is key. Each option has its own set of benefits and drawbacks, making it essential to choose based on your specific needs and preferences. Let’s break down the most common materials:
Gravel
Gravel is the go-to choice for those looking for a cost-effective and rustic solution. Gravel driveways are made up of loose stones that are spread and compacted to form a solid surface.
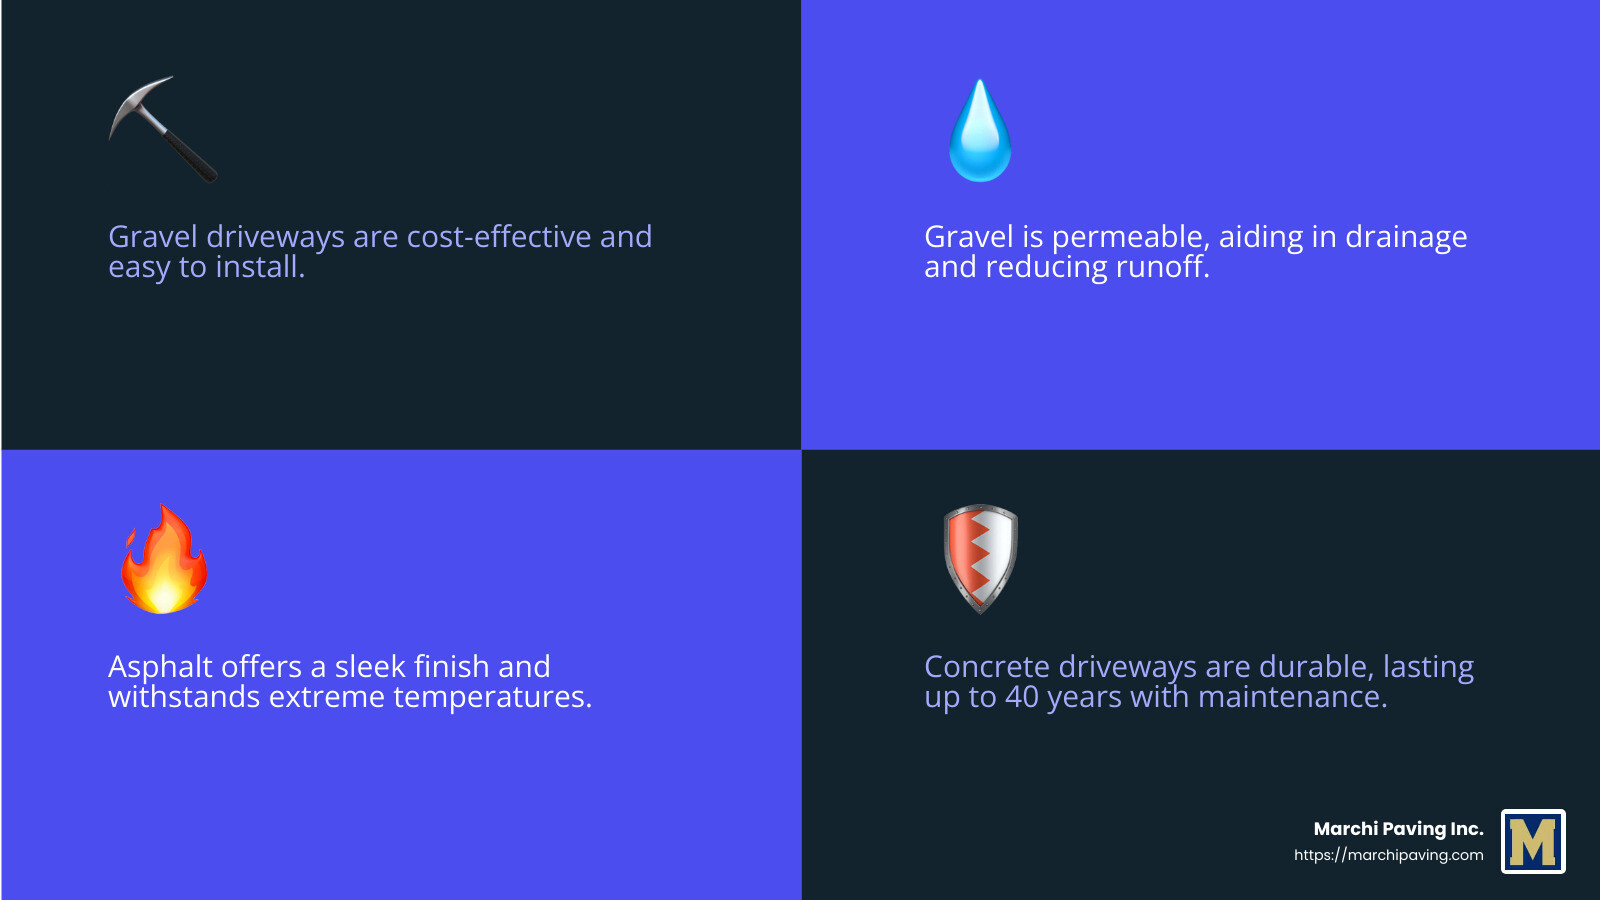
- Pros: It’s affordable and easy to install. Gravel is also permeable, which helps with drainage and reduces runoff.
- Cons: It may require regular maintenance to keep the surface even, especially after heavy rains or snow.
Asphalt
Asphalt is known for its smooth finish and sleek appearance, making it a popular choice for many homeowners.
- Pros: Asphalt is relatively affordable and quick to install. It performs well in extreme temperatures and can be easily repaired.
- Cons: It requires periodic sealcoating to protect against UV rays and water damage. The lifespan is typically around 15-20 years.
Concrete
Concrete driveways offer a durable and long-lasting option. They can be colored and stamped to mimic the appearance of natural stone.
- Pros: Concrete is strong and versatile. It lasts up to 40 years with proper maintenance.
- Cons: It can crack in regions with freeze-thaw cycles, and repairs can be more expensive compared to asphalt.
Brick Pavers
Brick pavers provide a classic and neat look that can add significant curb appeal to your property.
- Pros: They offer a timeless design and are available in a variety of colors. Brick pavers are also durable and can be easily repaired by replacing individual bricks.
- Cons: The initial cost can be higher than other materials, and they may require more maintenance to keep weeds from growing between the bricks.
Stone Pavers
Stone pavers are often used for their natural beauty and durability. They come in various sizes and shapes, allowing for creative designs.
- Pros: Stone pavers are incredibly durable and have an aesthetic appeal that improves property value. They are also resistant to cracking.
- Cons: They can be one of the more expensive options and may require professional installation for best results.
Choosing the right material for your driveway paving project involves balancing cost, maintenance, and aesthetics. Each material has its strengths and weaknesses, so consider your priorities and local climate conditions before making a decision.
Paving Driveway: Step-by-Step Process
Installation
Installing a driveway is a multi-step process that requires careful planning and execution. Here’s a quick rundown of what you can expect:
- Site Preparation: This involves clearing the area of any existing vegetation, debris, or old paving materials. Proper grading is crucial to ensure water drains away from the driveway, preventing future damage.
- Sub-Base Installation: A stable foundation is key. Typically, a layer of compacted gravel or crushed stone is laid down. This layer should be 4 to 8 inches deep, depending on soil type and expected traffic load. Compacting the sub-base prevents settling and provides a solid foundation for the surface layer.
- Surface Layer: Depending on your chosen material, the surface layer is applied next. For asphalt, it’s laid hot and smoothed out. Concrete is poured and leveled. Each material has specific requirements for curing, so follow your contractor’s advice for best results.
- Finishing Touches: Edging or borders are added to improve appearance and provide structural support. This is also the time to add any decorative elements, like stamped designs or colored finishes.
Maintenance
Keeping your driveway in top condition involves regular maintenance:
- Cleaning: Sweep away leaves and debris regularly. For stubborn stains, a power washer can help.
- Sealing: Sealcoating is essential for asphalt driveways. It protects against UV damage, oil spills, and water penetration. For asphalt, this should be done every 3-5 years, while concrete may require less frequent sealing.
- Weed Control: For paver and brick driveways, keep an eye out for weeds growing between the joints. Regularly remove them to maintain a neat appearance.
Sealcoating
Sealcoating is a vital process, especially for asphalt driveways. It involves applying a protective layer over the surface to extend its lifespan. This layer acts as a barrier against weather elements, oil, and chemical spills. Sealcoating not only improves the appearance by giving the driveway a fresh look but also prevents cracks and potholes from forming.
Repair
Even with the best maintenance, driveways can develop issues over time. Here’s how to address common problems:
- Cracks: Small cracks can be repaired using crack filler available at home improvement stores. For larger cracks, consider hiring a professional to ensure a lasting fix.
- Potholes: These require more extensive repair. The damaged area needs to be cleaned out, filled with new material, and compacted to match the surrounding surface.
- Resurfacing: If your driveway has widespread damage, resurfacing might be the best option. This involves applying a new layer over the existing surface, giving it a fresh start without the cost of a full replacement.
By following these steps and tips, you can ensure your driveway paving project is successful and long-lasting. Up next, we’ll dig into the cost considerations for driveway paving, helping you make informed financial decisions.
Cost Considerations for Driveway Paving
When planning your driveway paving project, understanding the costs involved is crucial. Let’s break it down into three key areas: cost comparison, long-term value, and maintenance costs.
Cost Comparison
Different materials come with varying price tags. Here’s a quick look:
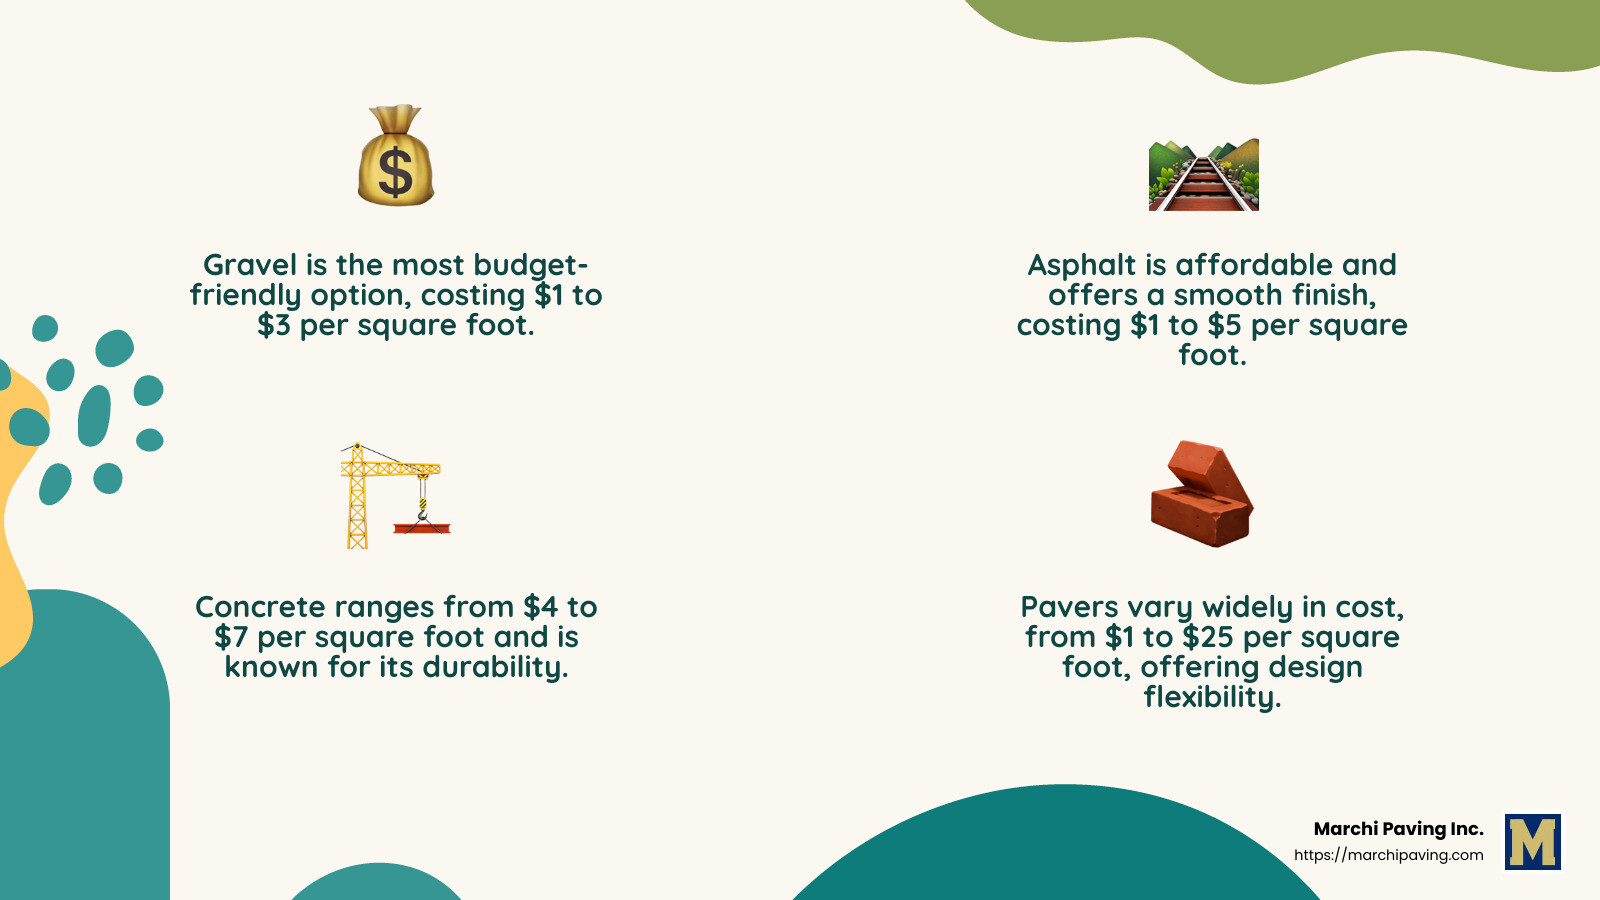
- Gravel: The most budget-friendly option, costing between $1 to $3 per square foot. It’s ideal for long, rural driveways but may not suit every aesthetic.
- Asphalt: A popular choice, costing $1 to $5 per square foot. It’s affordable and offers a smooth finish but requires regular maintenance.
- Concrete: More expensive than asphalt, ranging from $4 to $7 per square foot. It provides durability and a clean look, making it a favorite for urban settings.
- Pavers: These can vary widely in cost, from $1 to $25 per square foot, depending on the material (brick, stone). They offer the most design flexibility but come at a higher price.
Long-Term Value
Investing in a quality driveway material can save money in the long run. Here’s why:
- Durability: Concrete and pavers tend to last longer than other materials, making them a wise investment despite their higher initial cost. A well-maintained concrete driveway can last up to 40 years.
- Curb Appeal: A beautifully paved driveway improves curb appeal and can increase your home’s value by $5,000 to $7,000 on average. This is something to consider if you plan to sell your home in the future.
Maintenance Costs
Maintenance is an ongoing cost that varies by material:
- Asphalt: Requires sealcoating every 3-5 years to prevent cracks and potholes, which can add to the overall cost over time.
- Concrete: Generally low maintenance but may need occasional sealing and crack repairs.
- Pavers: Require weed control and periodic leveling. However, individual pavers can be replaced easily if damaged, saving on repair costs.
By considering these factors, you can choose a driveway paving option that fits your budget and meets your long-term needs. Next, let’s explore eco-friendly and permeable paving options that not only save money but also benefit the environment.
Eco-Friendly and Permeable Paving Options
Let’s explore eco-friendly paving. These options not only make your driveway look great but also help the environment. Here’s how:
Permeable Pavers
Permeable pavers are a top choice for those who care about the planet. They allow rainwater to seep through gaps between the stones, recharging the groundwater and reducing runoff. This helps prevent puddles and flooding in your yard.
Benefits:
- Stormwater Management: By letting water pass through, permeable pavers reduce the risk of flooding and erosion.
- Pollution Control: They help filter pollutants from rainwater before it reaches streams and rivers.
- Durability: Made from materials like concrete and clay, they are strong and long-lasting.
Green Driveways
A green driveway is not just about color. It’s about using materials that support plant growth. This type of driveway combines solid surfaces with spaces for grass or plants. Imagine a driveway that looks like a lush garden!
Options Include:
- Grass Pavers: These are grids filled with soil and grass, offering a natural look.
- Porous Concrete: Similar to regular concrete but with larger gaps to allow water through.
Stormwater Management
Proper stormwater management is essential for any driveway. With eco-friendly options, you can control where rainwater goes.
Techniques:
- Gravel Borders: Installing gravel along the edges helps direct water away from your home.
- Sloped Design: Ensuring your driveway slopes correctly can guide water to desired drainage areas.
By choosing eco-friendly and permeable paving driveway options, you not only create a beautiful entrance to your home but also contribute positively to the environment. Up next, let’s tackle some of the most frequently asked questions about paving driveways.
Frequently Asked Questions about Paving Driveway
What is the cheapest option for paving a driveway?
When it comes to budget-friendly options, gravel is often the go-to choice. Gravel driveways are simple to install and require minimal materials. The cost can range from $1 to $3 per square foot, making it the most affordable option for many homeowners. While gravel is easy on the wallet, it requires periodic maintenance, such as grading and replenishing, to keep the surface even.
Another relatively inexpensive option is brick. Though not as cheap as gravel, bricks can be cost-effective if you find reclaimed or recycled bricks. They offer a rustic charm and can be laid in various patterns to improve curb appeal.
Is a paver driveway cheaper than concrete?
Paver driveways can sometimes be more affordable than concrete, depending on the type of pavers you choose. Basic pavers might cost around $10 to $25 per square foot, while concrete ranges from $4 to $7 per square foot. However, the initial cost isn’t the whole story. Pavers often offer better long-term value due to their durability and ease of repair. If a paver cracks, you can replace just that piece—unlike concrete, which may require more extensive repairs.
What type of paving is best for a driveway?
Choosing the best type of paving depends on your needs and style preferences. Here are some popular options:
- Cobblestones: Known for their old-world charm, cobblestones are highly durable and ideal for creating a classic look. They are more expensive upfront but offer excellent longevity.
- Crazy Paving: This style uses irregularly shaped stones to create a unique, mosaic-like pattern. It’s perfect for those who want a one-of-a-kind driveway and can be a conversation starter.
- Filetti: These are long, thin stones that create a sleek, modern appearance. Filetti stones are durable and provide a distinct European flair to any driveway.
Each option has its pros and cons, so consider factors like climate, traffic, and personal taste when deciding on the best paving driveway material for your home.
Conclusion
At Marchi Paving Inc., we understand that choosing the right driveway paving option is more than just a decision—it’s an investment in your home. With over 20 years of experience, we specialize in delivering durable, aesthetically pleasing, and low-maintenance driveways that stand the test of time.
Durability is at the forefront of what we offer. Our asphalt driveways, when paired with regular maintenance like sealcoating and crack filling, can last up to 20 years. This longevity not only saves you money in the long run but also ensures that your driveway remains in top condition, enhancing your property’s curb appeal.
When it comes to aesthetics, we provide a variety of options to suit any style. From the rustic charm of cobblestones to the sleek look of filetti, our range of materials ensures that your driveway will complement your home beautifully. Our skilled team uses advanced equipment to execute projects with precision, ensuring that every driveway we pave is a work of art.
Maintenance is key to keeping your driveway looking fresh and new. Regular upkeep not only prolongs the lifespan of your driveway but also improves its safety and appearance. Our team at Marchi Paving Inc. is committed to providing high-quality maintenance services, ensuring that your investment remains protected.
If you’re ready to transform your driveway with a durable, beautiful, and low-maintenance solution, contact us today to get started. At Marchi Paving Inc., we’re here to help you make the best choice for your home.
Residential Excavation Companies Near Me: Top 5 Trusted
Finding the best residential excavation companies near me is vital for anyone planning a construction project, whether it’s a new home, an extension, or significant landscaping work. These specialized companies handle tasks crucial to the foundation and longevity of any structure, such as site preparation, grading, and ensuring proper water drainage.
- Key Considerations:
- Skilled contractors with necessary licensing and insurance
- Modern, well-maintained heavy machinery
- Knowledge of local regulations and permits
- Top Benefits:
- Accurate site preparation for stable construction
- Efficient scheduling to prevent project delays
- Improved property value with proper groundwork
A reliable excavation company can transform a rough terrain into a ready-to-build site. With a focus on precision and safety, these professionals ensure your project’s groundwork is solid, setting the stage for successful construction.
Choosing the right company will not only streamline your project but also save time and money in the long run. Look for firms with a proven track record and excellent customer reviews to ensure quality and peace of mind throughout your construction journey.

Terms related to residential excavation companies near me:
– dirt work near me
– dozer work near me
– hydrovac excavation companies near me
What Does a Residential Excavation Company Do?
Residential excavation companies play a crucial role in preparing a site for construction. Their work ensures that the land is ready and safe for building. Here’s a breakdown of the key services they provide:
Grading
Grading is all about creating a level base for construction. It involves reshaping the land to ensure proper water flow and drainage. This prevents future water damage to the structure. Proper grading is essential for both safety and longevity of the building.
Benefits of Grading:
– Prevents water pooling and erosion
– Supports stable and solid foundations
– Improves the overall aesthetic of the property
Digging Trenches
Trenches are essential for laying down utilities like water, sewer, and electrical lines. Excavation companies dig precise and safe trenches to ensure these utilities are installed correctly.
Trenching Highlights:
– Ensures utilities are buried at correct depths
– Protects utility lines from potential damage
– Facilitates easy maintenance and access
Foundations
Creating a strong foundation is perhaps the most critical part of any construction project. Excavation companies dig out the area where the foundation will sit, ensuring it is level and stable. The type of foundation—whether it’s a slab, crawl space, or basement—will dictate the excavation process.
Foundation Facts:
– A solid foundation supports the entire structure
– Proper excavation prevents future settling or shifting
– Foundation types vary in cost and complexity

Site Preparation
Before any construction begins, the site must be prepared. This involves clearing the land of trees, rocks, and debris. Excavation companies use heavy machinery to efficiently prepare the site, ensuring it’s ready for building.
Site Preparation Steps:
– Clearing and leveling the land
– Removing obstacles that could hinder construction
– Ensuring the site complies with local building codes
A well-prepared site is the cornerstone of a successful construction project. It sets the stage for everything that follows, ensuring a smooth and efficient building process. Residential excavation companies combine expertise, experience, and equipment to deliver high-quality results.
By understanding these core services, you can appreciate the value that residential excavation companies bring to any construction project. They lay the groundwork—literally and figuratively—for successful and lasting builds.
How to Choose the Best Residential Excavation Company Near Me
When searching for residential excavation companies near me, consider several key factors to ensure you choose a reliable and skilled contractor. Here’s what you need to look for:
Contractor Licensing
First and foremost, verify that the excavation company holds the necessary licenses to operate in your area. Licensing ensures that the contractor meets local standards and regulations. It also protects you from potential legal issues.
Why Licensing Matters:
– Confirms the contractor’s qualifications and expertise
– Ensures compliance with local building codes
– Provides a level of consumer protection
Insurance
Excavation work can be risky. That’s why it’s crucial to hire a company with adequate insurance coverage. This includes general liability insurance and workers’ compensation.
Benefits of Insurance:
– Covers potential damages to your property
– Protects you from liability in case of worker injuries
– Offers peace of mind during the project
Heavy Machinery
The quality and condition of the machinery used can significantly impact the efficiency and safety of the excavation process. Make sure the company uses well-maintained, modern equipment.
Machinery Considerations:
– Modern equipment improves precision and safety
– Well-maintained machinery reduces the risk of breakdowns
– Advanced technology can speed up project timelines
Permits
Before any excavation work begins, necessary permits must be obtained. A reputable company will handle this process, ensuring all paperwork is in order.
Permit Importance:
– Prevents legal issues and fines
– Ensures the project complies with local regulations
– Demonstrates the company’s professionalism and attention to detail
Local Regulations
Familiarity with local regulations is crucial. Each area may have specific rules regarding excavation, such as noise restrictions or working hours. A local company will understand these nuances and ensure compliance.
Local Regulation Awareness:
– Avoids project delays due to non-compliance
– Ensures adherence to environmental and safety standards
– Facilitates smoother communication with local authorities
Choosing the right residential excavation company involves more than just comparing prices. By focusing on these critical factors, you can select a contractor who will deliver quality work, ensuring your project is completed safely and efficiently.
Next, let’s explore some of the top residential excavation companies in the areas where Marchi Paving Inc. operates.
Top Residential Excavation Companies Near Me
If you’re in New Jersey, you’re in luck. This area is home to some of the most reputable residential excavation companies in the region. Whether you’re in need of site preparation, grading, or trenching, these companies have proven track records of delivering quality work.
Northern New Jersey
In Northern New Jersey, you’ll find companies that are well-versed in handling the unique soil and terrain challenges of the area. These companies often offer comprehensive services, from initial site assessments to final grading. Their familiarity with local regulations ensures that your project will proceed smoothly and without unnecessary delays.
Central New Jersey
Central New Jersey’s excavation companies are known for their efficiency and expertise. They typically employ skilled operators and use state-of-the-art equipment to tackle even the most complex projects. Whether it’s a small residential job or a larger commercial endeavor, these companies have the resources to meet your needs.
Southern New Jersey
The broader Southern New Jersey region is home to a variety of excavation specialists. These companies are adept at navigating the area’s diverse landscapes and are familiar with the permitting processes required by local governments. Their experience in the region translates to reliable and timely service.
Jersey Shore
The Jersey Shore area also boasts reputable excavation companies. These businesses often emphasize customer satisfaction and tailor their services to meet the specific needs of homeowners. Their local presence means they are just a call away, providing quick and responsive service.
By choosing a residential excavation company in these areas, you’re opting for professionals who understand the local terrain and regulations. This local knowledge is invaluable, ensuring that your project is in capable hands from start to finish.
In the next section, we’ll dig into the factors that can influence the cost of excavation, helping you budget effectively for your upcoming project.
Factors Influencing Excavation Costs
When planning an excavation project, it’s crucial to understand the factors that can impact costs. These elements can vary significantly depending on your specific needs and location.
Soil Quality
The type of soil on your property is a major cost driver. Dense or rocky soils require more effort and specialized equipment to excavate, leading to higher expenses. Conversely, softer soils are easier to work with and generally result in lower costs. It’s important to have your soil tested before starting a project to anticipate potential challenges.
Landscaping Features
Existing landscaping features like trees, shrubs, and hardscaping (such as patios or walkways) can add to the complexity and cost of excavation. Removing these elements requires additional time and labor. If your site has extensive landscaping, you might need to budget for its removal or relocation.
Manual Excavation
In some cases, manual excavation might be required, especially in tight spaces where heavy machinery can’t fit. This process is labor-intensive and can significantly increase costs. Manual excavation is often necessary in urban areas or locations with challenging access.
Heavy Machinery
The use of heavy machinery like bulldozers, backhoes, and excavators is standard in most excavation projects. Renting or operating these machines comes with its own set of costs. Advanced equipment may offer efficiency but can be more expensive, as noted in the research.
Labor Costs
Labor is another significant factor. Skilled operators and laborers are essential for a successful excavation project. Labor rates can vary based on location and the complexity of the job. According to the research, hiring an excavation specialist can cost between $40 and $180 per hour, depending on the project’s demands.
Understanding these factors will help you budget effectively and choose the right residential excavation company near me for your needs. By considering soil quality, existing landscaping, and the need for manual labor or heavy machinery, you can better anticipate the overall costs and avoid unexpected expenses.
In the next section, we’ll discuss how long excavation typically takes, providing insights into project timelines and what to expect during the excavation process.
How Long Does Excavation Take?
The duration of an excavation project can vary widely. Several factors influence how long it takes to complete, especially when it comes to foundation excavation.
Foundation Excavation
Foundation excavation is a critical step in constructing a new home or building. The time it takes depends largely on the size and complexity of the foundation. For a typical residential project, expect the excavation phase to last anywhere from a few days to a couple of weeks.
Influencing Factors
Several factors can impact the timeline for excavation:
- Soil Type: The soil quality plays a big role. Rocky or clay-heavy soils require more effort and time to excavate than softer soils.
- Weather Conditions: Weather can significantly affect excavation timelines. Ideal conditions are during warm months when the ground is softer. Heavy rain or snow can delay the process, sometimes by several days.
- Project Complexity: The complexity of the site and the excavation itself can add time. Projects involving intricate designs or multiple levels might take longer.
- Permits and Regulations: Securing the necessary permits and adhering to local regulations can also influence the timeframe. Delays in obtaining permits can push back the start date.
- Site Accessibility: If the site is difficult to access or requires additional preparation, such as removing existing structures or utilities, this can extend the time needed for excavation.
Project Duration
On average, a straightforward residential excavation project might take about one to two weeks. However, more complex projects can extend to several weeks or even months. It’s essential to discuss timelines with your contractor to set realistic expectations.

By understanding these factors, you can better plan your project and work with your contractor to ensure a smooth excavation process. Next, we’ll address some frequently asked questions about residential excavation companies near me, shedding light on responsibilities and common concerns.
Frequently Asked Questions about Residential Excavation Companies Near Me
Who is responsible for excavation?
When it comes to excavation, excavation contractors are the main players. These professionals are responsible for everything from site preparation to operating heavy machinery. They ensure that the land is ready for construction, whether it’s for a new home, a pool, or installing utilities.
Excavation contractors handle the entire process, including obtaining necessary permits and adhering to local regulations. They bring in the right equipment and skilled operators to get the job done safely and efficiently. So, if you’re planning a project that requires digging, it’s best to hire a residential excavation company near you to handle the task.
How long does it take to excavate?
The duration of an excavation project can vary greatly based on several factors. For example, foundation excavation typically takes one to two weeks, but this can change depending on the project’s complexity and site conditions.
Influencing factors include:
- Soil Type: Hard or rocky soil takes longer to excavate than soft soil.
- Weather: Bad weather, like rain or snow, can delay progress.
- Site Accessibility: Difficult-to-reach sites may require more time.
- Project Complexity: Complex designs or large projects increase the duration.
Discussing these factors with your contractor helps set realistic expectations and timelines for your project.
What is the most profitable excavation service?
The profitability of excavation services can depend on several factors, including the type of service offered and the demand in a specific region. Among the various excavation services, those related to large-scale construction projects and utility installations often bring in the most revenue.
For example, services involving foundation excavation for commercial buildings or extensive residential developments can be particularly lucrative. Additionally, specialized services like trenching for utility lines or creating build pads for complex structures require expertise and can command higher prices.
Top companies in the industry often focus on these high-demand services, investing in advanced heavy machinery and skilled operators to maximize efficiency and profitability. By offering a range of specialized services, these companies can cater to various client needs, ensuring steady business and revenue growth.
Understanding these aspects can help you make informed decisions when choosing a residential excavation company near you for your project.
Conclusion
Choosing the right residential excavation company can make all the difference in the success of your project. At Marchi Paving Inc., we pride ourselves on delivering high-quality service with precision and care. With over 20 years of experience, our seasoned professionals bring a wealth of knowledge and expertise to every project, ensuring that your excavation needs are met with the utmost efficiency and excellence.
Our commitment to using advanced equipment sets us apart. By investing in state-of-the-art machinery, we improve the precision and speed of our work, allowing us to complete projects on time and within budget. This dedication to quality means you can trust us to handle everything from grading and trenching to foundation excavation with the highest standards of safety and reliability.
Located in Chelmsford, MA, Marchi Paving Inc. is your go-to residential excavation company near you. We understand the importance of each project and are dedicated to providing custom solutions that meet your specific needs. Whether you’re preparing a site for a new home or tackling complex drainage issues, our team is here to help.
Ready to start your project? Contact us today to learn more about our services and experience the Marchi Paving difference. We look forward to partnering with you to bring your vision to life.
Sewer Line Repairs Near Me: Top 5 Best Services 2024
If you’re looking for sewer line repairs near me, you’re likely dealing with blocked pipes, foul odors, or even sewage backups. These issues can quickly upset daily life, creating health hazards and potential property damage. It’s crucial to address these problems promptly.
Here’s what you need to do:
- Identify the Problem: Look for slow drainage, gurgling sounds, or wet patches in your yard.
- Contact Professional Services: Reach out to local experts like Donnelly’s Cooling, Heating & Plumbing if you’re in the Greater Philadelphia area.
- Schedule an Inspection: An annual inspection can prevent future problems by spotting early signs of wear or damage.
Sewer line maintenance is not something to ignore. Undetected issues can lead to costly repairs and disruptions. Professional services offer comprehensive solutions, including trenchless repairs that are less invasive and time-consuming than traditional methods.
In Middlesex County, MA, for instance, choosing a reliable sewer repair service is essential to ensuring the long-term safety and usability of your plumbing system. Experts are ready to provide quick, cost-effective solutions to keep your property in top condition.

Terms related to sewer line repairs near me:
– trenchless sewer line repair
– sewer line from house to street
– sewage pipes
Signs Your Sewer Line Needs Repair
Sewer line issues can sneak up on homeowners, but there are telltale signs to watch for that can help you catch problems early. Recognizing these signs can save you from costly repairs and disruptions.
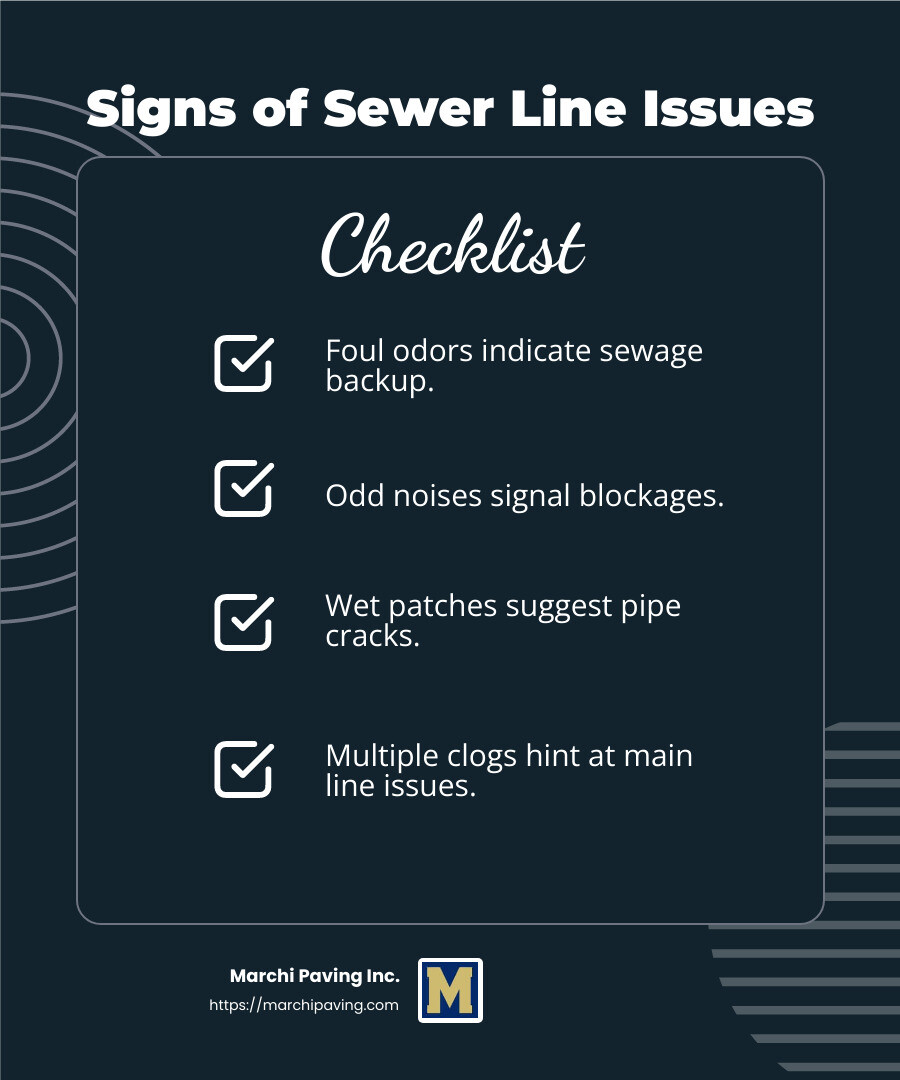
Foul Odors
One of the first signs that something is amiss with your sewer line is a bad smell. If you notice a persistent, unpleasant odor in your home or yard, it could mean that sewage is not flowing properly and is backing up somewhere in the system.
Odd Noises
Gurgling or bubbling sounds coming from your drains can indicate a blockage or damage in the sewer line. These noises happen because air is trapped and struggling to pass through the pipes. If you hear these sounds regularly, it’s time to investigate further.
Wet Patches in Your Yard
Unexplained soggy spots or standing water in your yard can be a major red flag. This often means that a pipe has cracked or burst underground, allowing wastewater to seep into the soil. If left unchecked, this can damage your landscaping and even your home’s foundation.
Multiple Clogs
If you’re experiencing clogs in several drains at once, it’s likely a problem with the main sewer line rather than individual pipes. This could be caused by a significant blockage or tree roots infiltrating the line. Addressing this quickly is crucial to prevent a full sewer backup.
Sewage Backup
The most serious sign of sewer line trouble is sewage backing up into your home. This can happen in toilets, sinks, or tubs and is a clear indication of a major blockage. Not only is this unpleasant, but it’s also a health hazard that requires immediate attention from professionals.
If you notice any of these signs, take action right away. Sewer line repairs near me can be found with local services that offer prompt and effective solutions. Regular inspections and maintenance can help catch these issues early, saving you time and money in the long run.
Common Causes of Sewer Line Issues
Understanding the reasons behind sewer line problems can help you prevent them. Here are some of the most common causes homeowners face:
Tree Roots
Tree roots are a leading cause of sewer line damage. They naturally seek out moisture and nutrients, making underground pipes a prime target. Over time, roots can infiltrate and crack pipes, leading to blockages and leaks. Regular inspections can help detect root intrusion early.
Hair Build-Up
Hair is a common culprit for clogs, especially in bathroom drains. Over time, hair can accumulate and create stubborn blockages that impede water flow. Using drain covers can help minimize hair build-up and keep your pipes clear.
Excessive Toilet Paper
While toilet paper is designed to dissolve in water, using too much can still cause clogs. Large wads of toilet paper can get stuck in pipes, especially if the plumbing system is older or has existing issues. Educating household members on proper toilet paper use can prevent these blockages.
Grease Build-Up
Pouring grease down the drain is a recipe for disaster. As grease cools, it solidifies and sticks to the inside of pipes, gradually narrowing the passageway and leading to clogs. To avoid this, always dispose of grease in the trash instead of the sink.
Food Build-Up
Food particles can also contribute to sewer line problems. Even with a garbage disposal, certain foods like coffee grounds, eggshells, and fibrous vegetables can create blockages. Be mindful of what you put down the sink and consider composting food waste instead.
Soap Build-Up
Soap residue, particularly from bar soap, can accumulate in pipes over time. This can mix with other debris, forming clogs that slow down drainage. Switching to liquid soap and regularly flushing drains with hot water can help dissolve soap build-up.
By being aware of these common causes and taking preventive measures, you can reduce the risk of sewer line issues. However, if you do encounter problems, seeking sewer line repairs near me from trusted local professionals can ensure the issue is resolved efficiently and effectively.
How to Fix a Broken Sewer Pipe
Fixing a broken sewer pipe is not a simple task. It requires careful planning and the right tools. Here’s a step-by-step guide to understand the process:
Identify the Location
The first step in repairing a sewer pipe is finding the exact location of the break. This can be tricky since sewer lines are typically underground. Plumbers often use cameras to inspect the inside of the pipes. This technology helps pinpoint the problem without unnecessary digging.
Specialist Cutting Tools
Once the problem area is identified, the next step is to remove the damaged section of the pipe. This requires specialist cutting tools. These tools ensure clean cuts, which are crucial for a successful repair. Clean cuts allow for a snug fit when installing the new pipe segment.
Matching Pipe Diameter
It’s essential to replace the damaged section with a pipe of the same diameter. Using the wrong size can lead to leaks or further damage. Plumbers measure the existing pipe to ensure the replacement section matches perfectly.
Flexible Rubber Couplings
To connect the new piece of pipe to the existing line, flexible rubber couplings are used. These couplings provide a secure and flexible connection. They can absorb minor shifts in the ground and prevent leaks. Plumbers tighten the couplings with metal clamps to ensure a tight seal.
Using these methods, a broken sewer pipe can be repaired effectively. However, it’s important to hire experienced professionals for this task. They have the tools and expertise to handle the repair safely and efficiently.
If you’re facing sewer line problems, seeking sewer line repairs near me from local experts can save you time and hassle.
Professional Sewer Line Repair Services
When dealing with sewer line issues, it’s crucial to have licensed technicians handle the repairs. Professionals bring the expertise and tools needed to fix problems efficiently and safely. In areas where Marchi Paving Inc. operates, such as Middlesex County, MA, you can find top-notch service from trusted local experts.
Licensed Technicians
Hiring licensed technicians ensures that the people working on your sewer lines are qualified and knowledgeable. These professionals are trained to handle various issues, from minor clogs to major breaks. They use state-of-the-art equipment to diagnose and repair problems, ensuring your sewer system is back in working order quickly.
Upfront Pricing
One of the biggest concerns for homeowners is the cost of repairs. With upfront pricing, you know exactly what you’ll be paying before the work begins. Reputable companies are transparent about their pricing, providing free estimates and avoiding hidden fees. This approach builds trust and helps you budget for the necessary repairs.
Customer Satisfaction
Customer satisfaction is a priority for reputable sewer line repair services. Positive reviews and testimonials from past clients highlight the courteous and fast service provided by technicians. These professionals not only fix the problem but also explain the process, ensuring homeowners understand what’s happening.
“Your tech was extremely courteous and fast. He did a great job for me and explained everything he was doing as he cleared my sewer line clog.” — Satisfied Customer
Marchi Paving Inc.
Marchi Paving Inc. has been serving Middlesex County, MA, for years. Their commitment to quality and customer care sets them apart. Offering same-day and emergency services, they ensure that sewer line issues are addressed promptly. Plus, with special financing options, they make it easier to afford necessary repairs.
When you need sewer line repairs near me, consider turning to trusted local experts like Marchi Paving Inc. Their licensed technicians, straightforward pricing, and dedication to customer satisfaction make them a top choice in Middlesex County, MA, and beyond.
DIY Sewer Line Maintenance Tips
Maintaining your sewer line doesn’t always require a professional. With a few simple DIY methods, you can keep your lines clear and avoid costly repairs. Here are some easy maintenance tips:
Baking Soda and Vinegar
A natural and effective way to maintain your sewer lines is by using a mixture of baking soda and vinegar. This combination can help break down minor clogs and keep your pipes clean.
- Pour 1/2 cup of baking soda down the drain.
- Follow with 1/2 cup of vinegar.
- Let it sit for about 15 minutes. You’ll notice fizzing as it works to dissolve build-up.
- Flush with hot water to clear out the loosened debris.
This method is safe for pipes and the environment, making it a great regular maintenance practice.
Hot Water Flush
A hot water flush is another simple method to help maintain your sewer lines. Hot water can dissolve grease and soap build-up that might be lurking in your pipes.
- Boil a pot of water.
- Carefully pour it down the drain in a slow, steady stream.
Doing this once a week can help keep your pipes clear and prevent minor clogs from becoming major issues.
Regular Inspections
Regular inspections are key to catching potential problems early. Even if you’re not a professional, you can still check for signs of trouble like slow drains or unusual odors.
- Walk around your property and look for wet patches or foul smells, which could indicate leaks.
- Listen for odd noises coming from your drains, as these can be signs of blockages or damage.
If you notice anything out of the ordinary, consider calling a professional to assess the situation. Regular inspections can save you from expensive repairs down the line.
By incorporating these simple DIY tips into your routine, you can help maintain your sewer line and avoid the need for costly repairs. Keep your system in check with these easy methods and enjoy peace of mind knowing your pipes are in good shape.
Frequently Asked Questions about Sewer Line Repairs
How is a broken sewer pipe fixed?
Fixing a broken sewer pipe involves several steps and requires professional expertise. First, identify the exact location of the break using specialized tools like cameras. Once located, professionals use techniques like pipe bursting or trenchless repairs to fix the pipe with minimal disruption. In some cases, traditional excavation might be necessary.
Trenchless methods are popular because they are less invasive and cost-effective, allowing repairs without extensive digging. For example, pipe lining involves inserting a resin-coated liner into the damaged pipe, which hardens to create a new pipe within the old one. Pipe bursting, on the other hand, breaks the old pipe while pulling a new one into place.
Are local governments responsible for paying for sewer line repairs?
This depends on where the break is located. Generally, homeowners are responsible for the sewer line that runs from their home to the property line. Beyond that point, it is typically the responsibility of the local government or utility company.
If you’re facing issues with your sewer line, it’s crucial to determine the location of the problem. For breaks on public property, contact your local municipality to report the issue. They will assess and address any repairs needed on their side.
How to flush sewer pipes?
Flushing your sewer pipes can help prevent clogs and maintain smooth operation. Here’s a simple method to do it:
- Use baking soda and vinegar as a natural cleaning solution. Pour 1/2 cup of baking soda followed by 1/2 cup of vinegar into the drain. Let it sit for 15 minutes, then flush with hot water.
- Perform a hot water flush regularly. Boil a pot of water and pour it down the drain slowly. This helps dissolve grease and soap build-up.
- Schedule regular professional inspections to ensure your sewer lines are clear and functioning properly. Professionals can use cameras to check for clogs or damage that might not be visible to the naked eye.
By keeping up with these maintenance practices, you can help prevent severe clogs and ensure your sewer system runs smoothly.
Conclusion
When it comes to sewer line repairs near me, Marchi Paving Inc. stands out as a trusted partner. With over 20 years of experience, we specialize in providing high-quality, in-house solutions for your sewer line needs. Our team uses advanced equipment to ensure each project is executed with precision and care.
Our dedication to quality and customer satisfaction means that you can count on us for reliable sewer line repairs. Whether you’re dealing with foul odors, multiple clogs, or even sewage backup, our expert technicians are ready to help. We offer a comprehensive range of services, from trenchless repairs to traditional excavation, custom to meet your specific needs.
Contact us today to learn more about how we can help with your sewer line issues. Our team is here to provide expert advice and solutions that ensure your plumbing system is in top condition. Visit our Excavation Services page for more information on how we can assist you.
At Marchi Paving Inc., we pride ourselves on delivering exceptional results and building strong relationships with our clients. Let us be your go-to experts for all your sewer line repair needs.
Asphalt Driveway Contractor Near Me: Top 5 Experts 2024
When looking for an asphalt driveway contractor near me, it’s crucial to find reliable professionals who ensure quality and timely work. Here’s what to expect:
- Experience & Expertise: Look for contractors with a strong track record and specialized skills in asphalt paving.
- Licensing & Insurance: Ensure your contractor is fully licensed and insured to protect your investment.
- Reputation: Check reviews and ratings from past customers for insight into their reliability and work quality.
- Competitive Pricing: Compare quotes to find a balance between cost and quality.
- Communication: Choose a contractor who is clear and responsive to your questions and concerns.
Whether you’re a homeowner seeking a durable new driveway or a commercial property owner optimizing parking lot paving, the right choice in contractor makes all the difference. This ensures not just an appealing finish, but a safe and accessible surface that stands the test of time.
As we dive deeper, we’ll explore the costs, benefits, and key factors in choosing the best asphalt paving solution for your needs. Stay tuned for detailed insights!

Asphalt driveway contractor near me definitions:
– Paving Contractor
– asphalt company
– pavers company near me
Understanding Asphalt Driveway Costs
When planning for an asphalt driveway, understanding the costs involved is crucial. Let’s break down the key factors that influence the final price.
Cost Calculation
The cost of an asphalt driveway is typically calculated based on square footage. On average, you can expect to pay between $3 and $5 per square foot. This means for a standard 1500 square foot driveway, the total cost could range from $4,500 to $7,500. However, several factors can cause this to vary.
Square Footage
The size of your driveway is the most significant factor in determining the cost. Larger driveways require more materials and labor, which increases the overall expense. It’s important to measure accurately to ensure you get an accurate quote.
Material Costs
Asphalt is made from a mixture of aggregates and bitumen, which are generally more affordable than concrete. However, the thickness of the asphalt layer will affect the price. Thicker layers provide more durability but also add to the cost.

Labor Costs
Labor costs can vary based on location and the complexity of the project. For instance, driveways that require extensive grading or preparation work will incur higher labor costs. It’s wise to get multiple quotes from contractors to ensure competitive pricing.
Additional Factors
Beyond these basics, other factors can influence costs:
- Drainage Solutions: Proper drainage is essential and may add to your expenses. Drainage Solutions
- Local Rates: Costs can vary based on local labor rates and material availability.
- Site Preparation: Removing existing pavement or significant grading can increase costs.
By understanding these elements, you can better anticipate the expenses involved in installing an asphalt driveway. This knowledge will help you make informed decisions and ensure you find the best asphalt driveway contractor near me for your project.
Next, we’ll explore why asphalt is often preferred over concrete for driveways. Stay tuned to learn more about the benefits and considerations of choosing asphalt.
How to Choose the Right Asphalt Driveway Contractor Near Me
Finding the right asphalt driveway contractor near me can make all the difference in your driveway project. Here are some key factors to consider when making your choice.
Contractor Selection
Begin by gathering recommendations from friends and neighbors who have recently had asphalt work done. Personal experiences can provide valuable insights into a contractor’s reliability and quality of work. Additionally, explore online reviews on platforms like Angi and the Better Business Bureau to gauge customer satisfaction and identify potential red flags.
When evaluating contractors, don’t hesitate to ask questions about their experience, credentials, and past projects. A contractor with a proven track record will likely deliver better results.
Local Expertise
Choosing a contractor with local expertise is crucial. Local contractors are familiar with the region’s climate and soil conditions, which can affect the longevity of your driveway. They also have established relationships with local suppliers, ensuring timely access to quality materials.
A contractor who understands local regulations and zoning laws can help steer any necessary permits, saving you time and headaches.
Quality Assurance
Quality assurance is paramount when selecting an asphalt contractor. Look for contractors who offer warranties on their work. A warranty indicates that the contractor stands by the quality of their craftsmanship.
Request references from recent projects and contact past clients to ask about their experiences. Positive feedback is a good indicator of a contractor’s reliability and attention to detail.
Additionally, ensure the contractor is licensed, insured, and bonded. This protects you from potential liabilities and demonstrates the contractor’s professionalism.
By carefully considering these factors, you can confidently select the best asphalt driveway contractor near me to ensure a smooth and successful project.
Next, we’ll dig into the benefits of choosing asphalt over concrete for your driveway. Stay tuned to find why asphalt might be the ideal choice for you.
Benefits of Asphalt Over Concrete for Driveways
When deciding between asphalt and concrete for your driveway, it’s important to weigh the pros and cons. Let’s explore why asphalt often emerges as the preferred choice.
Cost Comparison
One of the most compelling reasons to choose asphalt is its cost-effectiveness. On average, asphalt driveways are less expensive to install than concrete ones. While prices can vary based on location and specific project requirements, asphalt typically costs between $3 to $5 per square foot. In comparison, concrete can range from $5 to $10 per square foot.
This cost difference is particularly noticeable for larger driveways, making asphalt a budget-friendly option.
Installation
Asphalt installation is generally quicker and less labor-intensive than concrete. Once laid, asphalt can be ready for use within 24 to 48 hours. This quick turnaround is beneficial for homeowners who want minimal disruption.
Concrete, however, can take up to a week to cure fully. This extended curing time can be inconvenient and may delay use of the driveway.
Durability
Asphalt driveways are known for their flexibility and resilience. They can withstand temperature fluctuations and minor ground movements without cracking. This makes asphalt an excellent choice for regions with extreme weather conditions.

Moreover, asphalt is easy to repair. Small cracks can be filled with cold mix asphalt, extending the driveway’s lifespan. Regular sealcoating, which protects against water damage and UV rays, can further improve durability.
In contrast, concrete driveways are prone to cracking, especially in areas with freeze-thaw cycles. While concrete is strong and durable, repairs can be more complex and costly.
Environmental Impact
Asphalt is the most recycled product in America. It can be reused multiple times, reducing its environmental footprint. Using recycled asphalt mix not only benefits the environment but also improves the driveway’s strength and longevity.
Concrete, while also recyclable, doesn’t offer the same level of flexibility in reuse as asphalt.
By considering these factors—cost, installation, and durability—asphalt emerges as a practical and efficient choice for many homeowners. In the next section, we’ll explore common issues with asphalt driveways and how to address them effectively.
Common Issues with Asphalt Driveways and How to Fix Them
Even though asphalt driveways are a great choice, they can still face some common problems. Let’s explore these issues and explore how to solve them effectively.
Tree Roots
Tree roots are a frequent culprit behind driveway damage. They grow under the asphalt, pushing it upwards and creating bumps or cracks. This not only looks bad but can also be hazardous.
Solution:
- Root Barrier Installation: Before installing a driveway, consider installing root barriers to prevent roots from reaching the asphalt.
- Regular Inspection: Keep an eye on nearby trees. If you notice roots starting to affect the driveway, consult an arborist or a professional contractor to address the issue early.
Repair Costs
Asphalt driveways, while durable, may require repairs over time. Costs can vary based on the extent of damage and the repair method.
Common Repairs Include:
- Crack Filling: Small cracks can be filled with a hot sealant to prevent water from seeping in and causing further damage.
- Pothole Repair: Potholes should be filled and compacted promptly to maintain a smooth surface and prevent accidents.
Cost Considerations:
Repair costs can range from a few dollars for simple crack filling to hundreds for extensive pothole repairs. Regular maintenance can help keep these costs down.
Maintenance Tips
Proper maintenance can significantly extend the life of your asphalt driveway. Here are some simple tips:
- Sealcoating: Apply a sealcoat every 3-5 years. This protects the surface from water, oil, and UV damage.
- Regular Cleaning: Remove debris and clean oil spills promptly to prevent staining and deterioration.
- Prompt Repairs: Address cracks and potholes as soon as they appear to prevent larger issues.
By understanding these common issues and taking proactive steps, you can ensure your asphalt driveway remains in top condition for years to come. In the next section, we’ll address frequently asked questions about asphalt driveways, including cost calculations and comparisons with concrete.
Frequently Asked Questions about Asphalt Driveways
How do you calculate the cost of an asphalt driveway?
Calculating the cost of an asphalt driveway involves a few key steps. First, measure the area where you want the driveway. Multiply the length by the width to get the total square footage. For example, if your driveway is 50 feet long and 30 feet wide, it covers 1,500 square feet.
Next, consider the cost per square foot. On average, asphalt driveways cost between $3 and $5 per square foot. This price includes both materials and labor. Therefore, for a 1,500 square foot driveway, expect to pay between $4,500 and $7,500.
Don’t forget to factor in additional costs like permits, drainage solutions, and any necessary site preparation. It’s always a good idea to get a detailed quote from your local contractor to avoid surprises.
How much is 1,500 square feet of asphalt?
For a 1,500 square foot asphalt driveway, the total cost can range from $10,500 to $19,500. This includes both materials and labor. The price can vary based on factors like the thickness of the asphalt, the base material, and regional pricing differences.
Pro Tip: Always ask for a breakdown of costs in your quote. This helps you understand where your money is going and allows you to compare quotes from different contractors effectively.
Is asphalt cheaper than concrete for a driveway?
Yes, asphalt is generally cheaper than concrete for paving a driveway. Asphalt costs between $3 and $5 per square foot, while concrete typically ranges from $6 to $10 per square foot.
Installation Time: Asphalt driveways are quicker to install, often completed in a day or two. Concrete driveways take longer to cure, which can extend the installation process.
Durability and Maintenance: Asphalt is less expensive upfront and easier to repair. However, it requires more maintenance, like sealcoating, to maximize its lifespan. Concrete, while more costly initially, is more durable and requires less frequent maintenance.
In summary, if you’re looking for an affordable and quick-to-install option, asphalt is a great choice. However, if you’re willing to invest more upfront for a longer-lasting solution, concrete might be worth considering.
With these insights, you’re now better equipped to make informed decisions about your driveway project. Next, let’s explore how Marchi Paving Inc. can ensure high-quality execution with their advanced equipment and expertise.
Conclusion
When it comes to choosing an asphalt driveway contractor near me, Marchi Paving Inc. stands out as a leader in the field. Based in Chelmsford, MA, we pride ourselves on delivering high-quality execution for every project.
High-Quality Execution
Our commitment to quality is best. With over 20 years of experience, we ensure that each driveway is not only functional but also improves the beauty of your property. We understand that a well-paved driveway is an investment, and we strive to deliver results that stand the test of time.
Advanced Equipment
At Marchi Paving Inc., we believe in using the best tools for the job. Our advanced equipment allows us to execute projects efficiently and to the highest standard. This means less downtime for you and a smoother, more durable surface that can handle the demands of everyday use.
Why Choose Us?
- Local Expertise: As a local business, we understand the unique needs of our community. We are familiar with the local climate and soil conditions, ensuring that your driveway is built to last.
- Comprehensive Services: Beyond asphalt paving, we offer a range of services including excavation, masonry, and drainage solutions. This means we can handle all aspects of your project in-house, providing a seamless experience from start to finish.
- Customer Satisfaction: Our clients consistently praise our attention to detail and dedication to customer satisfaction. We work closely with you to ensure your vision becomes a reality.
Ready to transform your driveway with the help of true professionals? Contact Marchi Paving Inc. today to get started on your project. Let us show you the Marchi Paving difference.
Hardscape and Landscape: Top Benefits in 2024 Guide
Hardscape and landscape are two key elements in crafting the perfect outdoor space. They work together to improve a property’s aesthetics and functionality. Both are essential for balancing the natural and structural aspects of an outdoor area. Here’s a quick rundown:
- Hardscape: Includes non-living elements like concrete, rocks, bricks, pavers, and wood. Provides structure and functionality.
- Landscape: Encompasses living elements such as grass, plants, trees, and flowers. Brings softness and life.
Achieving a harmonious blend of these elements can transform any yard into a stunning retreat. A well-thought-out design that balances hard and soft features not only improves the appeal but also the utility of your space. Imagine a yard where stone pathways lead gracefully through vibrant flower beds or a patio that flows seamlessly into lush lawns. This balance creates inviting areas for relaxation, entertainment, and enjoyment.
Understanding how hardscape and landscape complement each other is crucial. Whether you’re dealing with a small backyard or a grand commercial property, incorporating these elements can lift your space. Not only will your outdoor area look fantastic, but it will also meet your practical needs, enhancing everything from drainage to privacy.

Simple hardscape and landscape glossary:
– hardscape design
– hardscape maintenance service
– landscape professionals near me
Hardscape vs. Landscape: Knowing the Difference
When designing an outdoor space, understanding the difference between hardscape and landscape is crucial. These terms describe the two main components that make up your yard, each playing a unique role in creating a balanced and inviting environment.
What Is Hardscape?
Hardscape refers to the non-living elements in your outdoor design. Think of these as the “bones” of your landscape—solid and enduring features that provide structure and definition. Common hardscape materials include:
- Concrete: Used for patios, driveways, and walkways.
- Rocks and Stones: Ideal for creating retaining walls and decorative accents.
- Bricks and Pavers: Popular for pathways and patios, adding a classic touch.
- Wood: Often used for decks, pergolas, and fences.
- Man-made Structures: Elements like arbors, gazebos, and outdoor kitchens fall under this category.
These elements are not just about aesthetics—they serve practical purposes too. For instance, retaining walls help manage soil erosion, while patios provide a durable space for outdoor gatherings.

What Is Landscape?
In contrast, landscape encompasses the living, “soft” elements of your outdoor area. These are the features that bring color, life, and movement to your space, changing it into a serene oasis. Key landscape elements include:
- Grass: Provides a lush, green carpet underfoot.
- Plants and Flowers: Add bursts of color and fragrance, attracting pollinators like bees and butterflies.
- Trees: Offer shade, structure, and habitat for wildlife.
- Shrubs: Can be used as decorative borders or privacy screens.
These living elements are vital for creating a calming and natural atmosphere. Properly placed trees can even reduce energy costs by providing shade in the summer and windbreaks in the winter.
By combining hardscape and landscape, you can craft an outdoor area that is both beautiful and functional. Imagine a garden where stone pathways wind through vibrant flower beds, or a deck that seamlessly transitions into a grassy lawn. This harmonious blend of hard and soft elements is key to changing any yard into a stunning retreat.
Benefits of Hardscaping
When it comes to enhancing your outdoor space, hardscaping offers numerous benefits that go beyond just adding visual appeal. From increasing functionality to improving drainage, hardscaping can transform your yard into a more efficient and enjoyable space.
Practical Uses
Hardscaping elements serve a variety of practical purposes in your yard. Here are some examples:
- Retaining Walls: These structures are essential for managing soil erosion and can create more usable space in sloped areas. They are not just functional; they can also be a beautiful addition to your landscape design.
- Stone Stairs and Paths: These elements guide foot traffic and connect different areas of your yard. They also add a touch of elegance and can be designed to complement the natural flow of your landscape.
- Drainage Improvement: Hardscaping can significantly improve drainage in your yard. Features like retaining walls and stone steps can redirect water flow, preventing standing water and flooding issues.
- Privacy Fences and Gates: These provide seclusion and security, creating a private oasis in your backyard. They also act as a backdrop for your landscape, enhancing the overall aesthetic.
Enhancing Outdoor Living
Hardscaping is not only about functionality; it also improves your outdoor living experience. Consider the following features:
- Outdoor Kitchens and Patios: These amenities extend your living space outdoors, providing a perfect spot for dining and entertaining. They are ideal for hosting gatherings or enjoying a quiet meal under the stars.
- Decks and Fireplaces: A deck can be a versatile space for relaxation or social activities, while a fireplace or fire pit adds warmth and ambiance, making your outdoor area usable even in cooler weather.
- Fire Pits: These create a cozy atmosphere and serve as a focal point for gatherings. Whether roasting marshmallows or simply enjoying the fire’s glow, a fire pit adds charm and functionality to your yard.
With these hardscaping elements, your outdoor space becomes more than just a yard—it becomes an extension of your home. Whether you’re looking to entertain guests or find a peaceful retreat, hardscaping provides the structure and amenities to make it happen.
Tips for Using Hardscape in Your Design
Integrating hardscape into your outdoor space can lift its aesthetic and functional appeal. Here’s how you can make the most of it:
Matching Exterior
To create a seamless flow between your home and yard, consider matching your hardscape materials to the exterior of your house. For instance, if your home features stone elements, incorporate similar stonework into your paths or patios. This cohesive design makes the transition from indoors to outdoors feel natural and intentional.
Creating Focal Points
Incorporate focal points in your design to guide the viewer’s gaze and add interest. Think about using a striking piece of stonework or a unique water feature as a centerpiece. Surround these focal points with softer landscaping elements like shrubs or flowers to provide places for the eyes to rest, creating a balanced and inviting atmosphere.
Incorporating Curves
Avoid too many straight lines, which can make your space feel rigid and unnatural. Instead, add curves and rounded edges in your design to improve creativity and visual appeal. This approach not only softens the look but also mimics the organic shapes found in nature, making your space feel more authentic.
Drainage Considerations
Proper drainage is crucial in any hardscape design. Use features like retaining walls and stone steps to manage water flow and address areas prone to standing water. These elements can help distribute water evenly across your yard, preventing flooding and ensuring your landscape remains healthy.
Planning for Expansion and Contraction
The natural expansion and contraction of the earth can damage your hardscaping if not properly planned for. Ensure that your hardscape elements are set below the frost line to prevent damage from temperature changes. This foresight will protect your investment and maintain the integrity of your outdoor design.
Integrating Greenery
Balance your hardscape with lush, vibrant greenery to avoid a cold, unwelcoming feel. Incorporating plants and shrubs softens the look of stone and concrete, adding warmth and a welcoming touch to your space. This integration not only improves aesthetics but also promotes a harmonious blend of hard and soft elements in your yard.
Hardscape and Landscape Maintenance
Keeping your hardscape and landscape in top shape is essential for maintaining their beauty and functionality. Let’s explore how you can ensure longevity and protect your investment.
Hardscape Maintenance
Hardscaping involves durable materials like stone, concrete, and wood. However, these elements still need care to stay in good condition.
Protective Measures
- Sealant Application: Applying a protective sealant can help prevent stains and water damage. This is especially important for porous materials like stone and concrete.
- Crack and Chip Repair: Regularly inspect your hardscape for cracks or chips. Fill them promptly to avoid further damage.
- Weed Prevention: Weeds can grow between pavers and stones. Use a weed barrier or apply weed-preventing solutions to keep them at bay.
Longevity Tips
- Frost Line Awareness: Ensure hardscape elements are set below the frost line to prevent damage from ground expansion and contraction.
- Regular Inspections: Check for any signs of wear or damage and address them quickly to extend the life of your hardscaping.
Cleaning Hardscape
Cleaning is crucial for maintaining the appearance and safety of your hardscape surfaces.
Protective Cleaning
- Spills and Stains: Clean up spills immediately to prevent staining. Use appropriate cleaning agents for different materials.
- Mold and Mildew: These can be slippery and unsightly. Remove them promptly using suitable cleaning solutions.
Tools and Techniques
- Pressure Washer: A pressure washer is effective for cleaning surfaces like concrete and flagstone. However, be cautious with materials like wood or composite decking, which can be damaged by high pressure.
- Gentle Tools: Avoid wire brushes or heavy-duty scrapers that might scratch or dent surfaces. Opt for softer brushes and non-abrasive cleaners.
By following these maintenance and cleaning tips, you can ensure your hardscape and landscape remain beautiful and functional for years to come.
Adding Value and Curb Appeal
When it comes to boosting your home’s value and making it stand out in the neighborhood, both hardscaping and landscaping play crucial roles. These elements not only improve the aesthetic appeal but also provide functional benefits that can increase your return on investment (ROI).
Hardscaping Features
Patios, Decks, and Outdoor Kitchens
Imagine stepping into a backyard with a beautifully crafted patio. Patios and decks are among the most sought-after hardscaping features. They offer a space for relaxation and entertainment, making your outdoor area an extension of your living space. Adding an outdoor kitchen can further lift this experience, providing a convenient and stylish way to host gatherings.
Stonework
Stone elements like pathways and retaining walls add a timeless elegance to any property. They guide visitors through your garden, creating a sense of flow and structure. Stonework not only looks impressive but also requires less maintenance compared to other materials, making it a practical choice for homeowners.
Landscaping Features
Flowers, Trees, and Decorative Shrubs
Landscaping brings life and color to your outdoor space. Planting a variety of flowers can create a vibrant and inviting environment. Trees offer shade and privacy, while decorative shrubs add texture and depth. These elements work together to create a harmonious and visually appealing landscape.
Complementary Design
A well-designed landscape complements the hardscaping features, enhancing the overall look and feel of your property. For example, lush greenery around a stone patio can soften its edges and create a seamless transition between different areas of your yard. This balance is key to achieving a cohesive and attractive outdoor space.
Incorporating both hardscape and landscape elements not only boosts curb appeal but also increases the property’s value. Whether you’re planning to sell or simply want to enjoy a more beautiful home, investing in these features can yield significant benefits.
Frequently Asked Questions about Hardscape and Landscape
What is the difference between hardscapes and landscapes?
Hardscapes and landscapes are two essential components of outdoor design, but they serve different purposes. Hardscapes refer to the non-living, man-made elements like driveways, walkways, patios, and walls. These structures are typically made from materials such as concrete, stone, brick, metal, and gravel. They provide a solid foundation and define the structure of your outdoor space.
In contrast, landscapes involve the living, natural elements like lawns, gardens, trees, and flowers. These features add life, color, and texture to your outdoor area, creating a lush and inviting environment. While hardscapes offer functionality and durability, landscapes bring beauty and a sense of tranquility.
What is hardscape for landscape?
Incorporating hardscape into your landscape design transforms your outdoor area into a functional and enjoyable space. Hardscape elements like patios and walkways define paths and gathering spots, making it easier to steer through your garden. Walls can provide privacy or act as retaining structures, while water features and fire pits add focal points and improve the ambiance.
Lighting and pergolas further improve the outdoor experience, allowing you to enjoy your space at any time of day. These features create an “outdoor room” feel, seamlessly extending the comfort and style of your home to the outdoors.
What is the meaning of hardscape?
Hardscape refers to the use of hard landscaping materials to create structural and functional features in an outdoor space. These materials include concrete, asphalt, stone, glass, brick, metal, and gravel. Hardscape elements provide the backbone of your outdoor design, offering durability and low maintenance.
They help define areas within your landscape, such as seating areas on patios, pathways through gardens, or driveways leading to your home. By incorporating hardscape elements, you can create a cohesive and organized outdoor environment that complements the natural beauty of your landscape.

In summary, hardscape and landscape elements work together to create a balanced and functional outdoor space. Whether you’re enhancing your property’s curb appeal or creating a private oasis, understanding these differences can help you make informed design choices.
Conclusion
At Marchi Paving Inc., we believe in the seamless integration of hardscape and landscape to transform your outdoor spaces into functional and beautiful living areas. Our expert services in Chelmsford, MA, focus on delivering high-quality results that improve your outdoor living experience.
With over 20 years of experience, our team is dedicated to crafting outdoor environments that blend aesthetics and functionality. We use advanced equipment and materials to ensure every project is executed with precision and care. Whether you’re looking to install a new patio, create a stunning walkway, or add a retaining wall, we have the expertise to bring your vision to life.
Our approach to hardscaping is not just about adding structures; it’s about creating spaces where you can relax, entertain, and enjoy the beauty of nature. By incorporating elements like outdoor kitchens, fire pits, and water features, we help you extend the comfort of your home into the outdoors. These features not only improve your property’s value but also provide a space for making memories with family and friends.
Choose Marchi Paving Inc. for your next hardscaping project and find how we can transform your outdoor space. Our commitment to quality and customer satisfaction ensures that you’ll receive a final product that exceeds your expectations.
Explore our hardscaping services today and let us help you create the outdoor oasis you’ve always dreamed of.
Cinder Block Retaining Wall: Top 5 Benefits & Drawbacks
When considering landscaping projects, a cinder block retaining wall often stands out as a practical choice for homeowners and property managers alike. They are not only functional but also affordable and relatively easy to install. If you’re short on time and just need a quick answer, here’s what you need to know:
- Purpose: Cinder block retaining walls help control soil erosion, create leveled garden beds, and provide privacy and safety for pets and children.
- Benefits:
- Cost-effective: Typically cheaper than other materials like natural stone or brick.
- Lightweight: Easier to work with, although it may require additional support for heavy loads.
- Versatile: Available in different shapes and sizes for various design preferences.
Cinder block retaining walls are becoming less common as preferences shift toward concrete blocks due to their strength and durability. However, when appropriately used, they offer a robust and reliable solution for many outdoor projects. Whether you’re tackling erosion problems or looking to add a new dimension to your garden, a cinder block retaining wall is a versatile option that can last for years with proper maintenance.

Easy cinder block retaining wall word list:
– block wall
– how to build a retaining wall with blocks
– concrete retaining wall blocks
What is a Cinder Block Retaining Wall?
A cinder block retaining wall is a type of structure used primarily to hold back soil and create level areas in a garden or yard. These walls are made from cinder blocks, which are hollow, rectangular blocks typically composed of concrete and coal cinders.
Materials and Structure
Cinder blocks are lighter than concrete blocks, thanks to the coal cinders used in their composition instead of heavier aggregates like sand or gravel. This makes them easier to handle and install, but also less strong and durable. They come in standard sizes, often making them interchangeable with concrete blocks in some projects.
The structure of a cinder block retaining wall involves stacking these blocks in a staggered pattern, and they are often reinforced with steel bars or filled with concrete for added strength. Proper installation is crucial to ensure stability and longevity.
Purpose
These walls serve multiple purposes:
- Erosion Control: They prevent soil from shifting, especially on sloped landscapes.
- Garden Design: Cinder block walls can create raised garden beds, adding visual interest and functionality to outdoor spaces.
- Privacy and Safety: When built to a certain height, they can offer privacy and act as enclosures for pets and children.

Despite their benefits, cinder block retaining walls are becoming less common due to their limited strength compared to concrete blocks. However, for the right project, they provide a cost-effective and versatile solution.
Pros of Cinder Block Retaining Walls
Durability
Cinder block retaining walls are known for their durability. While they may not be as strong as solid concrete blocks, they can still last for many years with proper care. The hollow design allows for reinforcement with steel bars or concrete, which can significantly improve their strength and longevity.
Cost-Effectiveness
One of the biggest advantages of using cinder blocks is their cost-effectiveness. They are generally cheaper than solid concrete blocks, both in terms of material and transportation costs due to their lighter weight. For homeowners on a budget, this can be a significant benefit.
Ease of Installation
Cinder blocks are lighter than their concrete counterparts, making them easier to handle and install. This can reduce labor costs and make the installation process quicker and more straightforward. For those considering a DIY project, this ease of handling can be particularly appealing.
Versatility
These blocks are incredibly versatile. They can be used in various landscaping projects, from creating garden beds to constructing small retaining walls. Their standard sizes and shapes allow for easy customization and adaptation to different designs and requirements.
Although cinder blocks might not be the first choice for decorative purposes, they offer a range of aesthetic possibilities. They can be painted, stuccoed, or faced with stone veneers to match the surrounding environment and improve the visual appeal of your landscape. This flexibility allows homeowners to create a look that complements their home and garden.

In summary, while cinder blocks may not be the most robust option available, they provide a durable, cost-effective, and versatile solution for many projects. Their ease of installation and aesthetic adaptability make them a popular choice for various landscaping needs.
Cons of Cinder Block Retaining Walls
While cinder block retaining walls offer several benefits, there are some drawbacks to consider before starting your project.
Weight Limitations
Cinder blocks are lighter than solid concrete blocks because they are made with coal cinders instead of denser aggregates like sand or gravel. This makes them easier to work with but also means they have a reduced pressure-bearing capacity.
This limitation can be a concern if your retaining wall needs to support heavy loads or withstand significant pressure from the soil behind it.
Potential for Cracks
One of the most common issues with cinder block retaining walls is their tendency to develop cracks over time. The material is more prone to bending and buckling, especially if not properly reinforced. Cracks can compromise the wall’s integrity and lead to costly repairs.

Maintenance
Maintaining a cinder block retaining wall can be labor-intensive. Regular inspections are necessary to check for any signs of damage, such as cracks or buckling. Repairs can be expensive, especially if the wall has been compromised by poor construction or environmental factors.
Drainage Issues
Proper drainage is crucial for the longevity and stability of any retaining wall. Cinder block walls can struggle with drainage if not correctly designed and installed. Poor drainage can lead to water buildup behind the wall, increasing pressure and the risk of collapse.
To mitigate this, incorporate drainage solutions like weep holes or gravel backfill to allow water to escape and reduce pressure on the wall.
In conclusion, while cinder block retaining walls offer a cost-effective and versatile option for many homeowners, they come with certain limitations. It’s important to weigh these cons against the benefits and consider professional installation to ensure your wall is both safe and durable.
How to Build a Cinder Block Retaining Wall
Building a cinder block retaining wall is a rewarding DIY project that can improve your property’s functionality and aesthetics. Here’s a step-by-step guide to help you get started.
Preparation
Tools and Materials Needed
Before you begin, gather the following tools and materials:
- Tools: 3-lb. hammer, 4 ft. level, block chisel, brick tongs, caulk gun, shovel, tamper, tape measure, transit, trowel, wheelbarrow.
- Materials: Compactable gravel, concrete adhesive, crushed gravel, sand, cinder blocks.
Site Assessment and Excavation
- Assess the Site: Determine the wall’s location and height. Check with local building codes to ensure compliance and determine if a permit is required.
- Excavate the Area: Clear the site of any debris. Excavate a trench deep enough to accommodate 4-6 inches of compacted base material, 1 inch of leveling sand, and half the height of the first course of blocks.
- Prepare the Base: Lay down compactable gravel in the trench. Use a tamper to compact the gravel until it’s level and stable.
Building the Wall
Laying the First Course
- Leveling: Spread leveling sand over the compacted gravel. Use a long, straight screed board and the tops of stakes as guides to ensure a flat surface.
- Lay the First Row: Place the first row of cinder blocks on the leveled sand. Use a string line to keep the row straight and a level to ensure each block is even.
Adding Subsequent Courses
- Install Pins: Use pins to lock each course together and maintain a 3/4-inch backset for stability. Offset vertical joints by at least 4 inches from the row below for added strength.
- Backfilling: After laying each course, backfill with crushed gravel to promote drainage and stability. Use a wheelbarrow to transport materials and a shovel to fill gaps.
Finishing Touches
Cap Blocks and Drainage Solutions
- Cap Blocks: Secure cap blocks with concrete adhesive for a polished finish. Position them with a slight overhang or flush with the wall face, depending on your preference.
- Drainage Solutions: Incorporate drainage features like weep holes or gravel backfill to prevent water buildup behind the wall. This helps reduce pressure and extends the wall’s lifespan.
Landscaping
Improve the appearance of your cinder block retaining wall with landscaping. Plant flowers or shrubs along the wall’s base, or add decorative stones for a finished look.
By following these steps and using the right tools and materials, you can build a sturdy and attractive retaining wall. Safety is key, so wear protective gear and consider enlisting a professional if you’re unsure about any part of the process.
Cost of Cinder Block Retaining Walls
When considering a cinder block retaining wall, understanding the costs involved is crucial. Let’s break down what you can expect in terms of material costs, labor expenses, and whether to tackle the project yourself or hire a professional.
Material Costs
Cinder blocks are generally more affordable than other building materials. However, their availability can be limited since production has decreased over the years. If you can find quality cinder blocks, expect to pay about $1 to $3 per block. You’ll also need additional materials like compactable gravel, sand, and concrete adhesive, which can add another $150 to $300 for a small project.
Labor Costs
Hiring a professional to build your retaining wall can significantly increase the total cost. Labor costs for installing a cinder block wall range from $33 to $90 per linear foot, depending on local rates and the complexity of the job. For a wall that’s 3 to 6 feet tall, total installation costs, including labor and materials, can range from $60 to $210 per linear foot.
DIY vs. Professional Installation
Building a retaining wall yourself can save you between $14 and $46 per square foot. However, it’s important to weigh these savings against the potential challenges and risks. DIY projects require time, effort, and the right tools. Mistakes can lead to costly repairs down the line.
Professionals, on the other hand, bring expertise and efficiency, reducing the risk of errors. They also handle permits and adhere to local building codes, which can be a hassle for DIYers.
Cost-Saving Tips
If you’re set on saving money, consider these tips:
- Choose Affordable Materials: Concrete is a cost-effective option that offers durability.
- Do Some Prep Work: Clear the site and excavate the area yourself to cut down on labor costs.
- Build a Shorter Wall: Reducing the height of your wall can lower both material and labor expenses.
- Obtain Multiple Quotes: Get at least three estimates from contractors to find the best deal.
By understanding these cost factors and considering your own capabilities, you can make an informed decision about how to proceed with your cinder block retaining wall project.
Tips for Maintaining Your Cinder Block Retaining Wall
Maintaining your cinder block retaining wall is key to ensuring its longevity and effectiveness. Here are some simple tips to keep your wall in top shape.
Regular Inspections
Perform regular inspections to catch small issues before they become big problems. Look for cracks, bulges, or any signs of shifting. Check the wall’s alignment to ensure it hasn’t moved. Inspections are especially important after heavy rains or freezing conditions, as these can cause damage.
Crack Repairs
Cracks can compromise the integrity of your wall. If you spot any, repair them promptly. Use a concrete patching compound to fill small cracks. For larger ones, you might need to replace the affected blocks. Early repair can prevent more extensive damage later.
Drainage Maintenance
Proper drainage is crucial. Without it, water pressure can build up behind the wall, leading to failure. Make sure drainage pipes and gravel are clear of debris. Regularly check that water can flow freely away from the wall. If you notice water pooling, it might be time to reassess your drainage system.
Cleaning
Keep your wall clean to prevent moss and mildew, which can weaken the structure. Use a mild detergent and a soft brush to scrub the surface. Avoid harsh chemicals, as they can damage the blocks. Rinse thoroughly with water to remove any soap residue.
By following these maintenance tips, your cinder block retaining wall will remain strong and serve its purpose for years to come. Up next, we’ll address some frequently asked questions about cinder block retaining walls.
Frequently Asked Questions about Cinder Block Retaining Walls
Are cinder blocks strong enough for retaining walls?
Cinder blocks are often used in retaining walls because they are lightweight and easy to handle. However, they have limitations in terms of strength and load capacity compared to solid concrete blocks. Cinder blocks are made with coal cinders, making them less dense and less strong. This means they are not ideal for very tall or heavy-duty retaining walls.
To improve their strength, reinforcement is crucial. This involves using rebar and filling the block cores with mortar or concrete. Proper reinforcement increases the wall’s ability to bear weight and resist pressure from the soil behind it.
How long do cinder block retaining walls last?
The lifespan of a cinder block retaining wall can vary, but with proper construction and maintenance, it can last for decades. Several factors affect durability, including climate, soil conditions, and the quality of the materials used.
Regular maintenance, such as inspecting for cracks and ensuring proper drainage, plays a significant role in longevity. Without these, water buildup can lead to cracks or wall failure over time. Consistent care and prompt repairs will help your wall stand the test of time.
Can I build a cinder block retaining wall myself?
Building a cinder block retaining wall is possible for DIY enthusiasts, but it requires a certain skill level and the right tools. It’s important to assess your abilities honestly before taking on this project.
Tools required include a measuring tape, level, mason’s trowel, and a small sledgehammer, among others. The process involves careful planning, from site preparation to laying blocks and ensuring proper drainage.
If you’re new to masonry, consider starting with a smaller wall or consulting with a professional. Incorrect installation can lead to costly repairs down the line. Properly assessing your skills and understanding the steps involved will determine if DIY is the right choice for you.
Conclusion
Building a cinder block retaining wall can be a practical solution for many homeowners looking to manage their landscape effectively. These walls offer a balance between affordability and functionality, making them a popular choice. However, understanding their limitations, such as potential for cracks and weight restrictions, is essential for long-term success.
Final Thoughts: Proper planning and maintenance are key to ensuring your retaining wall stands strong over time. Regular inspections, addressing drainage issues, and reinforcing the structure can significantly extend the wall’s lifespan. For those considering a DIY approach, it’s crucial to assess your skill level and have the right tools on hand. However, if the project seems overwhelming, hiring a professional is a wise investment.
At Marchi Paving Inc., we bring over 20 years of expertise in masonry and hardscaping services. Our team is committed to delivering high-quality results using advanced equipment and techniques. Whether you need installation, maintenance, or consultation, we’re here to help you achieve the best outcome for your property.
If you’re ready to improve your landscape with a durable and aesthetically pleasing retaining wall, contact us today for a consultation. Let us pave the way to a more beautiful and functional outdoor space.
Retaining Wall Stone Near Me: Top 5 Stunning Options
Why Retaining Walls are Essential for Your Property
Retaining wall stone near me is a common search for property managers, homeowners, and business owners alike, who aim to stabilize their landscapes effectively. Whether you need to manage sloped terrains or stabilize your property’s soil, selecting the right retaining wall stone is crucial.
- Stabilization: Retaining walls help prevent soil erosion and landslides on steep terrains.
- Support: They provide support to vertical slopes of soil, ensuring land usability.
- Aesthetic Improvement: Besides functionality, retaining walls contribute to enhancing the visual appeal of your landscape.
- Drainage: Properly installed retaining walls improve water drainage.
In areas like Middlesex County, MA, where managing accessibility and project coordination are key concerns, retaining walls are indispensable for both residential and commercial properties. Not only do they offer practical solutions to manage slopes and unstable earth, but they also add an element of beauty and structural integrity to any landscape.
Installing a retaining wall can seem overwhelming, but it’s all about selecting the right materials and professional expertise. Next, we’ll explore various types of stones available and their specific benefits for your retaining wall project.
 Retaining wall stone near me terms at a glance:
– retaining wall landscaping near me
– retaining wall repair near me
– retaining walls installers
Types of Retaining Wall Stones
When considering a retaining wall, the type of stone you choose can make a significant difference in both function and aesthetics. Let’s explore the options: granite, limestone, and boulders.
Granite Retaining Walls
Granite is a popular choice for retaining walls due to its durability and cost-effectiveness. This stone is known for its strength, making it ideal for supporting heavy loads and withstanding harsh weather conditions. Granite’s natural beauty and range of colors add a timeless appeal to any landscape.
- Durability: Granite is one of the hardest natural stones, ensuring your wall lasts for decades.
- Cost: While initially more expensive than some materials, its longevity makes granite a cost-effective option in the long run.
Limestone Retaining Walls
Limestone offers an aesthetic appeal that is hard to match. Its smooth texture and subtle color variations make it a favorite for those looking to add elegance to their property. However, this comes with a higher price tag compared to granite.
- Aesthetic Appeal: Limestone provides a refined and classic look that improves any landscape.
- Higher Cost: The beauty of limestone comes at a premium, but its visual impact can justify the expense.
Boulder Retaining Walls
For a more natural look, boulders are an excellent choice. These stones are often hand-placed, creating a unique and organic structure that blends seamlessly with natural surroundings. Boulder walls are not only functional but also add character to your landscape.
- Natural Look: Boulders provide a rustic and earthy appearance, perfect for natural landscapes.
- Hand-Placed: Each boulder is carefully selected and placed, resulting in a custom and one-of-a-kind wall.
Choosing the right stone for your retaining wall is about balancing practicality with personal style. Whether you prioritize the durability of granite, the elegance of limestone, or the natural beauty of boulders, there’s a perfect option for your project.
Next, we’ll dig into the benefits these stones bring to your property, beyond just holding back the earth.
Benefits of Retaining Wall Stones
Retaining wall stones are more than just a practical solution for holding back soil. They offer a range of benefits that improve your property in various ways.
Support and Stabilization
Retaining walls provide essential support and stabilization for landscapes with slopes or uneven terrain. By holding back soil, these walls prevent erosion and landslides, protecting your property and ensuring it remains safe and functional.
- Stability: Retaining walls keep soil in place, even during heavy rain or snowmelt.
- Protection: They safeguard your landscape from erosion, preserving the integrity of your property.
Drainage
Proper drainage is crucial for any retaining wall. Without it, water can build up behind the wall, leading to pressure and potential failure. Retaining wall stones are designed to allow water to pass through or around them, reducing hydrostatic pressure and preventing damage.
- Water Management: Stones like boulders and crushed stone promote natural water flow, preventing buildup.
- Longevity: Good drainage extends the life of your wall, reducing maintenance and repair costs.
Aesthetics
Retaining wall stones add a visual appeal that transforms your landscape. Whether you choose the timeless elegance of limestone or the rugged charm of boulders, these walls can be a stunning focal point in your outdoor space.
- Visual Appeal: Stones offer a variety of colors and textures to complement your landscape design.
- Customization: Hand-placed stones like boulders create unique, personalized structures.
Property Value
Investing in a well-designed retaining wall can increase your property’s value. Not only do they improve the aesthetic appeal, but they also improve functionality and safety, making your property more attractive to potential buyers.
- Curb Appeal: A beautiful retaining wall boosts the overall look of your property.
- Market Value: Improved aesthetics and functionality can lead to a higher resale value.
By choosing the right retaining wall stones, you can enjoy these benefits and more. Next, we’ll explore how to select the best stone for your specific needs and environmental conditions.
Choosing the Right Stone for Your Retaining Wall
Selecting the right stone for your retaining wall involves understanding the differences between materials like crushed stone and natural gravel. Each option has its own benefits, especially when it comes to drainage and compacting. Additionally, considering the environmental and soil conditions of your site is crucial for a successful project.
Crushed Stone vs. Natural Gravel
Crushed stone and natural gravel are two popular choices for retaining wall bases. They both offer excellent drainage, which is crucial to prevent water buildup and pressure behind the wall.
- Crushed Stone: Known for its angular edges, crushed stone compacts well, providing a stable base that supports the wall structure. Its rough texture allows for better locking between stones, enhancing stability.
- Natural Gravel: This option is smoother and typically more rounded. While it provides good drainage, it may not compact as tightly as crushed stone. However, it still remains a reliable choice for aesthetic and functional purposes.
When comparing these materials, consider the specific needs of your project. If compacting and a strong base are priorities, crushed stone may be the better choice. For projects where the natural look is more important, natural gravel could be suitable.
Environmental and Soil Considerations
Before starting your retaining wall project, analyze the environmental conditions and soil at your site. A thorough site analysis will help determine the best materials and methods for your wall.
- Soil Conditions: Understanding the type of soil you’re working with is crucial. Different soils have varying levels of stability, drainage, and compacting needs. For instance, clay-heavy soils may require additional drainage solutions to handle water retention.
- Environmental Requirements: Consider local weather patterns, such as heavy rain or freeze-thaw cycles, which can affect the wall’s durability. Materials like boulders and crushed stone are often chosen for their resilience in challenging climates.
A professional site analysis can help identify these factors and guide you in choosing the right stone and design for your retaining wall. With careful planning, your wall will not only look great but also stand the test of time.
By taking these considerations into account, you can ensure that your retaining wall is both functional and beautiful. Next, we’ll dive into the installation process, from consultation to construction.
Installation Process for Retaining Walls
Project Consultation and Site Analysis
The journey to a successful retaining wall begins with a project consultation. This step is crucial as it allows clients to outline their needs, budgets, and time frames. At this stage, Marchi Paving Inc. focuses on understanding the unique requirements of each project, ensuring that the final result aligns with the client’s vision.
Following the initial consultation, a thorough site analysis is conducted. This involves evaluating the soil conditions and environmental factors that could impact the wall’s stability. By understanding these elements, we can tailor the design to suit the specific site, enhancing both functionality and longevity.
Design and Engineering
Once the site analysis is complete, the next step is design and engineering. During this phase, detailed scaled plans are developed, taking into account the topography and selected materials. These plans serve as a blueprint, guiding the construction process and ensuring that all elements are in harmony.
For projects that require it, certified stamped plans are obtained. These are crucial for meeting regulatory standards and ensuring that the wall is engineered to withstand environmental pressures. Whether it’s a small garden wall or a large structural retaining wall, Marchi Paving Inc. ensures that every design is carefully crafted for durability and aesthetic appeal.
Construction and Completion
The final phase is construction and completion. Here, the project schedule is set, and the work is carried out by our professional stone mason team. Their expertise guarantees that each stone is placed with precision, contributing to the overall strength and beauty of the wall.
Throughout the construction process, quality assurance is a top priority. Regular inspections are conducted to ensure that the wall meets both structural and aesthetic standards. This commitment to quality ensures that the finished product not only meets but exceeds client expectations.
With these steps, Marchi Paving Inc. delivers retaining walls that are both functional and visually striking. By focusing on client needs and employing expert craftsmanship, we create structures that stand the test of time.
Frequently Asked Questions about Retaining Wall Stones
What’s the cheapest stone retaining wall cost?
When considering the cost of a stone retaining wall, granite and limestone are popular materials, each with its own price range. Granite is often seen as a cost-effective option due to its durability and long lifespan. On average, you can expect to pay between $40 and $110 per square foot for a natural stone wall, depending on the complexity and location of the project.
Limestone, while typically more expensive, offers a unique aesthetic appeal that many homeowners prefer. Its cost per square foot might be on the higher end of the spectrum compared to granite.
What is the cheapest kind of retaining wall?
If you’re looking for the most budget-friendly retaining wall options, consider materials like poured concrete or pressure-treated pine. These materials are generally cheaper than stone options, making them attractive for those with tighter budgets. However, they may not offer the same aesthetic and durability benefits as natural stone.
Stone options, while more costly upfront, can add significant value and beauty to your property. For a balance between cost and appearance, some homeowners opt for manufactured stone veneer, which typically costs between $20 and $40 per square foot.
What is the best stone for a retaining wall base?
The foundation of your retaining wall is crucial for its stability and longevity. Crushed stone is often recommended as the best base material due to its excellent drainage properties and ability to be compacted effectively. Proper drainage is essential to prevent water buildup, which can compromise the wall’s integrity.
Gravel is another option, but it may not compact as well as crushed stone. Ensuring that the base material is well-compacted and provides adequate drainage will help maintain the structural integrity of your retaining wall over time.
By understanding these aspects of retaining wall construction, you can make informed decisions that balance cost, appearance, and functionality for your landscape project.
Conclusion
At Marchi Paving Inc., we pride ourselves on delivering exceptional quality in every retaining wall project. Our in-house project execution ensures that every step, from design to construction, is handled by our skilled team. This approach allows us to maintain high standards and keep a close eye on quality control.
We use advanced equipment to improve efficiency and precision. This investment in technology means we can meet project timelines and budgets without compromising on quality. Our machinery helps create smooth, durable, and aesthetically pleasing retaining walls that stand the test of time.
With over 20 years of experience, we understand the nuances of different materials and environmental conditions. Whether you’re interested in granite for its cost-effectiveness and durability or limestone for its aesthetic appeal, we can help you choose the right stone for your needs.
Our commitment to customer satisfaction is unwavering. We offer transparent communication and detailed consultations to ensure your vision becomes reality. When you choose Marchi Paving Inc., you’re partnering with a team dedicated to delivering outstanding results.
Ready to transform your landscape with a stunning retaining wall? Contact us today to start your project and experience the Marchi Paving difference.
