
Gabion Retaining Wall: Top 10 Strong & Stylish Benefits
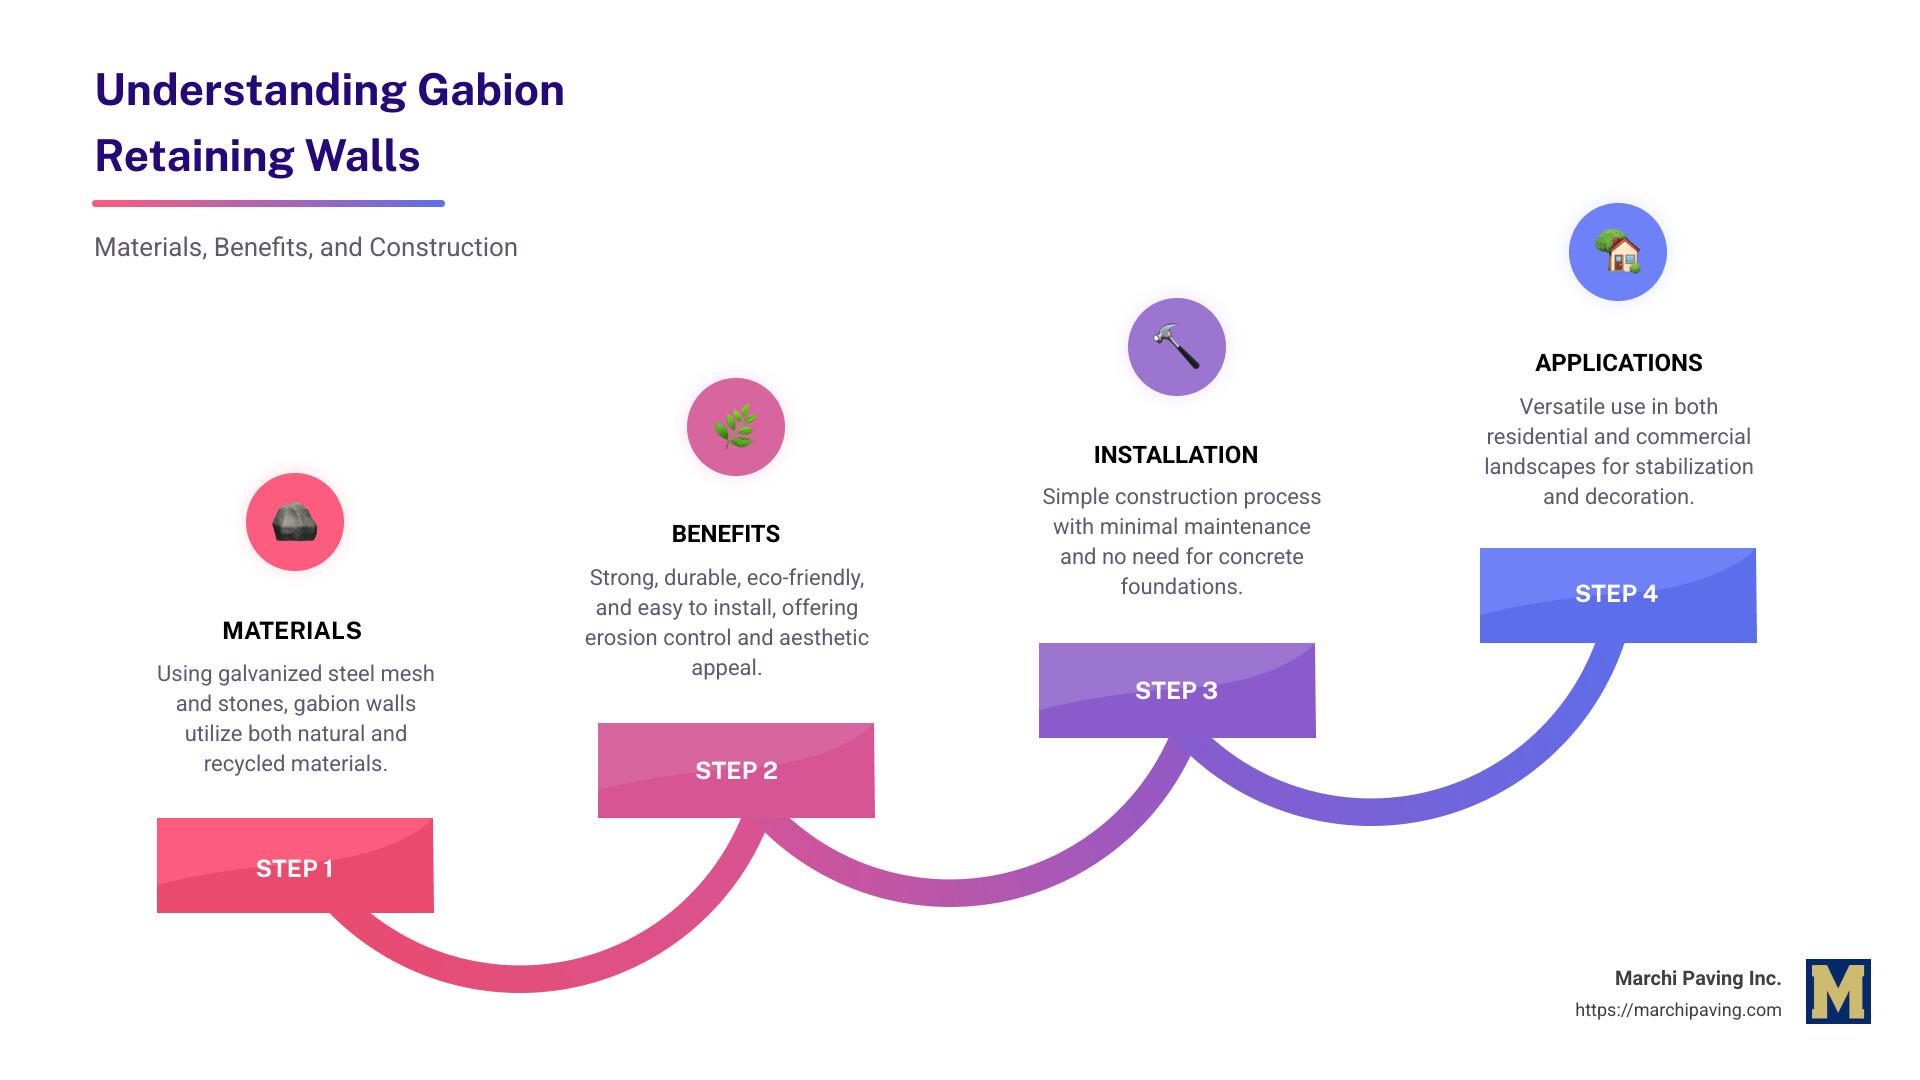
Gabion retaining wall is a popular solution for both residential and commercial properties seeking a combination of strength, style, and sustainability. These structures are composed of wire mesh cages filled with stone or other materials. They offer an eco-friendly method to prevent soil erosion, stabilize landscapes, and add aesthetic appeal.
- Definition: Gabion retaining wall consists of wire boxes filled with rocks, designed to stabilize soil and prevent erosion.
- Benefits:
- Strong and durable, adapting to landscape movement.
- Easy to install and require minimal maintenance.
- Environmentally friendly by using natural and recycled materials.
- Materials: Typically include galvanized steel mesh and stones, although other fill materials like concrete or recycled materials may also be used.
Historically, the concept of gabions dates back to ancient times, with early versions used in military fortifications. Over the years, their role has expanded into civil engineering and landscaping due to their versatility and reliability. Today, gabions continue to serve as both functional and stylish elements in construction projects worldwide.
By utilizing local materials and straightforward construction techniques, gabion walls offer an effective solution for various architectural needs, from erosion control to landscape design.
Terms related to gabion retaining wall:
– boulder retaining wall
– concrete retaining wall
– retaining wall ideas
What is a Gabion Retaining Wall?
A gabion retaining wall is a structure made of wire mesh cages filled with stones or other materials. These walls are primarily used to manage soil erosion and provide support for landscapes. They are a blend of functionality and design, offering a sustainable way to stabilize land.
Components of a Gabion Retaining Wall
1. Steel Mesh:
The backbone of a gabion wall is its steel mesh. This mesh is typically made from galvanized steel, which provides durability and resistance to rust. The mesh forms the cage that holds the fill materials in place.
2. Fill Materials:
Gabion walls are filled with stones, which are often sourced locally. Common materials include basalt, granite, and limestone, chosen for their weight and durability. The rocks should have a specific gravity of at least 2.5 to ensure stability. Some gabions may also use recycled materials like broken concrete.
3. Geotextile Fabric:
To improve stability and prevent soil from seeping through, a layer of geotextile fabric is often placed between the soil and the gabion wall. This fabric allows water to pass while keeping soil particles out, maintaining the wall’s integrity.
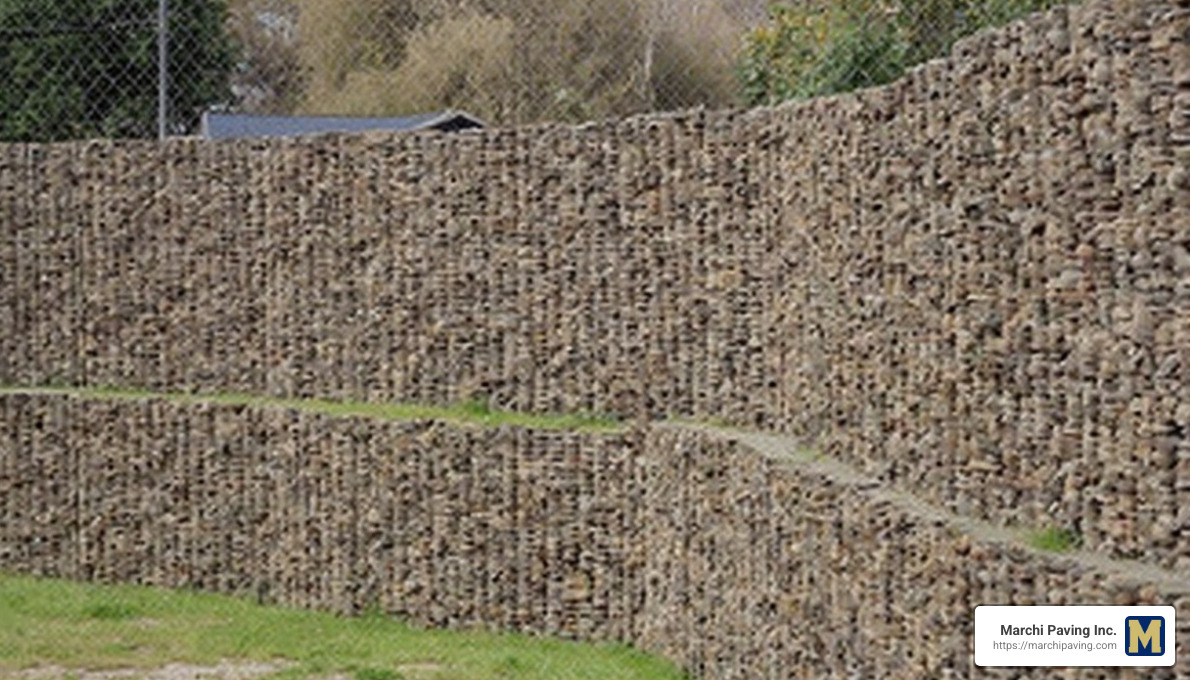
Types of Gabion Walls
1. Retaining Walls:
These are the most common type of gabion walls, used to hold back soil and prevent erosion. They are ideal for sloped landscapes and can be constructed up to 30 feet high, although they are most effective at heights of 18 feet or less.
2. Free-Standing Walls:
Unlike retaining walls, free-standing gabion walls do not hold back soil. Instead, they are used as barriers or fences. These walls can add a rustic charm to gardens and outdoor spaces, offering both functionality and aesthetics.
3. Decorative Walls:
Gabion walls can also serve purely decorative purposes. By using different types of stones or even colored materials, they can create striking visual features in landscapes. Their versatility allows for creative designs that improve the beauty of any outdoor space.
Historically, gabions have been used since ancient times for military purposes, providing protection and fortification. Over the centuries, their use has expanded into civil engineering and landscaping, thanks to their robustness and adaptability. Today, gabion walls are appreciated for their eco-friendly nature and ability to blend seamlessly into natural environments.
Benefits of Gabion Retaining Walls
Erosion Control
Gabion retaining walls are masters at combatting erosion. By using the natural strength of stones and the stability of steel mesh, these walls effectively manage both wind and water flow. This makes them an excellent choice for landscape protection. In areas prone to soil erosion, like some neighborhoods in Houston, gabion walls offer a robust solution that not only stabilizes the soil but also adds to the landscape’s visual appeal.
Easy Installation
One of the standout features of gabion walls is their simple construction. Unlike traditional retaining walls, they don’t require concrete foundations, which can be costly and time-consuming to install. Instead, you can place gabion cages directly on a graded soil foundation. This makes them a fantastic option for DIY enthusiasts looking to tackle a project on their own. With easy-to-assemble kits available, building a gabion wall can be a straightforward weekend project.
Affordability
Gabion walls are known for their cost-effectiveness. They use low-cost materials like locally sourced stones, which can significantly reduce expenses. Additionally, the potential for DIY installation means you can save on labor costs. While professional installation is always an option, the simplicity of gabion walls makes them accessible for those looking to cut costs without sacrificing quality.
Eco-Friendliness
If sustainability is a priority, gabion walls are an excellent choice. They often incorporate recycled materials, such as broken concrete, which reduces waste and promotes resource conservation. By using local materials, you can further minimize the environmental impact associated with transportation. This eco-friendly approach makes gabion walls a smart choice for environmentally conscious homeowners.
Permeability
Gabion walls excel in permeability, allowing both water and wind flow. This natural drainage capability prevents water buildup behind the wall, reducing pressure and the risk of structural damage. The permeability of gabion walls also means they can support healthy plant growth, contributing to a vibrant and dynamic landscape.
Longevity
Durability is a key advantage of gabion walls. Made from rust-resistant galvanized steel, these walls are built to withstand the test of time. Whether facing harsh weather conditions or heavy loads, gabion walls maintain their integrity, offering a long-lasting solution for retaining and decorative purposes.
Aesthetics
Beyond their functional benefits, gabion walls offer significant aesthetic appeal. Their modern design can improve any landscape, providing a sleek and natural look. With the option to use customizable fill materials, such as colorful stones or even glass, you can create a unique visual statement that reflects your personal style. Gabion walls not only serve a practical purpose but also lift the beauty of outdoor spaces, making them a popular choice for both residential and commercial projects.
Design and Construction Tips for Gabion Retaining Walls
Building a gabion retaining wall involves careful planning and execution to ensure stability, durability, and aesthetic appeal. Here’s a guide to help you design, construct, and maintain these versatile structures.
Design Considerations
Site Conditions: Before starting, assess the site conditions. Check for slope stability, drainage patterns, and potential erosion areas. This helps in determining the wall’s height, length, and placement.
Soil Types: Understanding the soil type is crucial. Gabion walls are ideal for soils with a minimum bearing capacity of 100 KPa. Remove any soft, loose, or organic material and replace it with compacted granular fill to ensure stability.
Load Calculations: Consider any additional loads the wall might support, such as from driveways or structures. If there are extra surcharges, increase the thickness of the gabions to handle the higher expected loads.
Construction Steps
Foundation Preparation: Start with a solid foundation. Excavate to a level that accommodates the gabion baskets and place a layer of compacted gravel to aid drainage and stability.
Cage Assembly: Assemble gabion cages using galvanized steel mesh to prevent rust. Ensure the cages are tightly secured and aligned properly.
Filling Techniques: Use locally sourced stones to fill the cages. The stones should be angular and fit snugly to minimize movement. For added stability, fill the cages layer by layer and compact each layer.
Maintenance
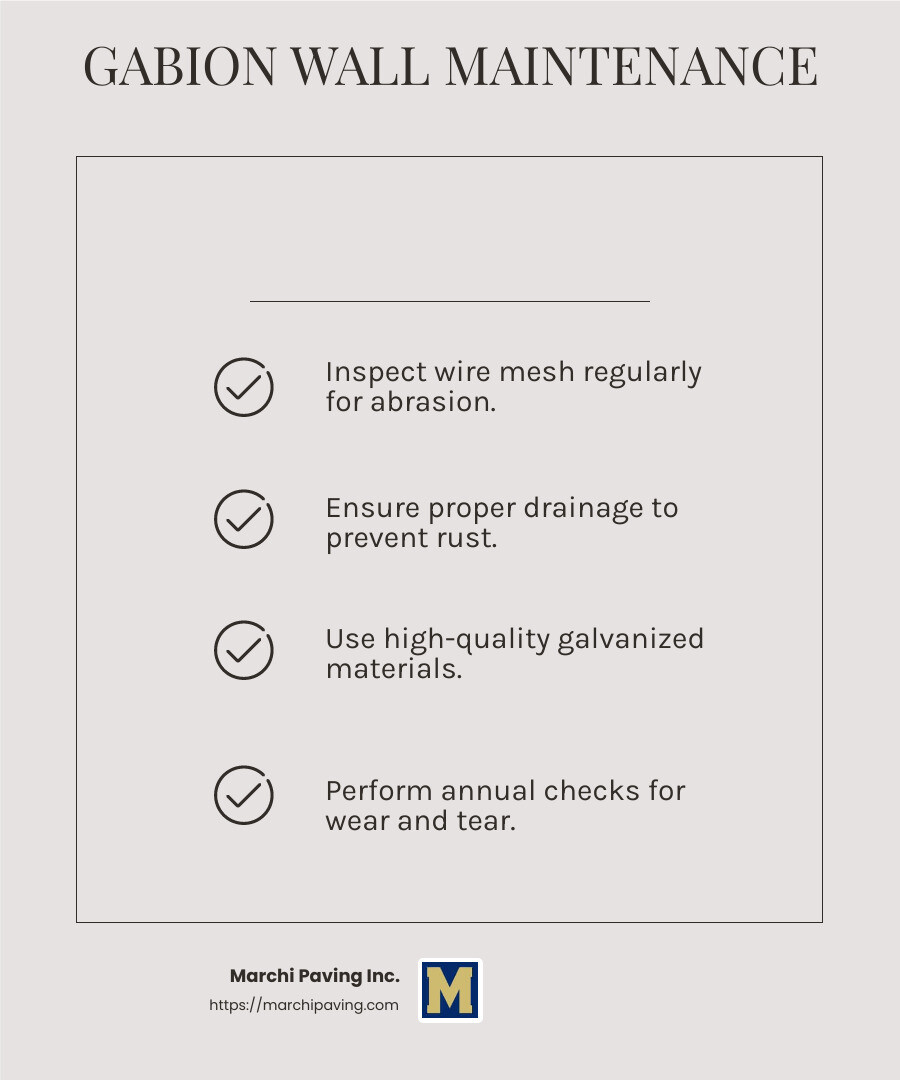
Drainage Inspection: Regularly check the drainage system to prevent water buildup, which can cause pressure and damage. This involves inspecting the geotextile fabric and ensuring water flows freely.
Annual Checks: Conduct annual inspections to identify any signs of wear, rust, or displacement. Addressing minor issues early can prevent major repairs later.
Repair Tips: If the wire mesh shows signs of rust or wear, replace affected sections promptly. For displaced stones, refill and compact as necessary to maintain the wall’s integrity.
By following these design and construction tips, you can create a gabion retaining wall that is not only functional but also improves the beauty of your landscape. Next, let’s explore some common issues that might arise with gabion walls and how to address them effectively.
Common Issues and Solutions
While gabion retaining walls offer many benefits, they come with their own set of challenges. Understanding these issues can help in planning and maintaining these structures effectively.
Disadvantages of Gabion Retaining Walls
One of the notable drawbacks is their low habitat value. Unlike natural stone walls, gabions don’t provide much shelter for wildlife. This can be a consideration if you’re aiming to support local biodiversity in your landscape design.
Additionally, gabion walls can sometimes have a higher cost than some alternatives, like simple wooden or concrete barriers. While the materials themselves might be affordable, the cost can rise due to the labor involved in filling and assembling the cages.
Wear and Tear
Over time, the wire mesh of gabion walls can suffer from wire abrasion. This wear is typically due to the movement of stones inside the cages. Regular inspections can help catch this early, allowing for timely repairs.
Rust prevention is another key concern. Although most gabion cages are made from galvanized steel to resist rust, exposure to harsh weather conditions can still lead to corrosion over time. Using high-quality galvanized materials and ensuring proper drainage can mitigate this risk.
Installation Challenges
Building a gabion wall requires some equipment needs and manual labor. The process involves assembling the cages, filling them with stones, and ensuring they are stable and aligned. This can be labor-intensive, especially for larger projects.
For those opting to DIY, it’s crucial to have the right tools and a solid understanding of the process. However, hiring professionals can alleviate these challenges, ensuring the wall is built correctly and efficiently.
By being aware of these common issues and their solutions, you can better prepare for the challenges of installing and maintaining a gabion retaining wall. This proactive approach helps ensure your wall remains a durable and attractive feature in your landscape.
Next, we’ll address some frequently asked questions about gabion retaining walls to further clarify any doubts you might have.
Frequently Asked Questions about Gabion Retaining Walls
What is the disadvantage of gabions?
While gabion retaining walls offer many advantages, they do have some downsides. One key disadvantage is their low habitat value. Unlike natural stone or wood walls, gabions don’t provide much shelter for wildlife. If supporting local biodiversity is a goal, this might be a concern.
Another potential drawback is the higher cost compared to some alternatives. While the materials—like galvanized steel and stones—can be affordable, labor costs may increase the overall expense, especially for large projects. Filling and assembling the cages is labor-intensive and can add to the cost.
Are gabions cheaper than a retaining wall?
The cost of gabions compared to traditional retaining walls can vary. Generally, gabions can be more affordable in terms of materials, especially if you have access to local stones or recycled materials. However, the labor involved in assembling and filling the cages might make them more expensive than simpler options like poured concrete or wooden barriers.
For DIY enthusiasts, gabions offer a chance to save on labor costs, but this requires time and effort. Hiring professionals can ensure proper installation, but it might increase the total expense. It’s essential to weigh these factors based on your specific project needs.
Are gabion retaining walls expensive?
Gabion retaining walls can be cost-effective, but the price depends on several factors. The materials—like the galvanized steel mesh and stones—are generally affordable. However, the overall cost can rise due to the labor needed for installation.
Compared to other types of retaining walls, like those made from natural stone or concrete, gabions might be less expensive if you have access to suitable fill materials. Additionally, their longevity and low maintenance needs can make them a good investment over time.
When planning a gabion wall, consider both the initial costs and the long-term benefits, such as durability and minimal upkeep. By doing so, you can decide if a gabion wall is the right choice for your landscape project.
In the next section, we will explore the design and construction tips for building effective and attractive gabion retaining walls.
Conclusion
In summary, gabion retaining walls are a fantastic choice for those seeking a blend of strength, style, and sustainability. These walls not only offer excellent erosion control and permeability but also provide a modern aesthetic that can be customized with various fill materials. Their durability and eco-friendliness make them a long-term investment that can withstand the test of time.
At Marchi Paving Inc., we bring over 20 years of experience in hardscaping services, including the installation of gabion retaining walls. Our team is dedicated to delivering high-quality, in-house project execution, ensuring your project is completed efficiently and to the highest standards. We serve a wide range of locations across Massachusetts, including Chelmsford, Cambridge, and Newton, among others.
If you’re considering a gabion retaining wall for your next project, we’re here to help. Our experts can provide guidance on design considerations, construction steps, and maintenance tips to make sure your wall not only meets but exceeds your expectations.
To learn more about our services or to get started on your gabion wall project, visit our hardscaping services page. We look forward to helping you create a strong, stylish, and sustainable landscape solution.
Parking Lot Paving: Top 5 Essential Tips in 2025
The Importance of Parking Lot Paving
Parking lot paving is a crucial consideration for property managers and commercial owners looking to maintain safe and accessible facilities. Here’s what you need to know right away:
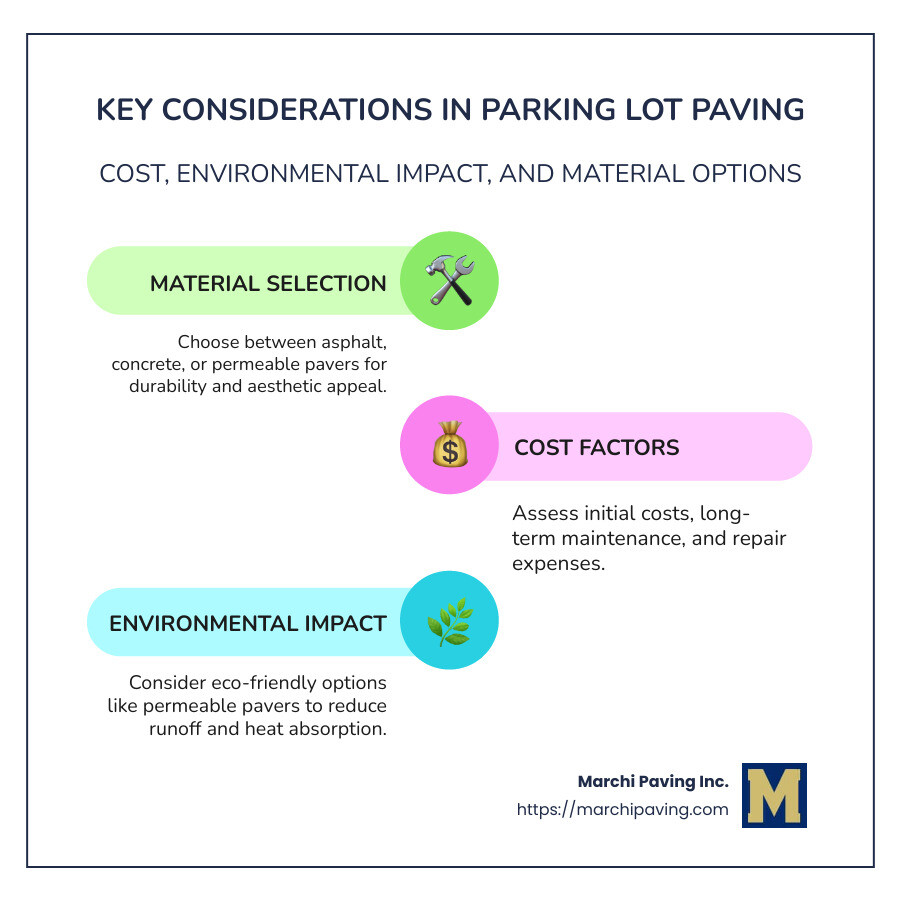
- Paving Considerations: Choose the right material (asphalt, concrete, or permeable pavers) to match your needs.
- Cost Factors: Consider initial costs, long-term maintenance, and potential repairs.
- Environmental Impact: Evaluate how materials affect the environment; permeable pavers are often more eco-friendly.
Managing a property, especially in busy areas like Middlesex County, MA, requires careful planning when it comes to parking spaces. Paving a parking lot significantly impacts not just aesthetics, but also operational efficiency and safety. The material chosen can affect everything from budget to environmental responsibility.
Traditional options like asphalt and concrete offer durability but come with ongoing maintenance costs. Over time, repairs like crack filling and pothole patching become necessary, adding to expenses. Moreover, the environmental impact of these materials is considerable; their production and installation can contribute to pollution and urban heat.
On the other hand, permeable pavers provide an eco-friendly alternative by allowing rainwater to seep through, reducing runoff and heat absorption. They’re also adaptable to different designs, which makes them a compelling choice for modern, sustainable construction projects.
It’s essential to weigh these considerations to craft a paving solution that not only meets immediate needs, but also aligns with long-term environmental and financial goals.
Common parking lot paving vocab:
– asphalt company
– local asphalt paving companies
– pavers company near me
Understanding Parking Lot Paving
When it comes to parking lot paving, choosing the right materials and preparation methods is crucial. Let’s explore the key options: asphalt, concrete, and permeable pavers, as well as the importance of proper site preparation.
Asphalt vs. Concrete
Asphalt and concrete are the two most common materials for parking lots. Each has its pros and cons.
- Asphalt is flexible, making it ideal for regions with temperature fluctuations. It’s generally cheaper to install and offers a smooth driving surface. However, it requires regular maintenance like sealcoating and crack repairs to extend its lifespan, which can be up to 30 years with proper care.
- Concrete, on the other hand, is known for its durability and strength. It’s less prone to temperature-related damage, but it’s more expensive upfront. Concrete can last longer than asphalt but may crack in freezing conditions. Regular sealing can help maintain its appearance and durability.
Both materials have environmental impacts due to the machinery and fuel used in their installation. However, advancements like warm and cold mix asphalt are helping reduce greenhouse gas emissions.
Permeable Pavers
Permeable pavers offer an eco-friendly alternative. They allow water to pass through, reducing runoff and helping replenish groundwater. This makes them especially beneficial in areas prone to flooding or with strict environmental regulations.
- Eco-friendly: They help maintain natural water cycles and reduce urban heat.
- Cost-effective: While initial costs might be higher, they save money in the long run by reducing the need for stormwater management systems.
- Aesthetic flexibility: With various designs and materials available, permeable pavers can improve the visual appeal of your parking lot.
Site Preparation
Proper site preparation is the foundation of a successful paving project. It involves:
- Clearing the Land: Removing debris and vegetation to ensure a clean slate.
- Grading: Leveling the area to promote proper drainage and prevent water pooling.
- Subgrade Improvement: Replacing unsuitable soils with high-quality subgrade materials to improve strength and drainage.
In regions like Massachusetts, where frost can be an issue, ensuring resistance to frost damage is critical. Using quality subgrade materials can prevent early pavement distress and extend the life of your parking lot.
By understanding these components, you can make informed decisions that balance cost, durability, and environmental impact for your parking lot paving project.
Next, we’ll walk through the entire paving process, from consultation to the final finishing touches, ensuring a smooth and efficient project execution.
The Parking Lot Paving Process
When it comes to parking lot paving, following a structured process ensures a durable and visually appealing result. Here’s a step-by-step guide to what you can expect:
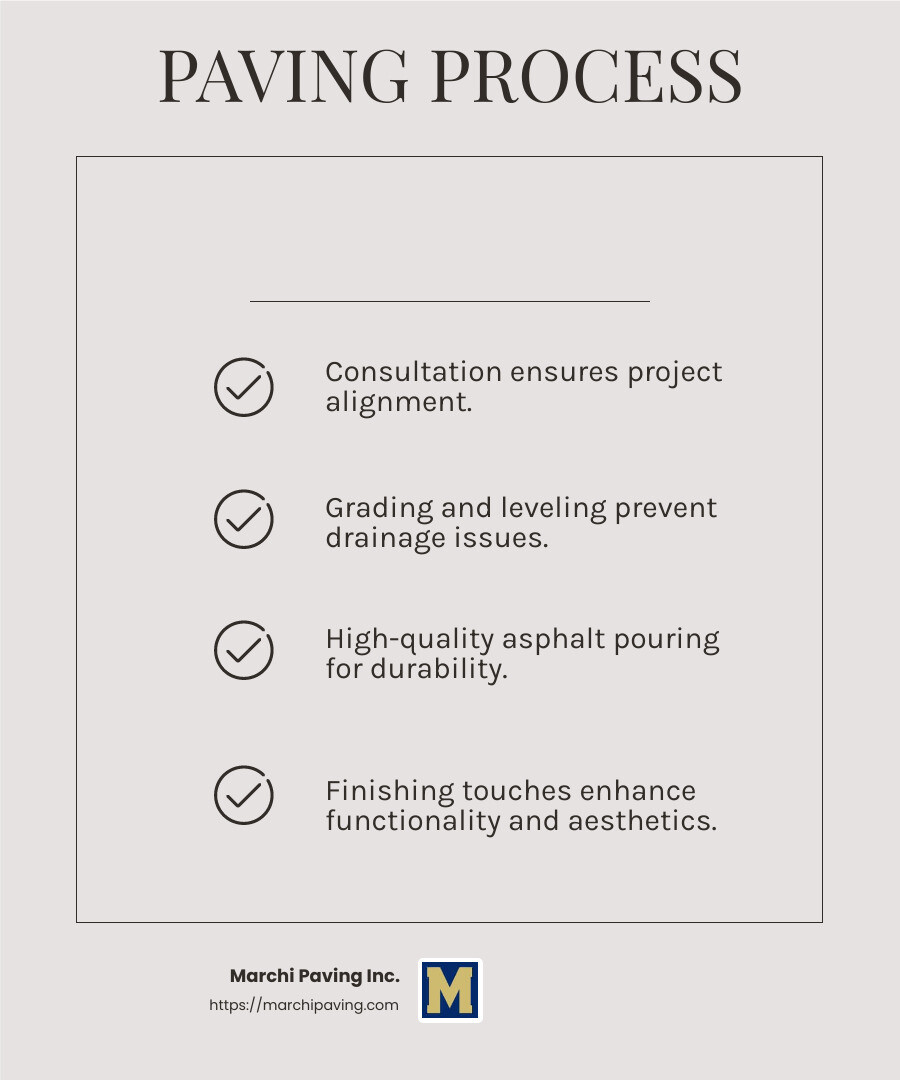
Consultation
The journey begins with a consultation. A paving expert will visit your site to understand your specific needs and discuss logistics. This is the time to talk about your vision, any specific requirements, and potential challenges. A thorough consultation helps tailor the project to meet both your functional and aesthetic goals.
Grading and Leveling
Once the plan is set, the next crucial step is grading and leveling. This involves preparing the land to create a smooth, even surface. Proper grading is essential for effective drainage, preventing water from pooling on the surface. This step also involves removing any unsuitable soil and replacing it with high-quality subgrade materials to ensure stability and longevity.
Asphalt Pouring
The most anticipated part of the process is asphalt pouring. A team of skilled contractors will lay down a high-quality asphalt layer. This layer is typically a couple of inches thick and will cure over time into a sturdy yet flexible surface. The use of high-quality materials and precise techniques ensures the pavement can withstand the rigors of traffic and weather.
Finishing Touches
Finally, the project is wrapped up with finishing touches. This includes painting lines for parking spaces and adding any necessary markings. Additional features like concrete curbs, walkways, and speed bumps might also be installed. These details not only improve functionality but also contribute to the overall aesthetic of the parking lot.
By understanding each step of the parking lot paving process, you can ensure your project runs smoothly and results in a parking lot that’s both functional and attractive. Next, we’ll explore the benefits of using permeable pavers in your project.
Benefits of Permeable Pavers
When it comes to parking lot paving, permeable pavers offer a fantastic blend of eco-friendliness and cost-effectiveness. Let’s explore why these innovative materials are gaining popularity.
Eco-Friendly
Permeable pavers are a sustainable choice that works in harmony with the environment. Unlike traditional concrete or asphalt, these pavers allow water to pass through, significantly reducing stormwater runoff. This helps prevent erosion and replenishes groundwater supplies, making your parking lot a mini drainage system.
Manufactured using sustainable methods, permeable pavers are a low-impact construction option. They help maintain natural water cycles and improve the water quality of nearby streams and rivers. By choosing permeable pavers, you’re not only creating a functional parking space but also supporting a healthier ecosystem.
Cost-Effective
Permeable pavers are not just good for the environment; they’re also kind to your wallet. They are generally cheaper and faster to install than traditional paving materials. Their lightweight yet strong design means they can be installed at over 1,000 square feet per man-hour, saving both time and labor costs.
Moreover, permeable pavers require less maintenance over time. They are durable and resistant to high heat, so unlike concrete and asphalt, they won’t break down as quickly. This longevity translates to lower long-term costs, as you won’t need to replace or repair them as often.
TRUEGRID: A Leader in Permeable Pavers
One standout in permeable pavers is TRUEGRID. These pavers are designed to handle anything you throw at them, from heavy traffic to extreme weather conditions. They outperform more expensive materials by lasting longer and requiring less maintenance.
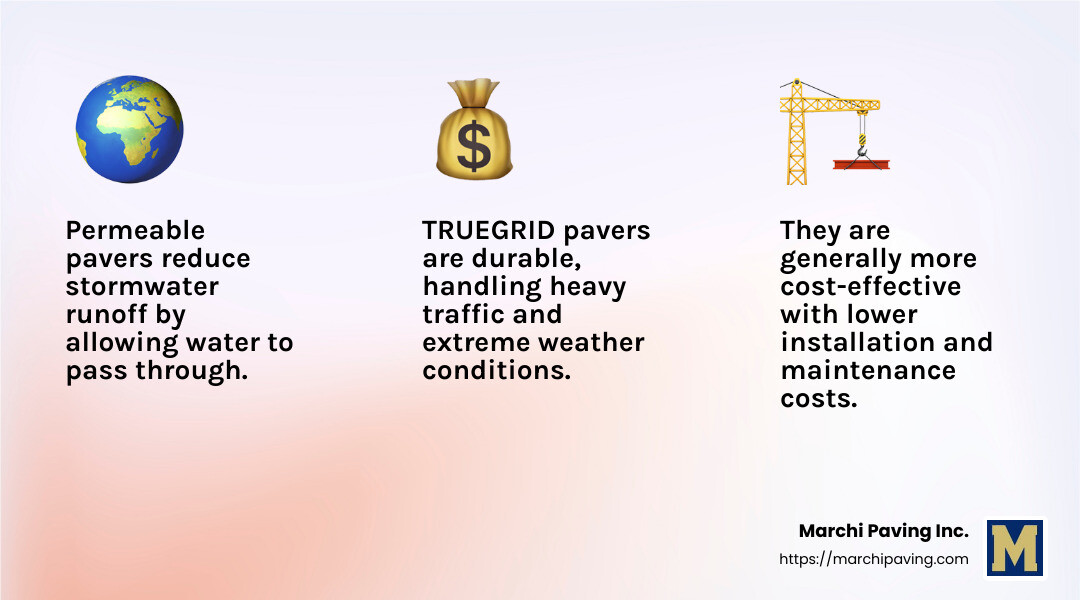
TRUEGRID pavers are also incredibly versatile. Whether you’re paving a residential driveway or a large commercial parking lot, they offer a solution that combines strength, durability, and environmental benefits.
Incorporating permeable pavers like TRUEGRID into your parking lot paving project is a smart move for both your budget and the planet. Next, let’s look at how proper maintenance can extend the life of your parking lot.
Maintenance and Longevity
Once your parking lot paving project is complete, maintaining its condition is crucial for longevity. Let’s explore some key maintenance practices that ensure your parking lot stands the test of time.
Drainage Systems
Proper drainage is essential to prevent water damage. Water is known as the number one asphalt killer, and effective drainage systems help keep it at bay. By ensuring your parking lot has a well-designed slope, you can direct water away from the surface, preventing pooling and potential damage. Installing catch basins or trench drains can further aid in managing stormwater, reducing the risk of potholes and cracks.
Sealcoating
Sealcoating is like sunscreen for your parking lot. It protects the asphalt from harmful UV rays, water, and traffic wear. Applying a high-quality sealcoat every few years can significantly extend the life of your pavement. It acts as a barrier, preventing oxidation and maintaining a fresh, clean appearance. This simple step can save money in the long run by reducing the need for costly repairs.
Regular Maintenance
Routine maintenance is your best defense against wear and tear. Here are some essential tasks to keep your parking lot in top shape:
- Crack Sealing: Fill cracks as they appear to prevent them from expanding. This stops water from seeping into the base layer, which can lead to bigger problems.
- Pothole Repair: Address potholes promptly to avoid accidents and further damage. Patching these areas keeps the surface smooth and safe.
- Sweeping and Cleaning: Regularly remove debris, dirt, and oil to prevent surface degradation. A clean lot not only looks better but also lasts longer.
- Line Striping: Keep parking lines and markings clear and visible. This ensures safety and organization for both drivers and pedestrians.
By implementing these maintenance strategies, you can improve the durability of your parking lot, ensuring it serves your needs for years to come. Now, let’s move on to some frequently asked questions about parking lot paving.
Frequently Asked Questions about Parking Lot Paving
Can you expense paving a parking lot?
Yes, you can expense paving a parking lot, but how you do it depends on whether it’s considered an operational or capital expense.
- Operational Expenses: These are costs for maintaining the day-to-day functions of your business. If the paving is part of regular maintenance or repair work, it might be classified as an operational expense. This can potentially be deducted in the year it’s incurred.
- Capital Expense: If you’re installing a new parking lot or making significant improvements, it’s likely a capital expense. Capital expenses are investments in the long-term value of your property. These costs are usually depreciated over several years.
Consult with a financial advisor to determine the best approach for your specific situation.
What is the best surface for a parking lot?
Choosing the right surface for your parking lot depends on several factors, including budget, usage, and climate. Here’s a quick rundown of the most common options:
- Asphalt: Asphalt is popular for its affordability and quick installation. It provides a smooth surface and is suitable for most climates. With proper maintenance, an asphalt parking lot can last up to 30 years.
- Concrete: Known for its durability, concrete can handle heavy loads and requires less maintenance than asphalt. It’s a great option for areas with extreme weather conditions. However, it’s more expensive and takes longer to install.
- Gravel: Gravel is the most budget-friendly option and is easy to install. It’s ideal for temporary or low-traffic areas. However, it requires regular maintenance and isn’t suitable for all climates due to its tendency to shift and erode.
Each material has its pros and cons, so consider your specific needs and consult with a paving expert to make the best choice.
How long does paving a parking lot take?
The time it takes to pave a parking lot can vary based on several factors:
- Weather Conditions: Ideal weather is key for paving. Rain or extreme cold can delay the process, as asphalt needs dry conditions to cure properly.
- Site Characteristics: If the site is uneven or requires significant preparation, it can add time to the project. Removing old pavement or leveling the ground are common tasks that may need extra attention.
- Job Size: Naturally, a larger parking lot will take more time to complete. Smaller lots can sometimes be done in as little as 24 hours, while larger projects might take several days.
On average, with favorable conditions and a skilled team, paving can be completed within a few days. Always plan for potential delays, especially if weather conditions are unpredictable.
Conclusion
At Marchi Paving Inc., we understand that a well-paved parking lot is more than just a convenience—it’s a crucial part of your business’s first impression. With over 20 years of experience, we specialize in delivering high-quality asphalt paving solutions custom to meet the unique needs of businesses across Chelmsford, MA, and surrounding areas.
Our commitment to excellence means that from the initial consultation to the final touches, we handle every step of the paving process with precision and care. We use advanced equipment and in-house expertise to ensure that your parking lot not only looks great but also stands the test of time.
Whether you’re considering asphalt for its affordability and smooth finish or exploring eco-friendly options like permeable pavers, our team is here to guide you. We believe in providing solutions that are both cost-effective and environmentally conscious.
Regular maintenance is key to prolonging the life of your parking lot. Services like sealcoating, crack sealing, and proper drainage systems are essential to maintaining a safe and functional space. Our comprehensive maintenance plans are designed to keep your pavement in top condition, reducing the need for costly repairs down the line.
For a smoother, more durable parking lot that improves your property’s value and appeal, trust the experts at Marchi Paving Inc. Ready to start your project? Contact us today for a consultation and experience the Marchi Paving difference. Let’s pave the way to a better future together.
Contractor to Build Retaining Wall: Top 5 Expert Tips
Finding the right contractor to build retaining wall can feel overwhelming, especially with the goal of safeguarding your property from soil erosion while enhancing your landscape design. Here’s a quick guide to start your journey:
- Identify Needs: Determine the type of retaining wall you require (segmental, concrete, etc.).
- Research Contractors: Look for licensed and experienced professionals.
- Verify Credentials: Check for insurance and bonding.
- Get Multiple Quotes: Compare prices and project timelines.
Retaining walls play a critical role in preventing soil erosion around your property. They are not only functional but also add an aesthetic touch to your landscape design. Whether you’re looking to fortify your garden, create usable space on a slope, or simply add beauty to your property, a well-constructed retaining wall can yield long-lasting benefits. It’s important to choose the right professionals to ensure your project is completed safely and effectively.

Simple guide to contractor to build retaining wall:
– retaining wall builders near me
– retaining wall engineer near me
– retaining wall repair near me
Understanding the Importance of Retaining Walls
Retaining walls are more than just a practical addition to your landscape—they’re a vital part of maintaining and enhancing your property. Here’s why they matter:
Soil Erosion Prevention
One of the primary functions of a retaining wall is to prevent soil erosion. This is especially crucial if your property is on a slope or has uneven terrain. Without a retaining wall, heavy rains can wash away soil, potentially compromising the stability of structures like a gazebo or patio.
Example: In Houston, retaining walls are commonly used to manage water flow during heavy rains, preventing erosion and protecting properties.
Aesthetic Appeal
Beyond functionality, retaining walls can significantly boost the aesthetic appeal of your outdoor space. They can be designed with a variety of materials, such as natural stone, brick, or concrete, to complement your landscape design. A beautifully crafted retaining wall can capture attention and improve the overall look of your property.
Example: A well-designed wall can transform a simple walkway into a stunning feature that leads to a pool or cabana.
Property Value
Investing in a retaining wall can also increase your property value. By creating a more stable and visually appealing environment, potential buyers may see your property as more desirable. It’s a smart investment that pays off in the long run.
Usable Space
Retaining walls can turn otherwise unusable slopes into functional outdoor areas. Whether you want to add a patio, plant boxes, or even an outdoor kitchen, these walls can help you make the most of your land.
Example: In The Woodlands, TX, a natural stone retaining wall not only solved an erosion problem but also added a beautiful feature to the homeowner’s backyard, creating additional space for gardening and relaxation.
In summary, retaining walls serve multiple purposes, from safeguarding your property against erosion to enhancing its beauty and value. Whether you need a simple garden wall or a complex structure, choosing the right contractor to build retaining wall is key to ensuring your project meets your needs and expectations.

Now that you understand the importance of retaining walls, let’s explore the different types available and how to choose the right one for your needs.
Types of Retaining Walls
When considering a contractor to build a retaining wall, understand the different types available. Each type has its unique benefits and is suited for specific applications. Here’s a breakdown of the most common types:
Segmental Retaining Walls
Segmental retaining walls (SRWs) are popular due to their flexibility and ease of installation. These walls use interlocking concrete blocks that are dry-stacked without mortar, making them a cost-effective choice. They are ideal for both small garden walls and large commercial projects.
Benefits: Quick installation, no need for concrete footing, diverse design options.
Concrete Walls
Concrete retaining walls are known for their strength and durability. They are often used in situations where a high degree of stability is required. Concrete walls can be poured in place or constructed using precast panels.
Benefits: Long-lasting, strong, suitable for high-load applications.
Timber Walls
Timber retaining walls offer a rustic and natural look, making them a favorite for residential gardens. They are typically constructed using pressure-treated wood to resist decay.
Benefits: Aesthetic appeal, easy to work with, cost-effective for small projects.
Example: Many homeowners in areas like New Jersey opt for timber walls to complement their natural landscape design.
Stone Walls
Stone retaining walls are prized for their timeless beauty and strength. They can be constructed using natural stones or manufactured stone veneers. Stone walls are versatile, suitable for both traditional and modern landscapes.
Benefits: Aesthetic appeal, durable, environmentally friendly.
Example: A homeowner in New Jersey had a stunning natural stone wall built that not only solved erosion issues but also added a classic touch to their garden.
Boulder Walls
Boulder retaining walls use large, natural stones to create a sturdy and visually striking barrier. These walls are perfect for creating a natural look in landscapes and can handle significant loads.
Benefits: Natural appearance, durable, minimal maintenance.
Story: In New Jersey, a boulder wall was used to stabilize a steep slope, adding both functionality and beauty to the property.
Choosing the right type of retaining wall depends on your specific needs, landscape design, and budget. Whether you prefer the modern look of segmental walls or the rustic charm of timber, understanding these options will help you make an informed decision when working with a contractor. Next, we’ll dig into how to select the right contractor for your retaining wall project.
How to Choose the Right Contractor to Build Retaining Wall
Selecting the right contractor to build a retaining wall is crucial for ensuring a successful project. The right contractor will not only construct a wall that meets your needs but also improves the beauty and functionality of your property. Here’s how to choose wisely:
Assessing Contractor Qualifications
When assessing potential contractors, it’s important to consider their qualifications. A licensed contractor is mandatory because it ensures they meet the local regulations and standards. Make sure the contractor is also insured and bonded. This protects you from liabilities in case of accidents or damages during construction.
Experience is another critical factor. Look for contractors with a proven track record in building retaining walls. A contractor with years of experience will likely have encountered and solved various challenges, giving you confidence in their ability to handle your project.
It’s also beneficial to check reviews and references from past clients. Positive feedback and satisfied customers are strong indicators of a reliable contractor.
In some cases, you may need specialists like a civil engineer or structural engineer for complex projects, especially if the wall is over 6 feet tall or requires intricate design considerations. For aesthetic elements, a landscape architect can ensure the wall complements the overall design of your garden or yard.
Evaluating Contractor Proposals
Once you’ve shortlisted potential contractors, the next step is to evaluate their proposals. A detailed proposal should include cost estimates, labor costs, material costs, and a project timeline.
Cost Estimates: Understand what you’re paying for. The estimate should break down the costs for materials, labor, and any additional services. This transparency helps you compare different proposals effectively.
Labor Costs: Labor costs can vary based on the complexity of the project. Make sure the proposal specifies the hourly rates and the estimated hours needed to complete the project.
Material Costs: Different materials come with different price tags. Whether you’re opting for segmental blocks, concrete, or natural stone, the proposal should clearly list the material costs.
Project Timeline: A reliable contractor will provide a realistic timeline for project completion. This includes start and end dates, as well as any milestones along the way. A clear timeline helps manage expectations and ensures the project stays on track.
By carefully assessing qualifications and evaluating proposals, you’ll be well-equipped to choose the right contractor for your retaining wall project. This sets the foundation for a successful installation that meets your needs and improves your property. Next, we’ll guide you through the steps of hiring a retaining wall contractor.
Steps to Hiring a Retaining Wall Contractor
Building a retaining wall is a significant investment. To ensure you’re getting the best value and quality, follow these steps to hire the right contractor to build a retaining wall.
Research and Shortlist Potential Contractors
Start with an Online Search: Use search engines to find local retaining wall contractors. Look for companies with professional websites that showcase their services and past projects. This gives you a sense of their capabilities and reliability.
Seek Local Recommendations: Ask friends, family, or neighbors for recommendations. Personal referrals are often trustworthy because they come from people with experience.
Visit Company Websites: Check out the contractor’s website for information about their services, experience, and customer testimonials. This helps you assess if they match your project’s needs.
Request and Compare Quotes
Get Detailed Quotes: Contact at least three contractors and request detailed quotes. These should include labor costs, material costs, and the overall project scope.
Understand Labor Costs: Labor costs can vary widely. Ensure each quote specifies hourly rates and the estimated hours required. This transparency allows for accurate comparisons.
Assess Material Costs: Different materials have different costs. Make sure the quotes break down the costs for each type of material, whether it’s concrete, stone, or interlocking blocks.
Check References and Past Work
Client Testimonials: Ask potential contractors for references from past clients. Speaking directly with previous customers can provide insights into the contractor’s reliability and workmanship.
Review Portfolios: Examine the contractor’s portfolio of completed projects. This shows their experience and the quality of their work.
Conduct Site Visits: If possible, visit some of the contractor’s past projects. Seeing their work in person can help you gauge their attention to detail and craftsmanship.
Verify Credentials and Insurance
Check Licenses: Ensure the contractor has the necessary licenses to operate in your area. This demonstrates they meet local standards and regulations.
Confirm Insurance and Bonding: A reputable contractor should have insurance to cover any accidents or damages during the project. Ask for proof of insurance and bonding to protect yourself from potential liabilities.
Look for Certifications: Certifications can indicate a contractor’s commitment to ongoing training and excellence in their field.
Finalize and Sign the Contract
Review Contract Details: Before signing, carefully review the contract. It should clearly outline the project details, including the scope of work, materials, and labor involved.
Understand Payment Terms: The contract should specify payment terms, including the total cost, payment schedule, and any deposits required.
Check the Project Timeline: Ensure the contract includes a realistic timeline for project completion, with start and end dates.
Look for Warranties: A good contractor will offer warranties on their workmanship and materials, providing peace of mind for your investment.
By following these steps, you’ll be well-prepared to hire a retaining wall contractor who delivers quality and value. Next, we’ll explore the cost considerations you should keep in mind when planning your retaining wall project.
Cost Considerations for Retaining Walls
When planning a retaining wall project, understanding the costs involved is essential. Let’s break down the key components: material costs, labor costs, and additional costs.
Material Costs
Choosing the right material for your retaining wall impacts both aesthetic appeal and budget. Here are common materials used:
- Concrete is durable and versatile, often used for its long lifespan. It’s a popular choice for modern designs.
- Interlocking blocks offer easy installation and come in various colors and textures, making them a favorite for DIY enthusiasts.
- Pressure-treated pine is affordable and provides a natural look. However, it requires regular maintenance to prevent decay.
- Stone walls provide a classic and neat appearance. They are sturdy but can be more expensive due to the labor intensity of installation.

Labor Costs
Labor costs can vary based on complexity and location:
- Hourly Rates: Landscapers typically charge between $25 to $50 per person per hour, with larger crews needed for more complex projects.
- Project Complexity: More intricate designs or challenging terrains increase labor time and costs. For example, walls with curves or those on steep slopes require more skill and time.
- Contractor Rates: Rates differ based on a contractor’s experience and reputation. Always compare quotes to ensure competitive pricing.
Additional Costs
Beyond materials and labor, consider these additional expenses:
- Permits and Inspections: Depending on your location, you may need a permit for your retaining wall. This ensures compliance with local regulations and safety standards.
- Drainage Solutions: Proper drainage is crucial to prevent water pressure from damaging the wall. This might include grading, drainage pipes, or weep holes.
- Inspection Fees: Some areas require inspections to verify that the wall meets engineering standards, adding to the overall cost.
By understanding these cost factors, you can plan your budget effectively and avoid unexpected expenses. Next, we’ll address frequently asked questions about hiring a retaining wall contractor.
Frequently Asked Questions about Hiring a Retaining Wall Contractor
Do you need a permit for a retaining wall in NY?
Yes, in New York, you typically need a permit to build a retaining wall, especially if it’s over a certain height. The specific requirements can vary by locality, so it’s crucial to check with your local building department. A permit ensures that your wall meets safety and engineering standards. During the permit process, you might also need a QRWI (Qualified Retaining Wall Inspection) to assess the wall’s design and impact on the surrounding area.
What is the cheapest way to build a retaining wall?
Building a retaining wall affordably involves selecting cost-effective materials and designs. Here are some budget-friendly options:
- Poured Concrete: Offers durability and is often less expensive than stone. It’s a great choice for long-lasting walls.
- Interlocking Blocks: These are easy to install and available in various styles. Their modular nature can save on labor costs.
- Pressure-Treated Pine: Provides a natural look at a lower cost, but requires more maintenance to prevent rot.
- Stone: While beautiful, stone can be labor-intensive and may not be the cheapest option unless sourced locally.
Choosing the right material depends on the wall’s purpose, aesthetic preferences, and budget constraints.
Who designs a retaining wall?
Designing a retaining wall involves several professionals to ensure it’s both functional and safe:
- Wall Design Engineer: Specializes in the structural aspects of the wall, ensuring it can withstand soil pressure and environmental factors.
- Site Civil Engineer: Focuses on the overall site layout, addressing drainage and erosion control.
- Geotechnical Engineer: Evaluates soil conditions and provides recommendations for foundation stability.
These experts work together to create a design that suits the landscape and complies with local regulations. Hiring a knowledgeable contractor to build retaining wall is crucial to implementing the design effectively.
Conclusion
When it comes to retaining wall construction, choosing the right contractor can make all the difference. At Marchi Paving Inc., we pride ourselves on delivering high-quality services with a focus on durability and aesthetics. With over 20 years of experience, our team is equipped with advanced equipment and expertise to handle any retaining wall project, ensuring it stands the test of time.
We understand that retaining walls are not just functional elements that prevent soil erosion but also key features that improve the beauty and usability of your property. Whether you’re looking to create usable space on a slope or add an aesthetic touch to your landscape, our skilled professionals are here to bring your vision to life.
Our commitment to quality means using only the best materials and techniques. From segmental retaining walls to concrete and stone options, we offer a variety of styles to suit your needs. Plus, our in-house project execution allows us to maintain strict quality control, ensuring every wall we build meets the highest standards.
If you’re ready to start your retaining wall project, contact us today to experience the Marchi Paving difference. Let us help you transform your landscape with a retaining wall that combines functionality and beauty.
Install a French Drain: Top 5 Proven, Stress-Free Tips
When it comes to keeping your property dry and safe, knowing how to install a french drain can make all the difference. Whether you’re dealing with a soggy yard or battling basement water woes, a French drain offers a robust solution for water diversion. Here’s a quick overview for those who need a fast answer:
- Gather Materials: Drain pipe, gravel, landscape fabric, shovel, and other tools.
- Plan and Mark Route: Choose a starting point where water collects and an exit point.
- Dig Trench: Ensure it’s sloped correctly to move water away from problem areas.
- Line and Fill: Use fabric and gravel for effective drainage and longevity.
- Complete Setup: Cover and seal the area, ensuring a thorough installation.
Water management is crucial in maintaining your landscape and protecting your home. French drains, a type of trench filled with gravel that houses a perforated pipe, provide a reliable way to redirect excess water away from key areas of your property. These systems are popular not just for their effectiveness but also for their relative simplicity when compared to more complex drainage solutions.
Proper drainage is more than just an aesthetic consideration; it’s essential for preventing water damage and preserving the longevity of your home’s foundation. Without a stable solution to reroute water, property owners face the continuous cycle of erosion, pest problems, and potential foundation issues, all of which can be costly to repair. The French drain, however, with its simple yet effective design, offers peace of mind by efficiently moving water from where it isn’t wanted to a safer, designated area.
If you’re ready to tackle water problems on your property, understanding the basics of French drains and their installation is the first step.

Basic install a french drain vocab:
– build french drain
– french drainage systems installation
– french drain for yard
Understanding French Drains
A French drain is a simple yet effective solution for managing water around your property. It involves a trench filled with gravel and a perforated pipe to facilitate subsurface drainage. Let’s break down how this system works and why it’s a reliable choice for water management.
The Trench
The trench is the backbone of the French drain system. It is typically dug from a high point where water collects to a low point where you want the water to exit. The trench must have a slight slope—about 1%—to use gravity to move water efficiently.
Key Points:
– Depth: Usually about 18 inches deep and 9 to 12 inches wide.
– Slope: Essential for effective drainage; at least 1 inch drop per 10 feet.
– Placement: Should direct water away from structures and towards a safe outlet.
Perforated Pipe
At the heart of the French drain is the perforated pipe, often made of PVC or flexible corrugated material. This pipe is laid at the bottom of the trench and is crucial for collecting and channeling water away.
Key Points:
– Material: Durable PVC or flexible corrugated pipe.
– Design: Perforations allow water to enter the pipe while keeping debris out.
– Installation: Placed with holes facing downward to collect water from below.
Gravel
Surrounding the perforated pipe is gravel, which serves multiple purposes. Gravel acts as a filter, keeping dirt and debris from clogging the pipe, and helps distribute water evenly.
Key Points:
– Type: Clean, large gravel is preferred for optimal drainage.
– Function: Filters debris and prevents clogging.
– Placement: Layered around the pipe and throughout the trench.
Subsurface Drainage
French drains are a subsurface solution, meaning they work below the ground. This makes them less visible and more aesthetically pleasing than surface drains. They are particularly effective at managing groundwater and preventing it from reaching unwanted areas, like basements or low-lying sections of your yard.
Benefits:
– Aesthetic: Hidden below the ground, maintaining landscape appearance.
– Efficiency: Redirects both surface and groundwater.
– Protection: Safeguards foundations and prevents water damage.
By understanding these components and how they work together, you can appreciate why French drains are a popular choice for homeowners looking to manage water effectively. Whether you DIY or hire a professional, ensuring each part is installed correctly will lead to a successful drainage system.

Next, let’s dive into the step-by-step process of how to install a French drain yourself.
How to Install a French Drain
Installing a French drain can be a rewarding DIY project if you’re prepared with the right tools and materials. Let’s go through the essentials and the step-by-step process to ensure you install a French drain correctly the first time.
Tools and Materials Required
You’ll need some specific tools and materials to get started:
Tools:
– Digging shovel: For manual trench digging.
– Mattock: Useful for breaking up hard soil.
– Utility knife: To cut landscape fabric.
– Line level with mason’s line: Helps maintain the correct slope.
– Tape measure: Ensures accurate measurements.
– Hammer: For driving stakes into the ground.
Materials:
– Corrugated pipe: Choose a 4-inch diameter perforated pipe for efficient drainage.
– Gravel: Opt for clean, large gravel or landscaping stone.
– Landscape fabric: A water-permeable barrier to prevent clogging.
– Wooden grade stakes: To mark the trench path and check slope.
Step-by-Step Installation Process
1. Location Selection
First, identify where water tends to pool in your yard. Plan the drain path from this area to a lower elevation where the water can safely exit—like a retention pond or storm drain.
Tips:
– Avoid directing water onto neighboring properties.
– Ensure the exit point is at a lower elevation than the starting point.
2. Trench Digging
Once you’ve marked the trench path with stakes or spray paint, it’s time to dig.
Steps:
– Depth and Width: Aim for an 18-inch deep and 9-12 inch wide trench.
– Slope: Maintain a 1% slope (1 inch drop per 10 feet) for optimal drainage.
– Tools: Use a shovel for small projects or rent a trencher for larger areas.
3. Slope Creation
Check the slope frequently using the line level and mason’s line. Adjust as needed to ensure water will flow towards the exit point.
4. Trench Lining
Line the trench with landscape fabric, leaving excess fabric on the sides. This will prevent dirt from clogging the system.
5. Pipe and Gravel Installation
- Gravel Bedding: Pour and compact about 3 inches of gravel at the bottom of the trench.
- Pipe Placement: Lay the corrugated pipe on the gravel with holes facing downward. This allows water to enter the pipe.
- Cover with Gravel: Add another layer of gravel over the pipe, keeping it below ground level.
6. Finishing Touches
Wrap the pipe and gravel with the excess landscape fabric to further protect against debris. Finally, backfill the trench with topsoil to conceal the system.
Optional: Add decorative stones or plants to blend the area with your landscape.
By following these steps, you can successfully install a French drain and improve your property’s drainage.
Next, we’ll explore the cost considerations involved in installing a French drain.
Cost Considerations for French Drains
When considering the installation of a French drain, understanding the costs involved is crucial. Let’s break down the average cost, factors affecting the cost, and the decision between DIY and professional installation.
Average Cost
The cost of a French drain installation can vary widely. On average, you might spend between $1,600 and $13,000, depending on the complexity and size of the project. For a professionally installed system, the cost typically averages around $6,200. However, costs can be significantly lower if you choose to install it yourself.
Factors Affecting Cost
Several factors can influence the total cost of installing a French drain:
- Type of French Drain: Exterior drains tend to be more affordable than interior ones. Interior drains often require more specialized materials and labor.
- Length of the Drainage Trench: Longer trenches require more materials and labor, increasing overall costs.
- Soil Type: Harder soils, like clay, may require more effort to dig through, adding to labor costs.
- Depth and Width of the Trench: Deeper and wider trenches necessitate more gravel and fabric, driving up material costs.
- Additional Features: Adding components like a sump pump or connecting to a municipal storm drain can increase expenses.
DIY vs Professional Installation
DIY Installation: If you’re handy and have the right tools, a DIY approach can save money. The cost for a DIY project is roughly $528 for a 25-foot system. This includes renting equipment like a trencher and buying necessary materials.
Professional Installation: Hiring professionals can cost between $10 to $75 per linear foot. While it might be pricier, professional installation offers expertise and saves you time and effort. It’s often the best choice for complex sites or when dealing with challenging soil conditions.
Choosing between DIY and professional installation depends on your budget, time, and comfort level with undertaking such a project.
Next, let’s dig into the pros and cons of installing a French drain.
Pros and Cons of Installing a French Drain
Installing a French drain can be a smart move for homeowners dealing with water issues. But like any home improvement project, it comes with its own set of advantages and challenges.
Pros: Better Drainage
Effective Water Management: French drains are excellent at redirecting water away from your home and yard. They help prevent standing water, which can damage your lawn and even your home’s foundation over time. This makes them a popular choice in areas prone to heavy rainfall.
Erosion Control: By directing water flow, French drains can also help control soil erosion. This is particularly beneficial for sloped properties where water runoff can wash away valuable topsoil.
Quick Installation: Compared to other drainage solutions, French drains can be installed relatively quickly. A professional team might complete the job in a single day, minimizing disruption to your home life.
Cons: Potential Issues
Installation Difficulty: Installing a French drain isn’t a simple weekend DIY project. It involves digging trenches, laying pipes, and ensuring proper slope. If not done correctly, the system won’t function as intended.
Clogging Concerns: Over time, the perforated pipes in a French drain can become clogged with dirt, debris, or roots. This can reduce the system’s effectiveness and require maintenance to clear blockages.
Potential for Flooding: If not properly designed, a French drain can become overwhelmed during heavy storms, leading to flooding issues. This is why it’s crucial to plan the system with adequate capacity and drainage outlets.
Maintenance Requirements
Regular Inspections: To keep your French drain working efficiently, regular inspections are essential. Check for signs of blockage or damage, especially after heavy rain.
Annual Cleaning: It’s recommended to clean the drain annually to remove any accumulated debris. This can involve using a sewer snake or hiring a professional to ensure the system remains clear and functional.
Avoid Overloading: Be mindful of the water sources feeding into your French drain. Connecting too many downspouts or other drainage systems can overwhelm the drain, leading to potential issues.
By weighing these pros and cons, you can decide if a French drain is the right solution for your property. Next, let’s address some frequently asked questions about French drains.
Frequently Asked Questions about French Drains
Can you install a French drain yourself?
Yes, you can install a French drain yourself, but it can be quite challenging. The process involves digging trenches, laying perforated pipes, and ensuring the correct slope. While some homeowners find satisfaction in completing the project themselves, it’s important to know that any mistakes can lead to ineffective drainage.
If you’re not confident in your DIY skills, hiring a professional is a wise choice. They have the expertise to ensure the system functions correctly and efficiently. Plus, professional installation can sometimes be more cost-effective when considering the time and potential for errors.
How deep does a French drain need to be?
The depth of a French drain depends on its purpose:
- General Yard Drainage: Typically, a trench should be about 8 inches to 2 feet deep. This depth helps manage surface water and prevents pooling in your yard.
- Foundation and Retaining Walls: For protecting foundations or retaining walls, the trench needs to be deeper. Ideally, it should reach the footing level of the foundation to effectively channel water away.
The depth can vary based on specific project needs and local conditions, so it’s crucial to plan accordingly.
What are the disadvantages of a French drain?
While French drains are effective, they come with some drawbacks:
- Installation Difficulty: The process is labor-intensive and requires precision. Improper installation can lead to drainage failure.
- Clogging Issues: Over time, debris, dirt, and roots can clog the perforated pipes, reducing the system’s efficiency. Regular maintenance is necessary to keep it functioning well.
- Potential for Flooding: If the system is not designed with adequate capacity, it might become overwhelmed during heavy storms, leading to flooding. Proper planning and installation are essential to avoid this issue.
By understanding these challenges, you can better prepare for a successful French drain installation.
Conclusion
At Marchi Paving Inc., we understand that installing a French drain is more than just digging a trench. It’s about safeguarding your home from water damage and ensuring your landscape remains beautiful and functional. With over 20 years of experience, our team of experts is committed to delivering high-quality drainage solutions custom to your specific needs.
Why Choose Marchi Paving Inc.?
- Professional Expertise: Our skilled team knows the ins and outs of French drain installation. We handle everything from planning and excavation to the final touches, ensuring a seamless process from start to finish.
- High-Quality Execution: We pride ourselves on using top-notch materials and advanced equipment. This commitment to quality ensures that every French drain we install is built to last, providing you with peace of mind for years to come.
- Comprehensive Services: Based in Chelmsford, MA, we offer a wide range of services, including drainage solutions, excavation, masonry, and more. Our holistic approach means we can tackle any project, big or small, with precision and care.
- Customer Satisfaction: Your satisfaction is our top priority. We work closely with you to understand your needs and provide solutions that exceed your expectations.
If you’re considering a French drain for your property, trust the experts at Marchi Paving Inc. to get it right the first time. Whether you’re facing frequent flooding or just want to improve your landscape, our professional services are designed to protect and beautify your home.
Ready to transform your property with a reliable drainage system? Contact us today to learn more about our services and get started on your project. Let us help you keep your landscape safe, dry, and stunning!
Asphalt Sealing Companies Near Me: Top 3 Trusted Experts
Asphalt sealing companies near me are essential for anyone seeking to protect and maintain their driveways in top condition. Finding a reliable company can be daunting, so here are the main points to consider:
- Look for experience and specialization in asphalt sealing.
- Check for customer reviews and satisfaction rates.
- Ensure they offer comprehensive driveway maintenance.
Asphalt sealing is not just a finishing touch; it’s a crucial step in maintaining the longevity and appearance of your driveway. Over time, exposure to harsh weather and constant traffic can cause asphalt to deteriorate. Proper sealing provides a protective layer that preserves the asphalt, preventing cracks, potholes, and other damage.
For those managing properties or looking to improve their home’s curb appeal, investing in regular asphalt maintenance is a wise decision. It not only extends the life of your driveway but also saves money on potential repair costs in the future.
In the following sections, we’ll explore more on how to choose the right company for your asphalt needs.

Asphalt sealing companies near me definitions:
– asphalt resurfacing near me
– asphalt driveway paving companies
– cost of driveway paving
Understanding Asphalt Sealing
Asphalt sealing, often referred to as sealcoating, is an essential maintenance practice for preserving asphalt surfaces. Let’s break down why it’s so important.
Sealcoating Benefits
Sealcoating acts like a shield for your driveway or parking lot. It protects against the elements and everyday wear and tear. Benefits include:
- Protection from UV Rays: Sealcoating blocks the sun’s harmful UV rays, which can cause asphalt to become brittle and crack over time.
- Resistance to Chemicals: It provides a barrier against oil, gas, and other chemicals that can degrade asphalt.
- Improved Appearance: A fresh sealcoat gives asphalt a rich, black finish, improving curb appeal.
Bitumen Loss
Bitumen is the “glue” that holds asphalt together. Over time, this binding agent can break down due to environmental factors. Sealcoating helps by:
- Reducing Oxidation: It slows down the oxidation process, which can cause bitumen to lose its binding properties.
- Maintaining Flexibility: By preserving the bitumen, sealcoating keeps asphalt flexible, which is crucial for handling temperature changes without cracking.
Water Penetration
Water is one of asphalt’s biggest enemies. If it seeps into the surface, it can cause significant damage, especially when it freezes and expands. Sealcoating prevents this by:
- Sealing Cracks: It fills in minor cracks and imperfections, preventing water from getting in.
- Preventing Freeze-Thaw Damage: By keeping water out, sealcoating reduces the risk of freeze-thaw cycles that lead to potholes.

Regular asphalt sealing keeps surfaces in great shape and extends their lifespan. It’s a cost-effective way to maintain your investment, whether it’s a residential driveway or a commercial parking lot.
In the next section, we’ll guide you through the process of selecting the right asphalt sealing company for your needs.
How to Choose the Right Asphalt Sealing Company
When it comes to selecting the right asphalt sealing company near me, making an informed choice can save you time, money, and headaches. Here’s how to ensure you pick the best contractor for your project.
Contractor Selection
The first step is finding a reliable contractor. Use online searches to find asphalt sealing companies near me. Look for companies with:
- Positive Reviews: Check their ratings and reviews on platforms like Google or Yelp. A high response rate and quick response time, similar to the 100% response rate seen in some businesses, indicate good customer service.
- Experience: Choose a company with years of experience. For instance, some companies have been in business for over 20 years, starting as family-run operations, which often means they have a wealth of industry knowledge.
- Licensing and Insurance: Make sure the company is properly licensed and insured. This protects you from liability and ensures the company meets local regulations. Always ask for proof of insurance directly from their insurance agent.
Quality Assurance
Quality should be a top priority when selecting a contractor. Here are some tips to ensure you get the best service:
- Materials and Techniques: Inquire about the materials and techniques they use. High-quality materials and modern techniques ensure a longer-lasting sealcoat.
- Warranty: Ask if they offer a warranty on their work. A warranty shows that the company stands by its work and is committed to quality.
- Past Projects: Request examples of their previous work. A well-maintained website with past projects can give you a sense of their capabilities and the quality of their work.
Questions to Ask
Before hiring an asphalt sealing company, ask these essential questions:
- What is the timeline for the project? Knowing when they can start and how long it will take helps you plan accordingly.
- What maintenance is required post-sealing? Regular maintenance can extend the life of your sealcoat.
- Do you offer free estimates? Many reputable companies provide free estimates to help you understand the cost without any commitment.
Choosing the right asphalt sealing company involves careful consideration of their experience, reputation, and the quality of their services. By following these guidelines, you can ensure your asphalt surfaces are well-maintained and long-lasting.
Next, we’ll explore the cost considerations for asphalt sealing to help you budget effectively for your project.
Cost Considerations for Asphalt Sealing
Understanding the costs associated with asphalt sealing is key to budgeting your project effectively. Here’s what you need to know about pricing and cost-effectiveness.
Pricing Per Square Foot
The cost of asphalt sealing typically depends on the size of your driveway or pavement. It is usually calculated on a per square foot basis. This method ensures you only pay for the exact area that needs sealing. Factors like the condition of your pavement and local market rates can influence the final price.
Average Costs
On average, the cost of sealing an asphalt driveway can vary. It’s important to get quotes from multiple asphalt sealing companies to compare prices and services. This helps ensure you’re getting a fair deal. The cheapest option isn’t always the best. Quality materials and professional application can save you money in the long run.
Cost-Effectiveness
Sealcoating is a cost-effective way to protect your driveway. It acts as a barrier against water, oil, and UV rays, which can cause damage over time. By investing in regular sealcoating, you can extend the life of your asphalt surfaces, preventing costly repairs or replacements down the road.
Moreover, sealcoating improves the appearance of your driveway, giving it a fresh, new look. This can boost curb appeal and potentially increase property value.
When evaluating the cost-effectiveness of asphalt sealing, consider the long-term savings. Regular maintenance through sealcoating can delay the need for more expensive interventions, making it a wise investment for maintaining your property.
Next, we’ll address some frequently asked questions about asphalt sealing to further guide your decision-making process.
Frequently Asked Questions about Asphalt Sealing
How much does it cost to top seal a driveway?
The cost to top seal a driveway can vary based on several factors, including the size of the area, the condition of the existing asphalt, and local market rates. Sealcoating is usually priced per square foot, which means larger driveways will cost more to seal than smaller ones.
To get the best deal, it’s wise to obtain quotes from several asphalt sealing companies near me. This allows you to compare prices and services, ensuring you receive quality work at a fair price. The lowest price isn’t always the best choice. Investing in a reputable company can lead to better results and longer-lasting protection.
Is it worth it to seal an asphalt driveway?
Yes, sealing an asphalt driveway is a worthwhile investment. Sealcoating provides a protective layer that guards against water penetration, UV rays, and oil spills, all of which can cause significant damage over time. This protective barrier helps maintain the structural integrity of the driveway, reducing the likelihood of cracks and potholes.
Moreover, sealcoating improves the appearance of your driveway. A freshly sealed driveway looks clean and well-maintained, which can improve your home’s curb appeal. In the long run, regular maintenance through sealcoating can save you money by preventing costly repairs or the need for a complete driveway replacement.
How long does asphalt driveway sealer last?
The lifespan of asphalt driveway sealer largely depends on factors such as weather conditions, traffic levels, and the quality of the sealer used. Generally, a quality sealcoat can last between 2 to 3 years. However, monitor your driveway for signs of wear and tear.
Regular resealing is crucial for maintaining the protective benefits of sealcoating. By resealing every few years, you can prevent deterioration and extend the life of your driveway. This maintenance routine not only preserves the appearance of your asphalt but also ensures it remains durable and safe for use.
Understanding these aspects of asphalt sealing can help you make informed decisions about maintaining your driveway. Next, we’ll conclude with why choosing Marchi Paving Inc. ensures high-quality results and a seamless project experience.
Conclusion
Choosing the right company for your asphalt sealing needs can make all the difference in the longevity and appearance of your driveway. At Marchi Paving Inc., we pride ourselves on delivering exceptional results with a focus on high-quality execution and advanced equipment.
Our commitment to quality starts with using only the best materials and state-of-the-art machinery. This ensures that every project we undertake is completed efficiently and precisely, resulting in a smooth, durable surface that stands the test of time. Our team of skilled professionals handles every aspect of the project in-house, maintaining strict quality control from start to finish.
With over 20 years of experience, Marchi Paving Inc. has built a reputation for excellence in the industry. We understand the specific needs and challenges of the areas we serve, allowing us to provide custom solutions that meet your unique requirements. Our local expertise ensures that your driveway is not only aesthetically pleasing but also built to withstand the local climate and conditions.
By choosing Marchi Paving Inc., you’re partnering with a team dedicated to outstanding workmanship and customer satisfaction. Whether you’re looking to protect your investment with sealcoating or need a complete driveway overhaul, you can trust us to deliver results that exceed your expectations.
Ready to experience the Marchi Paving difference? Contact us today to get a detailed quote and start your project with confidence.
Commercial Snow Plow Blades: Top 3 Best in 2025
Commercial snow plow blades are essential tools for managing the heavy and challenging winters. Whether it’s clearing roads, parking lots, or walkways, these specialized blades do the critical job of keeping pathways safe and accessible. For someone looking to efficiently handle commercial snow clearing, here’s what you need to know:
- Durability and Efficiency: Commercial snow plow blades are designed to withstand frequent use and harsh weather conditions.
- Material Matters: The choice of blade material—steel, urethane, or carbide—affects the blade’s performance in different snow conditions.
- Surface Protection: Quality blades not only clear snow but also protect the surfaces from damage.
Choosing the right blade is crucial to ensure reliability and minimize downtime during snowstorms. With advances in blade technology, options like urethane blades, highlighted for their noise reduction and vibration dampening properties, are now popular for their effectiveness and long life.
This brief guide gives you the essential details to make an informed decision on commercial snow plow blades, ensuring your winter operations run smoothly.

Essential commercial snow plow blades terms:
– commercial plowing service
– commercial snow plow cost
– commercial snow plow insurance
Types of Commercial Snow Plow Blades
When selecting commercial snow plow blades, understanding the different types available is key to optimizing performance and longevity. Here’s a quick rundown of the most common types:
Steel Blades
Steel blades are the traditional choice for snow plowing. Known for their strength and durability, they can handle heavy and compacted snow with ease. These blades are ideal for large-scale operations, like highways and major roads, where toughness is a priority. However, they can be noisy and may cause wear on surfaces over time.
Pros:
– Extremely durable
– Effective on packed snow and ice
Cons:
– Can be noisy
– Might damage delicate surfaces
Urethane Blades
Urethane blades are gaining popularity due to their versatile nature. They offer a balance between durability and surface protection, making them suitable for both commercial and residential applications. These blades are known for their vibration dampening properties, significantly reducing noise during operation. Plus, they are reversible, offering extended service life.
Pros:
– Quiet operation
– Surface-friendly
– Reversible for longer use
Cons:
– Generally more expensive than rubber
– Not as robust as steel for extremely heavy-duty tasks
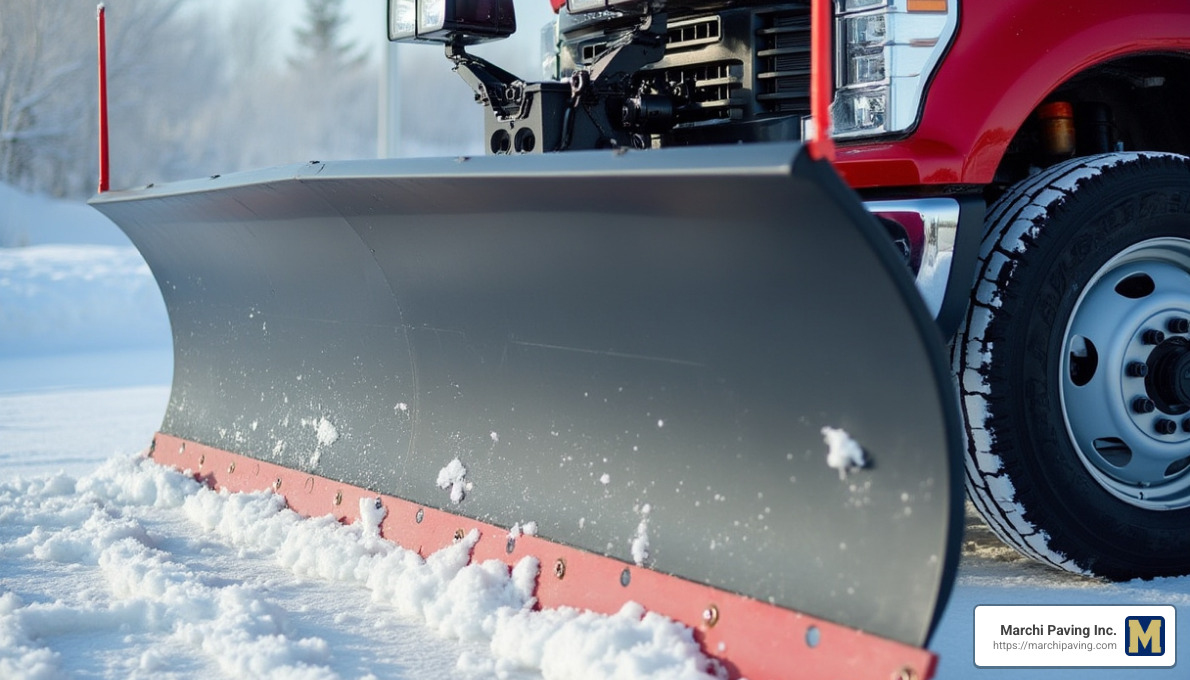
Carbide Blades
Carbide blades are the heavy hitters in snow plow blades. They are designed with a steel body and carbide inserts, providing exceptional wear resistance. These blades are perfect for intensive use in harsh conditions, where longevity and durability are crucial. Carbide blades can tackle the toughest jobs, reducing the frequency of replacements.
Pros:
– Extremely wear-resistant
– Ideal for heavy-duty applications
Cons:
– Higher initial cost
– May require specialized maintenance
Each type of blade has its strengths and weaknesses, and the choice largely depends on your specific needs and the conditions you’ll be facing. Whether you prioritize durability, noise reduction, or surface protection, selecting the right blade can make all the difference in your snow management strategy.
Advantages of Different Blade Materials
When it comes to commercial snow plow blades, the material you choose can greatly impact performance and longevity. Here’s a look at the advantages of different blade materials, focusing on durability, vibration absorption, and surface protection.
Durability
Durability is a key consideration when selecting snow plow blades. Steel blades are renowned for their robust nature and ability to handle heavy and compacted snow. This makes them a top choice for large-scale operations, like plowing highways and major roads. However, if you’re looking for something that balances durability with other benefits, carbide blades offer exceptional wear resistance. They feature a steel body with carbide inserts, making them ideal for intensive use in harsh conditions. This combination ensures a longer lifespan, reducing the need for frequent replacements.
Vibration Absorption
Vibration during plowing can be a significant issue, leading to operator fatigue and noise pollution. Urethane blades excel in this area. They are designed to absorb vibrations effectively, making them much quieter than their steel counterparts. This not only creates a more comfortable experience for the operator but also minimizes disturbance in residential areas. The vibration dampening properties of urethane contribute to a smoother and quieter plowing operation.
Surface Protection
Protecting the surface being plowed is crucial, especially in areas with delicate pavements or decorative driveways. Urethane blades are particularly surface-friendly. Unlike steel, which can scratch or damage surfaces, urethane provides a gentler touch. Its elasticity helps shield the pavement from harm, making it a preferred choice for environments where surface preservation is a priority.
In summary, each blade material offers distinct advantages. Steel is best in strength and durability, urethane excels in noise reduction and surface protection, and carbide leads in wear resistance for heavy-duty tasks. The right choice depends on your specific needs and the conditions you’ll encounter.
Top Commercial Snow Plow Blades
Now that we’ve explored the advantages of various materials, let’s dive into some of the top commercial snow plow blades available today. We’ll look at the Sno-Shock, 3X-Flex, and React System, each offering unique features to tackle winter’s toughest challenges.
Sno-Shock
The Sno-Shock blade is engineered for extreme durability. It combines the strength of steel with advanced shock absorption technology. This design helps it withstand the impact of heavy snow and ice, making it ideal for large-scale commercial operations. The shock absorption feature is particularly beneficial in reducing wear and tear on both the blade and the plowing equipment.
3X-Flex
The 3X-Flex blade is all about flexibility and adaptability. Made from high-performance urethane, it offers excellent vibration dampening. This makes it a favorite in areas where noise reduction is a priority, such as residential neighborhoods or near hospitals. The 3X-Flex also provides superior surface protection, preventing damage to delicate pavements. Its reversible design means you get double the lifespan, maximizing value and reducing downtime.
React System
The React System is a cutting-edge blade that integrates smart technology for improved performance. It features a modular design, allowing for easy customization and upgrades. This system can adapt to different snow conditions, adjusting its angle and pressure automatically to optimize plowing efficiency. The React System is perfect for those who need a versatile and intelligent solution to handle varied winter weather.
Each of these blades brings something unique to the table, catering to different needs and environments. Whether your priority is durability, noise reduction, or advanced adaptability, there’s a commercial snow plow blade that fits the bill.
Installation and Maintenance Tips
Installing and maintaining your commercial snow plow blades is crucial for optimal performance and longevity. Here’s a straightforward guide to help you get it right.
Universal Compatibility
One of the standout features of modern snow plow blades is their universal compatibility. This means you can fit these blades onto almost any plowing equipment, regardless of the bolt pattern. This flexibility saves you time and hassle, making it easier to switch out blades as needed.
Installation Instructions
Installing a new blade is a simple process if you follow these steps:
- Remove the Old Blade: Start by detaching the worn-out blade from your plow. Ensure all bolts are removed and keep them handy for the new blade.
- Trace the Bolt Pattern: Lay the old blade over the new one and trace the bolt holes. This ensures that the new blade will fit perfectly onto your plow.
- Drill Holes: Use the traced pattern to drill holes in the new blade. Precision here will make mounting much easier.
- Attach the New Blade: Secure the new blade onto the plow using the old bolts. For added support, either place the old blade on top or use large washers.
- Flip and Re-Drill: Once the blade wears down, you can flip it 180 degrees to use the other side. You can also re-drill the bolt pattern to extend the blade’s life further.
Maintenance Tips
Proper maintenance will keep your blades in top condition:
- Regular Inspections: Check for wear and tear regularly. Early detection can prevent more significant issues down the line.
- Clean After Use: Snow, ice, and debris can cause damage over time. Clean your blades after each use to prevent buildup.
- Check Bolts: Ensure all bolts are tight before each use. Loose bolts can lead to inefficient plowing and potential safety hazards.
- Store Properly: When not in use, store your blades in a dry place to prevent rust and corrosion.
By following these installation and maintenance tips, you can ensure your commercial snow plow blades perform at their best, season after season. This leads us to the next section, where we’ll address some frequently asked questions about these essential winter tools.
Frequently Asked Questions about Commercial Snow Plow Blades
What are the best materials for snow plow blades?
When it comes to choosing the best materials for commercial snow plow blades, you have several options, each with its own advantages:
- Steel Blades: Known for their strength and durability, steel blades are a popular choice for heavy-duty plowing. They can handle tough snow conditions but might be a bit noisy and can cause surface damage if not used carefully.
- Urethane Blades: These are becoming increasingly popular due to their ability to last up to five times longer than traditional rubber blades. They offer excellent vibration absorption, reducing noise and protecting surfaces from damage. Urethane is also elastic, which helps in preserving the plowed surface.
- Carbide Blades: Ideal for extreme conditions, carbide blades offer exceptional wear resistance. They are designed to handle the harshest environments but can be more expensive upfront.
Each material has its own strengths, so the best choice depends on your specific needs and conditions.
How do I install a new snow plow blade?
Installing a new snow plow blade is straightforward if you follow these steps:
- Remove the Old Blade: First, detach the old blade from your plow. Keep the bolts for reuse.
- Trace the Bolt Pattern: Place the old blade over the new one and trace the bolt holes. This ensures a perfect fit.
- Drill Holes: Use the traced pattern to drill holes in the new blade. Accuracy is key here.
- Attach the New Blade: Secure the new blade using the old bolts. For added support, place the old blade on top or use large washers.
- Flip and Re-Drill: When the blade shows wear, flip it 180 degrees to use the other side. You can also re-drill the bolt pattern to extend the blade’s life.
These steps ensure a smooth installation process, allowing you to get back to plowing efficiently.
What maintenance is required for snow plow blades?
Maintaining your snow plow blades is essential for longevity and performance:
- Regular Inspections: Check your blades for wear and tear frequently. Early detection of issues can prevent costly repairs.
- Clean After Use: Remove snow, ice, and debris after each use to prevent buildup and potential damage.
- Check Bolts: Ensure all bolts are tight before each use. Loose bolts can affect plowing efficiency and safety.
- Store Properly: When not in use, store blades in a dry place to prevent rust and corrosion.
By following these maintenance tips, you can keep your commercial snow plow blades in excellent condition, ready for any winter challenge.
Conclusion
At Marchi Paving Inc., we pride ourselves on our expertise and commitment to high-quality execution in every project we undertake, including our commercial snow removal services. With over 20 years of experience, our team has honed the skills necessary to tackle even the toughest winter conditions using advanced equipment and proven techniques.
Our focus is on delivering exceptional results that meet the specific needs of each client. We understand that the right choice of commercial snow plow blades can make a significant difference in both performance and longevity. That’s why we are meticulous in selecting the best materials and ensuring precise installation for optimal efficiency.
By choosing Marchi Paving Inc., you’re not just hiring a contractor; you’re partnering with a team dedicated to maintaining the highest standards of quality and professionalism. Our local expertise in Chelmsford, MA, and surrounding areas allows us to provide personalized solutions that ensure your property remains accessible and safe throughout the winter months.
Experience the Marchi Paving difference today and let us help you steer the winter season with confidence and ease.
Union Excavation Companies Near Me: Top 3 Reliable Picks

Union excavation companies near me offer a reliable and skilled workforce for property owners and managers seeking top-notch construction services. Whether you’re a homeowner needing foundation work or a commercial property owner managing large-scale projects, partnering with a union excavation company can ensure quality results due to their adherence to safety standards and rigorous training programs.
- Reliable and Skilled Workforce: Union companies provide highly trained workers.
- Safety Standards: High emphasis on safety and compliance.
- Local Expertise: Familiar with regional regulations and conditions.
Local union excavation contractors are vital for maintaining property accessibility and safety. In places like Middlesex County, MA, where maintaining infrastructure is crucial, these contractors play a significant role in projects ranging from driveway repairs to large-scale commercial constructions. Their commitment to high standards and fair contracting ensures that both small-scale and extensive projects are completed efficiently and effectively.
Easy union excavation companies near me glossary:
– excavating companies near me
– excavating contractor near me
– residential excavation companies near me
Benefits of Hiring Union Excavation Companies
Hiring a union excavation company brings several advantages that can make a big difference in your construction project. Here’s why choosing a union excavation company near me is a smart move:
Safety Standards
Union excavation companies prioritize safety. They follow strict safety protocols to protect both their workers and your property. This includes regular safety training and adherence to industry standards. Such dedication to safety reduces the risk of accidents and ensures a smooth project flow.

Skilled Workforce
Union workers are highly skilled and trained. They undergo rigorous training programs, which means they bring expertise and professionalism to every job. This skilled workforce is well-equipped to handle complex excavation tasks efficiently. Whether it’s preparing land for construction or demolishing old structures, union workers get the job done right.
Regulatory Compliance
Working with a union company ensures compliance with local and national regulations. Union contractors are familiar with the necessary permits and environmental guidelines. This compliance helps avoid legal issues and potential fines, keeping your project on track.
Quality Assurance
Quality is a hallmark of union excavation companies. They focus on delivering top-notch results by using the best practices and equipment. This commitment to quality means your project will meet high standards, providing you with peace of mind and long-lasting results.
By choosing a union excavation company like Marchi Paving Inc., you’re investing in a reliable partner who values safety, skill, compliance, and quality. This choice not only improves the success of your project but also supports fair labor practices in your community.
How to Find Union Excavation Companies Near Me
Finding a reliable union excavation company near me doesn’t have to be a daunting task. Here are some straightforward ways to locate the best options in your area:
Local Directories
Start by checking local directories. These can be a goldmine for finding reputable union excavation companies nearby. Many directories categorize businesses by service, making it easy to find specialized contractors. Look for listings that highlight union affiliations for added assurance.
Online Reviews
Online reviews are a powerful tool. Platforms like Angi and HomeAdvisor provide ratings and feedback from previous clients. Reading both positive and negative reviews can help you gauge a company’s reliability and service quality. A company with consistently high ratings is likely a trustworthy choice.

Contractor Associations
Contractor associations, like The Association of Union Constructors (TAUC), are excellent resources. They often have member directories and can connect you with union contractors committed to high standards. Being part of such associations usually means the company values quality and professionalism.
Angi
Angi is a well-known platform where you can find verified reviews and ratings for local contractors, including excavation services. By using Angi, you can compare different companies, read customer experiences, and make an informed decision based on real feedback.
TAUC
As the premier trade association for union contractors, TAUC offers a wealth of information. They provide resources and support to help you find union-affiliated companies. Checking with TAUC ensures you’re choosing a company that adheres to industry best practices and union standards.
By leveraging these resources, you can confidently find a union excavation company near me that meets your needs. This approach not only ensures quality and compliance but also supports fair labor practices in your community.
Key Considerations When Choosing an Excavation Company
When selecting an excavation company, it’s crucial to consider several key factors to ensure you make the right choice. Here’s what you need to know:
Licensing and Insurance
First, always check if the company is properly licensed and insured. Licensing ensures the company meets local regulations and standards. Insurance protects you from potential liabilities during the project. A licensed and insured company, like Marchi Paving Inc., provides peace of mind and demonstrates professionalism.
Permits
Excavation often requires specific permits. Before starting any project, confirm with the company that they will handle the necessary permits. This step is important to avoid any legal issues or project delays. An experienced company will know the local requirements and ensure everything is in order.
Equipment
Modern and well-maintained equipment is essential for efficient excavation. Ask about the machinery the company uses and ensure it’s up-to-date. Companies that invest in advanced technology can complete projects faster and with higher precision. This can save you time and money in the long run.
Project Scope
Clearly define the scope of your project. Discuss your needs and expectations with the excavation company. A good company will provide a detailed plan outlining how they will meet your requirements. This conversation ensures both parties are on the same page and helps prevent misunderstandings.
Cost Estimates
Get detailed cost estimates before hiring an excavation company. The estimate should include all aspects of the project, from labor to equipment use. Comparing estimates from different companies can help you find the best value for your budget. The cheapest option isn’t always the best; consider the company’s reputation and quality of work.
By focusing on these key considerations, you can select a reliable excavation company that meets your needs and expectations. This careful approach will help ensure your project is completed smoothly and successfully.
Top Union Excavation Companies Near Me
Finding reliable union excavation companies near me can make a significant difference in the success of your project. Here are some top recommendations and insights to help you make an informed decision.
Local Recommendations
When searching for reputable union excavation companies, it’s wise to start by asking for recommendations from local contractors or construction professionals. They can provide insights based on their experiences, offering you a list of trusted names in your area. Additionally, checking with organizations like The Association of Union Constructors (TAUC) can connect you with top-rated union contractors who adhere to high standards of safety and quality.
High-Rated Companies
Online platforms like Angi and HomeAdvisor offer ratings and reviews from homeowners who have previously used excavation services. These platforms can help you identify high-rated companies with a proven track record of customer satisfaction. Look for companies with consistently positive reviews, highlighting their professionalism, efficiency, and quality of work.

Marchi Paving Inc.
Among the top union excavation companies, Marchi Paving Inc. stands out for its commitment to delivering high-quality services. Based in North Chelmsford, MA, they have built a strong reputation for reliability and expertise in both residential and commercial excavation projects. Marchi Paving Inc. is known for using modern equipment and employing a skilled workforce, ensuring that projects are completed efficiently and to the highest standards.
Their dedication to customer satisfaction is evident through positive testimonials and repeat business from satisfied clients. By choosing Marchi Paving Inc., you can trust that your excavation needs will be handled with professionalism and care.
By considering these local recommendations and high-rated companies, you can find a reliable union excavation company near you. Next, let’s address some common questions about union excavation companies to further guide your decision-making process.
Frequently Asked Questions about Union Excavation Companies
What licenses and permits are required for excavation work?
Before hiring an excavation company, ensure they have the necessary licenses and permits. A contractor’s license is essential as it validates the company’s ability to perform excavation tasks legally and safely. Additionally, a commercial equipment license is crucial, especially if the project involves operating heavy machinery.
Permits are also required for excavation work. These excavation permits ensure compliance with local regulations and help prevent legal issues. It’s vital to check with your local building department to confirm the specific permits needed for your project.
How much does excavation typically cost?
The cost of excavation can vary widely. On average, costs range depending on the project’s complexity, location, and soil type. Factors like the presence of rocks or clay can increase expenses significantly.
To manage costs, consider these cost-saving tips:
– Get multiple estimates from different companies.
– Plan your project during favorable weather conditions to avoid delays.
– Clear the site of any movable objects beforehand to reduce labor costs.
Why should I call 311 before excavation?
Calling 311 before starting an excavation project is a critical step to ensure safety. This service helps you identify and mark underground utility lines, such as gas, water, and electrical cables. Knowing their locations prevents accidental damage during digging, which could lead to costly repairs or dangerous situations.
Ignoring this step can result in property damage or even injuries. Therefore, it’s not just a good practice but a necessary precaution to protect both your property and the workers involved in the excavation.
Conclusion
When it comes to union excavation companies near me, choosing the right partner can make all the difference. At Marchi Paving Inc., we bring over 20 years of experience and a commitment to delivering high-quality service. Our team is dedicated to ensuring your excavation project is executed with precision and care.
High-Quality Service
We pride ourselves on maintaining exemplary standards in every project we undertake. Our skilled workforce is trained to adhere to strict safety and regulatory requirements, ensuring that each excavation job is completed efficiently and safely. From small residential projects to large commercial endeavors, our attention to detail and commitment to quality remain unwavering.
Advanced Equipment
Utilizing advanced equipment is a cornerstone of our approach. We invest in state-of-the-art machinery to improve the efficiency and precision of our work. This investment not only allows us to complete projects on schedule but also ensures that we deliver results that exceed expectations. Our equipment is regularly updated and maintained, allowing us to tackle even the most challenging excavation tasks with confidence.
Over 20 Years of Experience
Experience matters, and at Marchi Paving Inc., we have over two decades of it. This experience translates into a deep understanding of the excavation industry and the ability to handle any challenges that may arise. Our team is equipped to manage all aspects of excavation, from initial planning to final execution, ensuring a smooth and successful project every time.
Choosing Marchi Paving Inc. means partnering with a team that values quality, safety, and customer satisfaction above all else. Ready to start your project? Contact us today to learn more about how we can assist with your excavation needs.
Fix Water Line Leak: Top 5 Easy Powerful Solutions
Fix water line leak tasks can be daunting, yet incredibly essential for homeowners and property managers. Addressing a water line leak early can prevent costly water damage and maintain the safety and accessibility of your property. Here are some quick steps to manage it:
- Identify the source of the leak: This might involve checking your water meter, listening for signs of running water, or visually inspecting pipes.
- Turn off the water supply: Find and use your home’s shutoff valve to stop water flow and minimize damage.
- Consider temporary fixes: Tools like pipe clamps and repair tape offer quick, though short-term, solutions to stop leaks instantly.
Water damage stemming from plumbing issues isn’t just a minor inconvenience; it can escalate into a serious problem without proper intervention. Even a seemingly small leak can lead to extensive property damage and costly repairs if neglected.
Temporary fixes, such as using clamps or pipe wrap tape, are crucial for immediate relief. However, they are stop-gap measures, and seeking permanent solutions promptly is key.
In the upcoming sections, we’ll dive into how you can effectively manage these challenges, ensuring the longevity and safety of your home or commercial property.

Terms related to fix water line leak:
– Water and Sewer Line Repairs
– cost to replace water service line
– repair sewer line
Identifying the Leak
When your water bill suddenly spikes or you notice damp spots in your yard, it might be time to fix a water line leak. Detecting the exact location of a leak can save you from extensive damage and costly repairs.
Leak Detection
Start by listening for unusual water sounds. Bubbling or rushing noises near the main water line or in your walls can be a telltale sign. Another method is to perform a visual inspection. Walk along the suspected path of the water line and look for damp soil or unusually lush vegetation, which might indicate a leak.
For a more precise approach, consider using a dye test. Introduce food coloring into the water line, then look for the colored water to emerge in your yard, pinpointing the leak’s location.
Water Supply and Shut-Off Valves
Once you suspect a leak, it’s crucial to shut off the water supply to prevent further damage. Locate your home’s shut-off valve, typically found near the water meter or where the main water line enters your house. Turn the valve clockwise to stop the water flow.

Keeping a flashlight and an adjustable wrench handy can make this process smoother. Label your shut-off valve for quick access during emergencies.
Professional Help
If these methods don’t reveal the leak, or if you’re unsure, it’s wise to contact a professional plumber. They have specialized equipment to perform thorough inspections and confirm the leak’s source.
Identifying a leak early is crucial. It not only helps in reducing water wastage but also minimizes potential damage to your property. Proper detection and immediate action can save you from expensive repairs down the line.
How to Fix Water Line Leak
When it comes to fixing a water line leak, there are both temporary and permanent solutions. Understanding which method to use can make a big difference in preventing further damage and ensuring a long-lasting repair.
Temporary Solutions
Epoxy Putty: This is a quick fix for small leaks. Epoxy putty comes as a two-part compound that you knead together. Once mixed, it becomes a solid color and can be molded around the leak. It begins to harden in just a few minutes, forming a watertight seal.
Self-Fusing Tape: Also known as pipe wrap tape, this is ideal for minor leaks. Stretch the tape tightly around the pipe, overlapping as you go to create a compression seal. Some tapes are designed for emergency repairs and can be applied even if the water is still running.
Both epoxy putty and self-fusing tape are great for emergencies but remember, these are temporary fixes. It’s important to follow up with a permanent solution to avoid further issues.
Permanent Solutions
Pipe Replacement: For more severe leaks or when dealing with old, corroded pipes, replacement might be necessary. This involves removing the damaged section and installing a new piece of pipe. It’s a more involved process but ensures a long-term fix.
Slip Repair Coupling: This is a handy solution for fixing small sections of a broken pipe. A slip repair coupling is designed to slide over the damaged area, connecting the two ends of the pipe securely. It’s a reliable method for a permanent repair without the need to replace the entire pipe.
Choosing between these solutions depends on the severity of the leak, the type of pipe, and your comfort level with DIY repairs. For complex or extensive repairs, consulting a professional plumber is always a wise choice.
Tools and Materials Needed
To fix a water line leak effectively, you’ll need the right tools and materials. Having these on hand can make the repair process smoother and more efficient.
Essential Plumbing Tools
- Pipe Wrench: A must-have for gripping and turning pipes, especially when dealing with stubborn nuts and fittings.
- Hacksaw: Useful for cutting through metal and plastic pipes when removing damaged sections.
- Plumber’s Tape: Also known as Teflon tape, this is crucial for sealing threaded connections to prevent leaks.
- Adjustable Wrench: Perfect for loosening or tightening various nuts and bolts without needing multiple wrenches of different sizes.
- Pipe Cutter: For clean and precise cuts on copper or plastic pipes, a pipe cutter is invaluable.
Repair Clamps and Couplings
- Repair Clamps: These are great for providing a temporary seal over a leaky pipe. They consist of a metal band with a rubber gasket that clamps around the pipe, sealing the leak. Make sure to choose the right size to match your pipe diameter.
- Slip Repair Coupling: This is a permanent solution for fixing leaks in sections of pipe without having to replace the entire pipe. It slides over the damaged area and connects securely to the existing pipe, offering a durable repair.
Additional Materials
- Epoxy Putty: As mentioned earlier, this is a quick fix for small leaks. It’s a versatile material that can be molded to fit the shape of the leak.
- Self-Fusing Silicone Tape: Ideal for emergency repairs, this tape creates a waterproof seal and is easy to apply, even on wet surfaces.
Having these tools and materials ready not only saves time but also ensures you’re prepared to handle a variety of plumbing issues. Always remember to assess the situation first and choose the appropriate method for repair. If you’re unsure, consulting a professional can prevent further complications.
Safety Precautions
When you’re ready to fix a water line leak, safety should be your top priority. Taking the right precautions can prevent accidents and ensure a smooth repair process.
Turn Off the Water Supply
Before starting any repair, always turn off the water supply. Locate the shut-off valve, usually found near your water meter, and turn it clockwise to stop the water flow. This prevents further water damage and makes the repair process safer.
Wear Gloves
Wearing gloves is essential when handling plumbing repairs. They protect your hands from sharp objects, chemicals, and possible contamination. Choose gloves that are durable and provide a good grip to handle tools effectively.
Electrical Safety
Water and electricity are a dangerous mix. Ensure all electrical appliances near the repair area are turned off. If the leak is near electrical wiring, it’s wise to cut the power to that section of the house until repairs are complete. This step is crucial to avoid electrical shocks.
Additional Safety Tips
- Use proper tools: Ensure you’re using the correct tools for the job to avoid injury and ensure an effective repair.
- Ventilation: If you’re using chemicals like epoxy putty, work in a well-ventilated area to avoid inhaling fumes.
- Secure the area: Keep the work area tidy and free of hazards to prevent slips or falls.
By following these safety precautions, you can confidently tackle a water line repair while minimizing risks. If you ever feel unsure about any aspect of the repair, it’s best to consult with a professional to ensure safety and proper repair.
Frequently Asked Questions about Water Line Repair
Can you repair a water supply line leak?
Yes, you can repair a water supply line leak, but the approach depends on the severity and location of the leak. For minor leaks, temporary solutions like pipe wrap tape or epoxy putty can be effective. These materials create a quick seal to stop the leak temporarily. However, for a long-term fix, it’s often necessary to replace the damaged section of the pipe. This ensures the integrity of the water line and prevents future leaks.
How do you seal a leaking water line?
Sealing a leaking water line can be done using various methods. Plumber’s putty is a common choice for small leaks. It’s easy to apply and provides a watertight seal. Simply clean and dry the area around the leak, then apply the putty, pressing it firmly into place. For a more durable solution, consider using a pipe wrap tape. This tape adheres to itself and forms a tight seal around the pipe, effectively stopping the leak.
Can you fix a leaky pipe without replacing the pipe?
Absolutely! You can fix a leaky pipe without replacing it, especially if the leak is minor. Pipe wrap tape and self-fusing silicone tape are excellent temporary fixes. These tapes wrap around the pipe and bond to themselves, creating a secure seal. Epoxy putty is another option, as it hardens to form a solid patch over the leak. While these solutions are effective for quick fixes, they are generally temporary. For a permanent solution, consider consulting a professional to assess whether a section of the pipe needs replacement.
Conclusion
In water line repairs, Marchi Paving Inc. stands out with our commitment to quality and expertise. With over 20 years of experience, we have become a trusted name in Chelmsford, MA, and surrounding areas, providing top-notch water and sewer line services. Our team is equipped with advanced tools and knowledge, ensuring each project is executed to the highest standards.
When it comes to fixing a water line leak, we understand the importance of both temporary and permanent solutions. Whether you’re dealing with a minor leak that can be temporarily managed with pipe wrap tape or epoxy putty, or a more serious issue requiring pipe replacement, we are here to help. Our approach combines quick, effective fixes with long-term solutions to ensure your water lines remain in excellent condition.
Our commitment to excellence doesn’t stop at repairs. We also offer comprehensive excavation services to address any underlying issues that may contribute to water line problems. This holistic approach ensures that your property is not only repaired but also fortified against future issues.
By choosing Marchi Paving Inc., you’re not just getting a service provider; you’re partnering with a team dedicated to delivering outstanding results. We take pride in our work and strive to exceed your expectations every time. So, when you’re faced with a water line leak, we’re just a call away, ready to provide the high-quality services you deserve.
Landscaping vs Hardscaping: Top 5 Stunning Benefits 2025
When planning your outdoor space, understanding landscaping vs hardscaping is crucial. While these two approaches may seem similar, they play distinct roles in changing your yard. Here’s a quick breakdown:
- Landscaping: Involves living elements like plants, trees, and grass to improve your yard’s natural beauty.
- Hardscaping: Involves non-living elements like stone, wood, and concrete to create functional outdoor features.
Creating the perfect outdoor space isn’t just about choosing the right plants or building a sturdy patio. It’s about striking a balance between these elements to achieve a harmonious design. Whether you aim to improve curb appeal or create a cozy gathering spot, both landscaping and hardscaping have unique benefits that can complement each other beautifully.
By integrating these components thoughtfully, you can turn your property into a stunning and functional sanctuary. Stay tuned as we explore how to achieve this balance and what each element brings to the table.

Learn more about landscaping vs hardscaping:
– hardscape and landscape
– landscape and hardscape
– what is hardscaping services
Understanding Landscaping vs. Hardscaping
When it comes to designing your outdoor space, understanding the difference between hardscaping and landscaping is key. Let’s break it down:
What is Hardscaping?
Hardscaping refers to the non-living elements in your outdoor area. Think of it as the “bones” of your landscape design. These elements include materials like stone, wood, and concrete, which are used to create functional features such as patios, walkways, and retaining walls.

Functional Features: Hardscaping provides structure and organization to your yard. It includes:
- Patios and Decks: Extend your living space outdoors.
- Walkways and Pathways: Connect different parts of your garden.
- Retaining Walls: Prevent soil erosion and create level areas on slopes.
Hardscaping is about more than just aesthetics. It offers practical benefits, like low maintenance and improved drainage. For example, a well-placed retaining wall can direct water away from your home’s foundation, protecting it from water damage.
What is Landscaping?
Landscaping, also known as softscaping, involves the living elements of your outdoor space. This is where nature takes center stage, with plants, trees, and flowers creating a dynamic and vibrant environment.

Softscape Elements: These are the living parts of your landscape, including:
- Trees and Shrubs: Provide shade and structure.
- Flowers and Plants: Add color and fragrance.
- Grass and Ground Cover: Create lush, green areas.
Landscaping focuses on horticultural design, which involves selecting and arranging plants to improve the visual appeal and ecological health of your yard. It also plays a role in stress reduction and improving air quality, making your outdoor space a haven for relaxation.
By combining hardscape and landscape elements, you can create a balanced and beautiful outdoor space. Each element has its own unique benefits, and when integrated thoughtfully, they can transform your property into a functional and aesthetically pleasing environment.
Stay tuned as we dive deeper into the benefits of each and how to integrate them effectively into your design.
Benefits of Hardscaping and Landscaping
When planning your outdoor space, it’s crucial to understand the benefits of hardscaping and landscaping. Each offers unique advantages that can transform your property into a functional and beautiful retreat.
Hardscaping Benefits
1. Low Maintenance:
Hardscaping elements like patios, walkways, and retaining walls require minimal upkeep. Unlike plants, they don’t need watering or pruning. This makes them a practical choice for those who want an attractive outdoor space without the hassle.
2. Structural Integrity:
Hardscaping provides the backbone of your outdoor design. Elements like retaining walls not only add visual interest but also prevent soil erosion and stabilize slopes. This ensures your yard remains safe and functional over time.
3. Drainage Solutions:
Effective hardscaping can solve drainage issues. For example, strategically placed pathways and patios can direct water away from your home’s foundation, reducing the risk of water damage.
4. Aesthetic Appeal:
While hardscaping is functional, it also improves your yard’s beauty. Stone walkways, wooden decks, and decorative fountains can create stunning focal points that lift the overall look of your outdoor space.
Landscaping Benefits
1. Natural Beauty:
Landscaping brings life and color to your yard. With trees, shrubs, and flowers, you can create a lush, vibrant environment that changes with the seasons. This natural beauty can significantly boost your home’s curb appeal.
2. Stress Reduction:
Being surrounded by greenery has been shown to reduce stress and improve mood. A well-designed landscape offers a serene escape where you can relax and unwind, improving your overall well-being.
3. Seasonal Dynamics:
Landscaping introduces dynamic changes throughout the year. Spring blooms, summer greenery, autumn foliage, and winter evergreens ensure your yard remains interesting and inviting year-round.
4. Improved Curb Appeal:
A thoughtfully landscaped yard makes your home more appealing to potential buyers. It can increase property value and make your house feel more welcoming.
By understanding the distinct benefits of hardscaping and landscaping, you can make informed decisions that maximize the potential of your outdoor space. Up next, we’ll explore how to integrate these elements seamlessly for a harmonious design.
Tips for Integrating Landscaping and Hardscaping
Creating a harmonious outdoor space requires a thoughtful blend of landscaping and hardscaping. Here are some essential tips to achieve a seamless and visually appealing design.
Creating Balance
1. Hardscape and Softscape Harmony:
To create a cohesive look, balance hardscape elements like stone paths or patios with softscape features such as plants and flowers. This mix ensures your yard is both functional and inviting.
2. Seamless Integration:
When planning your outdoor design, consider how each element interacts. For example, placing a small garden wall along a patio can soften straight edges and create a natural transition between hard and soft areas.
3. Focal Points:
Use hardscaping elements as focal points to guide the eye. A stunning fire pit or a beautifully crafted bench can serve as a centerpiece, surrounded by lush greenery to improve its appeal.
Design Considerations
1. Curves and Lines:
Incorporate curves in your design to break up the rigidity of straight lines. Rounded pathways or circular patios can add a dynamic and organic feel to your space.
2. Natural Drainage:
Plan your landscape according to the natural drainage of your yard. Avoid placing patios or other hardscapes in areas prone to flooding. Instead, use these spots for plants that thrive in moist conditions.
3. Material Durability:
Choose durable materials for hardscaping that can withstand local weather conditions. For instance, ensure that structures like posts and foundations are constructed below the frost line to prevent shifting and damage.
By focusing on design harmony and visual appeal, you can create an outdoor space that feels like a natural extension of your home. Up next, we’ll address common questions about landscaping vs. hardscaping, helping you make informed choices for your project.
Frequently Asked Questions about Landscaping vs. Hardscaping
Is hardscaping and landscaping the same thing?
No, hardscaping and landscaping are not the same thing. Landscaping is a broad term that includes both hardscape and softscape elements. Hardscape refers to the non-living parts of your outdoor area, like patios, pathways, and retaining walls. Landscaping, on the other hand, also includes softscape elements, which are the living components like lawns, gardens, and trees.
What does hardscape include?
Hardscape involves the use of solid, non-living materials to create functional and decorative features in your outdoor space. Some typical hardscape elements are:
- Paved Areas: These include walkways, driveways, and patios made from materials like concrete, brick, or pavers.
- Retaining Walls: Structures built to hold back soil and prevent erosion. They can be made from stone, concrete, or wood.
- Wood and Stone Features: These can include decks, pergolas, and stone benches, which add structure and style to your landscape.
What’s the difference between hard and soft landscaping?
Hard landscaping is all about the solid, man-made features in your yard, such as paved areas and retaining walls. These elements offer durability and low maintenance, often providing structural integrity and solutions for drainage issues.
Soft landscaping, or softscape, focuses on the living elements. This includes anything that grows, like lawns, gardens, and decorative plants. Soft landscaping adds natural beauty and can change with the seasons, offering a dynamic and refreshing look to your outdoor space.
Both hard and soft landscaping are essential for creating a balanced and appealing outdoor environment. By combining these elements thoughtfully, you can achieve a harmonious design that meets both aesthetic and functional needs.
Conclusion
In the battle of the greens, deciding between landscaping and hardscaping can feel overwhelming. But understanding the unique benefits of each can help you make the right choice for your outdoor space.
At Marchi Paving Inc., we pride ourselves on providing expert services that transform your outdoor area into a beautiful and functional living space. With over 20 years of experience, we specialize in high-quality hardscaping services, offering solutions that are durable, low-maintenance, and visually appealing.
Hardscaping is a fantastic way to improve your property’s value and functionality. From stunning patios to sturdy retaining walls, these non-living elements provide structure and style. Our team ensures that each project is executed with precision and care, using advanced equipment for a seamless experience.
But we don’t stop there. We understand that a well-designed outdoor space often includes a balance of hardscape and landscape elements. Our approach considers both, offering solutions that integrate beautifully with your existing environment.
Whether you’re looking to add a new patio, create a safe and attractive walkway, or install a retaining wall for improved drainage, we are here to help. Our commitment to quality means you can trust us to deliver outstanding results that stand the test of time.
Ready to make a change? Contact us today to discuss your project and find how Marchi Paving Inc. can bring your outdoor vision to life.